

Introduction: HOW TO CREATE a MORTISE


Mortise and tenon joinery is the heart of any furniture building and as complicated as it may seem a mortise is actually very approachable.
Step 1:


The simplest way is to invest in a mortising machine, with a auger bit nestled inside of a square chisel it makes quick work of creating mortises. But this can be a pricey way to go and unless your a serious woodworker you might not be able to justify the price of even an entry level machine. That being the case let me share three ways I commonly use to create a mortise.
Step 2: 1 - THE ROUTER TABLE


The router table is a great way to create mortises that just requires a little bit of set up. First I draw out my mortise in the location I want it on my piece of stock making sure the that lines that represent the ends of the mortise I also draw on the sides of my piece of stock.
At this point I can put my bit in my router table, I like to use a spiral bit because it will remove the material as it cuts it.
Step 3:


With my bit in my router table I can adjust my fence so that my stock is center with my bit then lock the fence in place.
Step 4:


Next I attach a piece of tape to the face of my router plate directly in front of the bit, then using a square against the fence and my bit I draw a line on the tape marking both sides of my bit. This creates my start and stop points.
Step 5:


With my set up done I can turn on my router table, then with my stock held firmly against the fence I gently lower down on to my bit making sure to line up my starting marks and move my piece forward until I reach the stop marks. Then with my router turned off remove my stock from the table.
Step 6:

This method does create tenons that have rounded ends, but they can easily be squared up with a chisel. Or a more common practice is to round the corners of the receiving tenon using a knife or chisel.
Step 7: 2 - THE DRILL PRESS

The drill press is another great way to create mortises. Or if you have confidence in your ability to hold a hand drill vertically you can certainly achieve the same results using a hand drill.
Step 8:

Just like using the router table the first step is to lay out the planned location of your mortise. With the appropriate size forstner bit in my drill press I set my fence so that the bit is center with in the walls of the mortise.
Step 9:


With my fence locked down it's just a matter of drilling a series of over lapping holes to the desired depth of my mortise.
Step 10:


This method does require a little bit of clean up with a chisel.
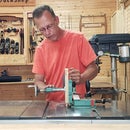
Step 11: 3 - a SHOP MADE MORTISING JIG

Shop made jigs always seem to be the heart of any workshop and they always seem to exceed their expectations, this jig is no different. It allows you to make repeatable mortises using your plunge router at your work bench. It is a must have jig for creating mortises and a simple weekend project, I have a full build article with plans available on my website at this link . https://www.theshavingwoodworkshop.com/mortise-jig-plans.html


