

Introduction: Half-Glass Stone Pendants


Uniquely beautiful pendants made with everyday stones and a bit of epoxy magic.
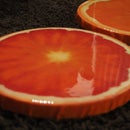
While I was walking around town I looked in to a jeweler's shop and saw this special rock which was part glass and had a golden center (pic 4). I was instantly enchanted.
As you can see, they don't have many pieces in the shop, but they have horrendous prices. This rock probably almost cost his weight in gold. Anyway the shop was already closed so I could at least take a picture with the thought:
I can do that too, but in pendant size.
Unfortunately I am not (yet) able to work with molten glass. So I chose the next best option, which was epoxid or epoxy resin. It is clear drying, much easier to handle than red-hot glass and can be used for many other projects too.
For the golden center I chose gold metal leaf. It gives the best imitation of gold, apart from the real thing of course.
And for the stones, I just went outside and and collected some special ones.
So what you'll need:
for the end product
- stones
- gold metal leaf and adhesive
- epoxyp resin
- loops and rings (e.g. from an old chain)
for the making process
- covered surface
- tea light candles (paraffin not stearin)
- a molding material, I used a diy one
- corn starch
- silicone caulk (the horribly smelling one)
- small containers with sand
- cups and scoops to prepare the epoxy
- disposable gloves
- flambé burner or small blowtorch
- small file
- a stand to let the pendants dry, I used two big shampoo bottles and a piece of wire
- cardboard box to cover the pieces while drying
- epoxy glue
Step 1: Overview


First a quick overview what the procedure will be
1. Collecting stones
2. Make wax models of the epoxy parts
3. Make casting molds
4. Apply the gold metal leaf
5. Cast the epoxy resin
6. Neaten the rough edges
7. Add a loop
8. Apply a top coat
Step 2: Collecting the Stones

First thing you need to find are small stones or pebbles.
I went outside and picked up the most interesting ones. I chose different shapes, sizes and types. Not all will work, but everyone is worth a try. When I was satisfied with my collection I cleaned the stones thoroughly and made sure that there are no loose parts.
Tip: Collecting the right stones. A clear cut off line helps to give the impression of a whole stone when it's finished. For example a stone with a chip missing.
Ideally you can already imagine what shape the stone will have in the end when you look at a it.
Just let the stones speak to you.
Step 3: Make Wax Models of the Epoxy Parts


To pour the epoxy into the right shape you need to make a casting mold and for that you need to make a removable model of the future epoxy part.
The easiest and cheapest method to make this model is using wax of tea light candles. It is easy to work with, sticks to the stones and is still easy to remove in the end.
I started with pouring a bit of wax on my plastic cover. That way it cooled fast enough so that I was able to apply it on the stone and mold it into the shape I wanted. I used multiple layers until I was satisfied with the general shape. I always tried to stay true to the original shape of the stone (round, smooth, edgy...)
To get rid of excess wax (pic 5) I held it over the flame a bit and melt it or cut sharper edges with a hot knife.
Tip: Make sure you have the right type of candles. Paraffin will work best because it is more clay like when warm, easy to mold and sticks well to the stones. Stearin is much more crumbly and won't hold on to the stones so well.
Step 4: Make the Molds


To make the molds I used a truly mysterious concoction. It is a silicone based elastic material that works really well for making molds even of detailed pieces. But you can use any molding material you like of course.
The molding material is made by mixing silicone caulk and corn starch. It has to be the pure silicone caulk from the hardware store with the very strong acid smell (my cats hated me for it). The bigger the corn starch part is the sooner it will be dry and the shorter the time is you can mold it.
I mixed it about 1 : 1 which gave me about 5-10 min to work it and about 30 min until it was properly dry.
For more details you can visit several instructable (e.g. oogoo from Mikey77).
So I mixed the molding material and covered the stones with it. I just left a small opening on the opposite side of the wax part. The molding material is still a bit flexible when dry, which helps to pull the stone out afterwards. I also made some markings on the outside, so I knew which way the stone needs to be put back in afterwards.
After the drying time I pulled the stones out and cleaned the molds and the stones of all wax residues.
Tips: Make only small portions of the molding material at a time, otherwise it will be dry before your done. It's quite a mess actually. You have to make sure you hands are covered with a lot of corn starch or the molding material will only stick to your fingers and not to the stones.
The stones need to be completely wax free in the end, otherwise the next step won't work.
Step 5: Make It Shine - Apply the Gold Metal Leaf


The extremely thin gold leaf was used for hundreds of years by the big masters of art in their paintings and in architecture. Gold metal leaf is actually a copper and zinc alloy put into very thin leaves but it works just like real gold leaf. But is much cheaper. It looks much shinier than gold paint and gives a great touch to paintings and different pieces of crafting. Another point for it is that it won't even out the small details of the rock surface like paint would do.
To apply it, the clean surface needs to be painted with the adhesive liquid exactly on the parts you want to be golden. It will need 30-90 min to dry and will be very sticky. Then you press the thin leaf on the adhesive and use a brush to press it into all the small dents and rifts of the stone and rub off the excess leaf.
The leaves are so thin you are hardly able to breath let alone take a decent picture while appling it. So, sorry for the quality.
Step 6: Cast the Epoxy Resin


Now the tricky part.
First take the normal precautions while working with epoxy resin: as covered surface, wearing gloves, working in a well ventilated room and so on. Also follow the instructions of the manufacturer of the epoxy about mixture ratio and drying time.
Now it is essential to have a bubble free resin to pour. I achieved this by mixing the two components very slowly and by poured it back and forth a few times between two cups. If that was not enough I put it into a small metall measuring cup and used a flambé burner to heat up the epoxy on all sides, which makes the bubbles rise and pop.
When I had a totally clear resin I poured a bit into one of the molds and placed the stone back in it. Unfortunately there is not really a way to be sure that there's no bubble between the epoxy and the stone. But when I had some epoxy flowing over on all sides of the stone, chances were good that it would work.
For the drying time I put the molds into a small container filled with sand to keep them upright. After the recommended time I peeled the stones out of their mold.
The epoxy will take the shape quite well. But there are always some unpretty edges so they need some cleaning up.
Fails: In the last two pictures there is one of the failed stones. A big bubble remained, which ruined it.
Step 7: Neaten the Routh Edges


The routh edges need some refinement. They will be mostly on the edge of the molds.
I was able to just peel and nibble off the thin layers of epoxy off the stone. The thicker parts I sanded down with a small file until they were evened out.
Now, you could sand and polish them all the way until they are very smooth and shiny.
But I really, really hate sanding. It takes forever, you need tons of different sanding paper, you will much likely loose the sharper edges you still wanted and at least I normally sand down more of my fingertips than from my workpiece. But if you like sanding feel free and skit step 9 later on.
Step 8: Add a Loop


To wear them as a pendant they need to have a loop and a little ring.
This step really depends on what you take as loops, so this is just a suggestion.
I took an old chain apart, cut the loops in half and shortened the rings fitting to the size of the stone.
Staying true to the used materials I used epoxid glue. It also consists of two components but it dries withing minutes.
So I took one of the stones, chose which side I wanted on the front and put a bit of epoxy on top of it. After carefully applying the little loop and let it dry a bit I put another layer of glue on the side of the hooks to make it more secure. Then let it dry again, check the strength and add the ring.
Step 9: Apply a Top Coat


To make the pendants all shiny and clear they need an top coat.
Now I have seen different instructions where clear nail polish is used to make an epoxy piece more shiny. I tryed different brands and none worked quite the way I wanted.
So in this project I applied another thin layer of epoxy to make them clear again.
To get an even result on all sides I used the following technique.
I started with building my "drying rack". It needs to be strong enough to carry all the pendants and it there had to be a way to easily put on each pendant. I used two full bottles of shampoo and a piece of wire between. Onside was curled around the cap and the other one was just shaped into a hook that lay on top of the bottle.
I used my metal meassuring cup again in which I mixed my epoxy and got rid of the bubbles ( sometimes with the help of the flambé burner). Then I dunked the pendants complitely into the epoxy and placed them on my "drying rack". That way all the acces epoxy will run off. Then I poured some more epoxy over the hook on the top to make sure I will stay put.
After a few minutes the epoxy will get more viscous and drops will form on the bottom of the pendants. With a toothpick they can be removed. It took about 30min in which I checked every 5min to get rid of them. Then I put them again under a box for 24h to dry complitely.
And then they are done in all their glory. :)
Step 10: Finished Pieces


Finally you can add a chain and wear them with the pride of knowing that you did them all by your self.
They also make really nice keychains.
I'd love to hear your comments and even more to see your own half-glass stones.

Participated in the
Jewelry Contest 2017


