

Introduction: Halloween Daniel Tiger Trolley


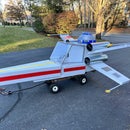

Last year, for Halloween, my 2 yr. old daughter was the ultimate explorer: an astronaut -- and what's an astronaut without her space shuttle wagon! I was happy with how it came out but wanted to do better. This year for Halloween, I think we all found we had a little more time on our hands than normal. My daughter was going to go as Daniel Tiger from PBS Kids Daniel Tiger's Neighborhood (based from the original Mr. Roger's Neighborhood show --which I grew up with) and you can't be Daniel Tiger unless you have his trolley!
I scoured the internet for pics, ideas, previous builds, and plans to get me going. Most were simple designs that could be done in one's living room typically made out of cardboard. That would not suit my purposes since this needed to be mobile and carry her up and down the street for a COVID safe trick-or-treat. I found a few projects I liked, but nothing seemed to combine the woodworking with the electronics to really take it to the next level.
So, trailblazing the path, my trolley would come equipped with a Raspberry Pi 3B+ controlling some buttons my daughter could push to perform different actions: they would turn on headlights, play a trolley bell sound (via a bluetooth speaker), and also cycle through some well-known songs from Mr. Roger's and Daniel Tiger's Neighborhood.
Supplies
For this project, a lot of stuff I had lying around and depending on your starting point will likely need various quantities of things, but overall you will need:
- 1 Radio Flyer (or equivalent) wagon with sides removed (mine were designed to be removable)
- 4' x 8' sheet of plywood (cut to the desired size you want)
- Plenty of spare 2 x 4's
- 4' x 4' sheet of 1/8" thick plywood
- 4' x 8' sheet of corrugated plastic
- 1" x 6" pieces of common board (pine) and 1" x 2" boards (which can be cut from the 1" x 6"s)
- Small wooden dowels (used as handholds)
- Apple red/Sunshine yellow/Glossy white Rust Oleum paint+primer spray paint (I used 4 cans of the red)
- Raspberry Pi 3B+ with on-board wifi and bluetooth
- 1 or 2 Bluetooth wireless speakers
- Larger LEDs for headlights (I had these lying around)
- 3 arcade-style buttons (red, green, and blue)
- 2 sets of LEDs to encircle the trolley on the inside and outside
- 3 batteries (1 for RPi, 2 for the LED strips)
- Velcro patches
- USB switches (available from Adafruit)
- Small hinges and hook/screw-eye set (for electronics cabinet)
- Screw eyes (to clip speakers to)
- Small 3/4" corner braces and assorted mending brackets (to provide stability holding pieces of wood together)
- Letter stickers (to spell out "Neighborhood Trolley")
Step 1: Building the Foundation

I was prohibited from modifying the wagon itself (it's been in the family for 50 years plus), so I needed to install some type of foundation inside the trolley that I could build off. To do this, I took some scrap 2 x 4's, cut them to size, and placed them around the perimeter of the wagon. Then, I laid down additional 2 x 4's inside of the perimeter to act as braces and increase its strength. It's important to also make sure the 2 x 4's height exceeds that of the wagon so that the wagon remains "out of the way" during construction. After those were in place, I cut the sheet of plywood to size and screwed it tightly to the 2 x 4s (this was another reason to make sure the 2 x 4's were higher than the trolley itself). Note: I did cut the plywood based on the footprint my kiddo has when she sits down in the wagon and I wanted to make sure she had enough room to not just sit but squiggle a little too. After jiggling the plywood, it and the associated 2 x 4's fit tightly and snugly in the wagon and made me feel confident that the trolley would have a stable base. With the plywood in place, I could then start framing the base of the trolley and going up.
Step 2: Going Up!
After having framed the base of the trolley, I needed to start adding the vertical posts. There would be 6 of them; 4 for the corners and 2 in the middle (see later pics). For these I had 2 x 2s lying around which were pretty sturdy. So, I cut them to pre-calculated heights and screwed them into the base frame. For the posts in the middle, I also added corner braces on either side (mounted to the plywood base) in order to provide additional strength. This turned out to provide the extra rigidity I needed. Afterwards, I framed the top of the posts with more horizontal 1 x 2s, along with another piece of plywood mounted as the roof. Referring to trolley pictures I found online, I noticed on the roof was another little raised rectangular, decorative structure. Since this seemed easy enough to add onto my design, I grabbed some more 1 x 2s, cut them to length, formed the box, and then topped it off with a piece of 1/8" sanded plywood. At this point, most of the trolley infrastructure was completed, and what was left was essentially decorative work.
Step 3: Adding the Decorative Features


All the trolley pics from the Daniel Tiger's Neighborhood show have these semicircular or curved surfaces at the ends of the trolley to which the headlights are mounted. This would prove to be problematic to build out of wood, so again turning to the University of Google, one parent noted that he achieved this with sheets of corrugated plastic. So, armed with this knowledge, it just so happened that Home Depot carried what I needed. I recommend when installing it, to curve it against the grain so it's not weakened. But upon doing that, one will have to screw it in to keep it in place and maintain its shape. I was able to do most of this myself, but during the build my father-in-law dropped by and having a second set of hands hold it while I drilled and screwed made it go a bit faster.
Next, referring to the online trolley pics again, one can see decorative features in front of each post which denote where the seats of the trolley reside. They have an outer design in red, and then a slightly more intricate design (which is smaller) in yellow. I definitely wanted to mimic these since they provide the added realism to the project. So I came up with a template, but only half of it, such that I could flip it over and get its mirror image for the other half to make the completed design. Once it was traced on some 1x6s, I used my jigsaw to cut it. These would form the red part of the design. I then screwed them into the vertical posts all around the trolley.
To form the yellow portions, I again came up with a second template, traced it on leftover corrugated plastic, and cut it. I spray painted them yellow, and once the entire trolley was painted red, I used Gorilla Glue to glue it to the red decorative portions.
As I was building the trolley, it occurred to me our streets and sidewalks were pretty bumpy and my kiddo would get bounced around quite a bit during a trolley ride. I wanted to give her some handholds to grab and stabilize herself with. I took some 2 x 4's, and made some angle cuts at what I thought would be a natural angle for her to grab them. Once they were secured to the plywood base and frame of the trolley, I then drilled a hole through the center (near the top) and inserted a small wooden dowel which would be the handle. It turned out great and my wife said that was one her favorite parts of the project.
Step 4: Electronics


I now needed to think about where the Raspberry Pi, wires, buttons, headlights, etc were going to live. I certainly did not want Daniel Tiger to get his paws on the electronics and accidentally toss them out of the trolley. I decided it would be a good idea to make a little electronics cabinet in the rear of the trolley. I measured what I thought was a good size for the box (turns out it wasn't exactly big enough since I forgot to allocate space for the power cable sticking out of the RPi) and added a lid with hinges and a latch to prevent it from flying open. (In the pic above I took out the RPi since I was in the middle of using it, but everything tucks away nice and neat.)
I also was wondering where I would put the buttons. I decided that among the 3 buttons I had, they would have the following functions:
- Red button: control the headlights on the front/back of the trolley
- Green button: play a trolley ding/bell sound
- Blue button: cycle through a bunch of songs from the Mr. Roger's Neighborhood show as well as Daniel Tiger's Neighborhood
These buttons each have 4 leads for wires, so there would be a total of 12, and I didn't want it making a mess everywhere. So, I made a little box right in front of the trolley handle. The sides and front/back pieces would be fixed to the trolley itself, but the lid would be screwed to the box so I could easily open it and fix wires if need be. I also wanted it to be an obvious part of the trolley so given an apple red trolley, the box would be a nice, bright white to make it clear where the buttons are. The wires were then spiraled together and exited the box through a small hole in the back and run underneath the trolley to the electronics cabinet. To make sure they didn't hit the wheels or the ground during operation, I also fixed them to the 2 x 4 infrastructure.
I initially struggled with how to mount the headlights. After a little thinking, I decided on using strong velcro to hold the lights to the plastic and then I only needed to drill a small hole for the wires to run to the electronics cabinet.
As night fell, it became clear I would need more light in the trolley, especially if we took it out around or after sunset. Turns out my wife was thinking the same thing and said it would be cool if there were LED strips on the inside and outside of the trolley. Since we were in agreement, I ordered some from Amazon (which were just the bright white kind) and terminated in a USB cable. I connected the USB cable to a USB switch which itself was connected to two separate batteries (for a total of 3: 2 for the LED strips and 1 for the RPi). This allowed me to easily turn them on and off. The only complication with installing the lights is that the adhesive backing wasn't super strong on a material like wood. So I used super glue/Gorilla Glue and it worked like a charm.
Lastly, I needed software to control the buttons that the RPi would run. Luckily, I had written a Python script I could reuse for last year's Halloween project (which also became an Instructable)! I did make some mods so that even if the sounds were playing, Daniel Tiger could still operate the headlights and sounds. All in all, it wasn't very difficult and saved me a lot of time
Step 5: Painting and Roof Sign


With everything cut, screwed in, mounted, etc., it was time for the fun part: the paint! I chose spray paint since that seemed like the easiest approach. I of course removed all the electronics, lights, and buttons (the wiring would be completed after the painting as well as the LEDs) and went to work.
The trolley itself got 2 overall coats of the apple red spray paint (paint + primer). The box was spray painted white, separately, and the decorative trolley features made out of plastic (that I mentioned in an earlier step) was also painted yellow separately. Once everything dried, I glued the yellow decorative features in their proper place, installed the box with the buttons and wires, and installed the LEDs and headlights.
The final touch was the little yellow sign on top that reads "Neighborhood Trolley". After I spray painted this yellow and a-fixed the adhesive-backed letters, I quickly saw that the letters were not sticking very well on the wood. Wondering what to do, my father-in-law suggested that since I had some polyurethane (from another project), I should apply a coat of that on top of the letters and hopefully it'll hold it in place once it dries. It nicely did the trick!
Step 6: It's Go Time!

Here is a video showing the trolley's bell and whistles! I should note that the end of the video is muted due to copyright restrictions since the song "It's a Beautiful Day in the Neighborhood" is playing. Not really sure how I can upload a video containing that or similar audio without getting sued.
Overall this was an extremely rewarding project which took about 3-3.5 weeks working mainly 2-3 hours a night. It was all worth it when Daniel Tiger saw it for the first time and had a smile beaming from ear-to-ear, and dancing up a storm. I think I did this project about 1% for myself so I could tinker, but the remaining 99% definitely for my daughter so she could hopefully have some memories she can carry with her.

First Prize in the
Halloween Contest


