

Introduction: Hand-painted Reduction Linoleum Print


Color relief prints don't always require multiple blocks. If you're looking for an economical alternative, reduction printing is a marvelous option. Today we'll take a look at reduction printing using hand-painted techniques to add a sense of texture and brushwork to our prints. This method is also compatible with conventional brayer printing, if you prefer that approach.
The example we'll be using depicts the church of San Francisco de Asis in Ranchos de Taos.
Step 1: Materials


Here's what you need to get started. You can find these tools at your local artist's supply store or online:
- Linoleum cutter and blades
- Artist's linoleum
- slow-drying paint or printing ink (I personally use Akua monotype inks when I make hand-painted prints)
- paper
If you prefer printing by brayer:
- Block printing ink
- Brayer
Helpful hints:
- Speedball produces a nice linoleum cutter kit that includes a handle and several interchangeable blades. The blades vary in size and produce different types of cuts, from fine, delicate cuts ideal for detail, to broader, shovel-like ones better suited to carving out larger areas of material.
- Artist's linoleum is available in a variety of grades, from very soft, eraser-like textures to firmer surfaces. If you're just starting out, use the softer grade. If you'd like to create more detailed images, use a firmer texture.
- A whole spectrum of colors is available in printing ink nowadays, but if you want to be economical I recommend getting just the three primary colors (red, yellow, blue), black, and white, and mixing different colors yourself. I'd also suggest getting water-soluble ink, as this is easier to clean. To minimize mess I put my ink on my piece of Plexiglas.
- Paper: You can use all kinds of paper for printing, but you'll want something strong enough to handle the pressure of your hand rubbing over it.
Step 2: Step 2: Optional Materials

Tracing paper and transfer paper aren't necessary, but can be helpful when getting your designs onto the linoleum block.
Step 3: Create Your Design


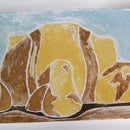
- To use the reduction printing method, you're going to carve out and print all of your colors on the same block. Keep this in mind when creating your design. If you're trying this method for the first time, use a design that has all your colors contained within a single shape. In our example here, the brown shadows are contained within the tan church. For another example, look at the turquoise coyote skull. See how all the colors I used are contained within the basic silhouette of the skull.
- Before you start printing, figure out how many prints you want to make in your edition. By the time you're finished with your block, you won't be able to reprint it.
- Start with the lightest colors in your print, then progressively work down to the darker colors. In the example we're looking at, we start by printing the light blue sky, followed by the tan church, and finally the brown shadows.
- When you are working on your block, what you are carving are the areas that you DON'T want to have printed a certain color. To look at our print, I started by painted the top part of the block blue. I then carved away the sky section, and printed the rest of the block a light tan. From there, I carved away the sections that I wanted to stay light tan, and printed the remaining block with a dark brown ink.
- When I'm figuring out the order in which I'll carve out my color secrions, I'll take a piece of tracing paper and number the areas according to the colors I want to use. In the example above, 1 represents the blue sky, which I printed first. 2 represents the tan church, which I printed second, and finally 3 represents the last color, brown.
- Once you have broken down your design into the colors you want to use, transfer the outline for each color onto a block. If you don't want to eyeball your work, insert a sheet of transfer paper between the linoleum block and design, then trace over the design with a pen or pencil. This will transfer an exact replica of your initial design onto the linoleum. Repeat this step for each color. See the photograph above to see the different color blocks used for this particular print.
- When making your design, have it facing in the opposite direction from how you'd like it to appear in the final print, as the image will get reversed during the printing process. This is where tracing paper becomes helpful, as you'll be able to flip the image easily.
Step 4: Print Your First Color


Once you've figured out which color you want to print first, go ahead and print it. For this example, I didn't need to carve out the sky, so I just painted the top section of the block by hand, and then carved out the sky when I was finished.
Helpful hints for carving:
- When carving, apply mild to moderate pressure to move the blade forward and through the linoleum. Be sure to carve away from your body at all times.
- Linoleum blades are very sharp, and you don't want to accidentally cut yourself.When carving out large areas, try overlapping your cuts to ensure that you've carved out the area thoroughly.
Helpful hints for printing:
- Lay a piece of paper over the block. Rub the paper by hand to transfer the image.
- Since you'll be printing multiple blocks on the same sheet of paper, you'll want to make sure that each block is placed in the exact same area on your paper, otherwise the print will look messy. This alignment is called registration. To help ensure registration, take a pencil and draw around one of the corners of the first printing block. When you print subsequent blocks, you can line them up with the corner you traced to make sure they all are printed in the same place. As you print your blocks, the outline of the block shape will also leave an impression on the paper, which can help you guide your blocks into the same spot.
- You can use either damp or dry paper for printing. Dry paper usually involves more rubbing and ink for a successful printing.
- If you don't want to use your hands, you can also set the block on the floor, stand on it, and rub the paper with your feet. If you try this, make sure you're wearing socks, otherwise your feet might stick to the paper.If you're printing multiples, or an edition, I recommend printing your edition one color at a time rather than making an entire print all at once. That way you only need to mix one color per printing session, and your ink has time to dry between printings.
Step 5: Carve and Print Your Second Color


Once you've printed your first color, it's time to carve out the areas of the block that you want to stay that color. Once you've done that, print the remainder of the block with the second color.
If you're hand-painting your blocks, feel free to try out different brushstrokes and textures to add visual interest to your prints. For these prints, I used Akua inks, but you can also use oil paints or other slow-drying inks. For this print, I printed the church twice. For the first printing I used sweeping brushstrokes to give a sense of movement, while for the second printing I used more dappled brushwork to suggest the adobe exterior of the church.
Step 6: Repeat Until You've Printed All Colors


Continue carving out and printing your colors until you finished printing all of them. Transfer paper can be helpful with blocking out your different color areas. By the time you're finished, the block will look pretty abstract.
Step 7: Finish Your Prints


Once you've printed all your colors, make any necessary touch-ups with a small paintbrush and paint.
Voila! You've now made a reduction print. With a little practice, you can make complex prints using multiple colors. The still life with gourds, for example, is a reduction print I made using eight different colors.


