

Introduction: Handmade Electric Guitar: the Pallet Flying V - a Zero Budget Build


In my almost 25 years of playing guitar I have never owned a flying V, so I decided to make one. I bought a cheap second hand Acoustic Solutions stratocaster copy to use as a donor guitar for the neck and hardware and by selling the parts of the donor guitar I didn't need I attempted to complete this build for a zero budget.
To see how I got along, read on. I have also produced a build video for this project with some actual footage of me playing the guitar quite badly which you can view at the end of this instructable.
Step 1: Stripping the Donor Guitar


First step was to remove all the parts I needed from the donor guitar. This was the neck, the pickups, pickup selector switch, volume and tone pots, bridge, the rear cover plate, and the strap buttons. Basically everything apart from the wooden body and the pickguard.
Of vital importance at this stage was to take a measurement from where the neck meets the body to the bridge. This distance needed to be duplicated on the new guitar as accurately as possible to keep the scale length the same, otherwise the frets wouldn't line up with the real physical positions of the notes on the strings and the guitar would sound perpetually out of tune.
Step 2: Constructing the Frame


To build the frame I used pieces of 2x2 timber that I had lying around surplus from another project. I took the distance I measured earlier from the neck to the bridge, added the length of the neck plate, a couple of inches for the bridge and another inch or so for safety and cut two pieces of 2x2 to that length, which I glued and screwed together.
Next I cut diagonal pieces on the chop saw to form the upper and lower wings as you can see in the pictures. I glued and screwed all the joints together to give the frame you can see in the pictures.
Finally I used a router to cut a recess for the neck to fit into, just deep enough for a piece of pallet wood to slot neatly between the frame and the overhanging part of the fingerboard.
Step 3: Cladding the Top of the Guitar With Pallet Wood


First thing I did here was to drill holes for the necks screws using the neck plate as a guide and attach the neck to the body. Once the neck was in place I used the frame as a template to cut and shape lengths of pallet wood to fit the top of the guitar. When all the pieces were cut I wood glued them to the frame and clamped them into position to dry.
TOP TIP - Using all wood from the same pallet will mean all your pieces will have about the same thickness and will make life far easier later on when you sand it down.
Step 4: Cutting Out for the Hardware


Next I had to cut out holes to fit pickups, the bridge and controls. First I marked the bridge position by measuring the distance from the neck to get the scale length right. Because the bridge I took off the donor guitar was a floating bridge I had to cut a slot in the body with a router for it to sit in. On hindsight I would have chosen a donor guitar with a fixed bridge as it would have been far easier to just surface mount the bridge but hey, beggars can't be choosers.
Then I measured and marked the position the pickups were going and cut slots for them to sit in To do this I used a drill with a spade bit the same width as the pickups to make a hole at either end of the mark. From then it was straightforward to use a jigsaw to do two straight cuts to connect the two holes up.
Also I had to cut out a hole for the jack plug, as this was a Fender style plate I had to use a spade bit and work the wood until I had made enough of a bowl shape for the plate and the jack assembly to sit comfortably in the body but without making and holes outside of the area the plate covered.
After this I marked and drilled holes for the volume and tone pots to sit in, I also had to recess the rear of the holes with a spade bit to create a cavity for the body of the pots to sit in. Also I used a hammer and chisel to cut a slot for the pickup selector.
Finally I used a router with a rounding bit to round all the edges of the guitar as well as rounding the inside of the pickup slots.
Step 5: Sanding, Filling, Making It Smooth


Next job was to use a bit of wood filler to smooth out some of the lines where pallet slats meet and cover the exposed screw heads before sanding everything flat using a 1/3 sheet sander. The only parts I couldn't reach with the sander were the edges of the pickup slots as they rounded in, so I sanded these parts by hand.
Step 6: Electronics


My original plan for the electronics was to remove the entire circuit intact from the donor guitar and simply transfer it to the new guitar. Sadly it turned out some of the original solder joints were quite brittle and snapped during handling so I elected to desolder all the components and start fresh using a thicker gauge wire I had lying around.
The schematic I used was for a standard Fender 3 pickup arrangement which I got from here
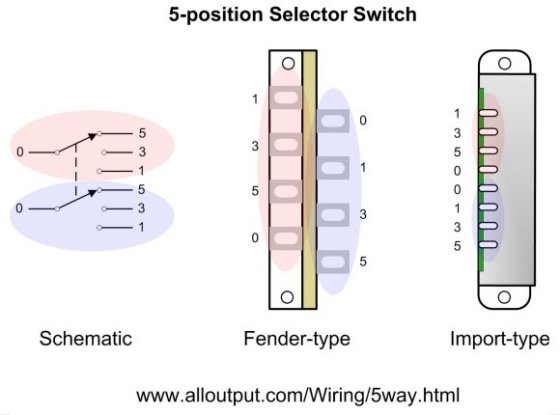
There were no real diffiulties assembing the circuit, one thing to be aware of if you do this yourself is the difference in wiring between Fender style 5 way switches and the so called import style switches as they are wired very differently. A diagram showing the difference in pin outs of the two can be viewed here
The only other thing to bear in mind is I had to leave the pickups disconnected at this stage as they are mounted from the front with the wire passing through into the body and I couldn't mount the pickups until the body was painted. I had to leave bare leads labelled up to be connected to the pickups after painting.
Step 7: Making the Back Panel


To make the back panel I used a piece of hardboard salvaged from a broken paste table. I needed something thin and light because to use more pallet wood on the back would have made the guitar too thick and heavy. Plus I happened to have some hardboard lying around.
I used the guitar as a template to draw around and then cut out the shape with a jigsaw, I also cut out a rectangle to cover with the back panel before gluing this piece to the back of the guitar and clamping it down. Once it had dried I ran around its edge with a router fitted with a rounding bit.
Step 8: Painting


Painting was really cheap and cheerful, I used a couple of tins of automotive black gloss paint that I bought in the pound shop for £1 each. Once this was dry I used a few coats of spray laquer to seal and protect the paintwork. The trick with applying laquer is to apply lots of light coats to stop it from running and ruining your finish.
Step 9: Final Assembly and Setup


Once the paint had dried it was time to put everything together. The pickups were fitted into their slots and wired up, the bridge, back plate, neck, and jack plate were all screwed into position.
The guitar was strung with my favorite Ernie Ball 9 gauge strings or Super Slinkys as they are better known.
Lastly I made final adjustments to each of the bridge saddles to fine tune the intonation and optimise the height of each string.
Step 10: Rock Out


Turn it up and make some noise!
Check out the build video complete with some pretty feeble guitar skills towards the end
Step 11: More Pictures


Step 12: Tools, Materials and Cost Breakdown
Tools used:
Chop Saw
Router
Drill with various sized wood bits
Sander
Jigsaw
Circular Saw
Hand Saw
Chisels
Screwdriver
Hammer
Materials Used and Costs
Donor guitar - £40
Pallet Wood - free salvaged
Hardboard - free salvaged
2x2 timber - 1 length of 2.4m - £2.18
2 x tins of black gloss paint - £2
quantity of spray laquer - estimate £3 worth used
screws and wood glue used - estimate £0.50
Total cost - £47.68
HOWEVER........The donor guitar I bought came as a bundle and for my £40 I also got a small amplifier and a bundle of learn to play books. I sold the amplifier on for £20, I sold the books for £10, then I sold the body of the donor guitar for £30 so really I am up by £12.32 and a free guitar to boot!

Participated in the
Audio Contest 2017

Participated in the
Reclaimed Contest 2017


