

Introduction: Sewing the Backstitch


The backstitch is the hand sewing stitch that I use the most. I use it for regular hand sewing and as my primary embroidery stitch.
The backstitch is most similar to a machine sewn stitch, so it's quite strong.
In this lesson, I'll show you how to do the backstitch properly and give you some tips for straighter sewing.
Step 1: Tools and Materials
For this lesson, you'll need:
- Pinned fabric pieces
- A regular sewing needle and all purpose thread
- Water soluble pen
- Clear sewing ruler
- Scissors
Step 2: Sewing the Backstitch

A backstitch is so strong because the thread on the back of your work overlaps two stitches at a time.
When hand embroidering, I alter this stitch a bit to look cleaner on the back, but we don't have to worry about that here as our seams will be hidden once we turn the fabric right side out.
To practice this stitch, you'll need a standard sewing needle and some all purpose thread.

Bring your needle to the front of the fabric and take a stitch to the right.

Bring the needle back to the front of the fabric a stitch length away to the right.

Now, push the needle back through the hole where the first stitch ends.

Bring it to the front of the fabric a stitch length away on the right from the last stitch.


Keep stitching to the right, using the same motions all the way across. Keep your stitches right next to each other.


The front of a backstitch will look like this. Small stitches very close together. They should be uniform in size.

The back of a backstitch will look like this! Lots of overlapping thread and pretty messy compared to the front. But it'll stay neat if you make sure to pull your thread taut every time.
Step 3: Marking and Sewing Straight Lines

Marking Your Sewing Lines
To get a really straight line of sewing, I highly recommend using a ruler and water soluble marker to draw where you'll be sewing.
In this example, I'm using a 1/4 inch seam allowance.

Make marks wherever you will be sewing!
Starting the Backstitch

Starting at one end of your marked lines, bring your needle through the fabric from back to front and make a stitch. Make one more stitch in the same spot, but further into the seam allowance. This really locks your stitches in place!
(Because we're going to be turning these pieces of fabric right side out after they're sewn, you want the stitches to be VERY strong so they don't pop! The top of the seam is going to take all the stress when it's turned right side out.)
Tips for Sewing the Backstitch


Now you can begin to backstitch. Try to keep your stitches as small as you can and uniform in size.

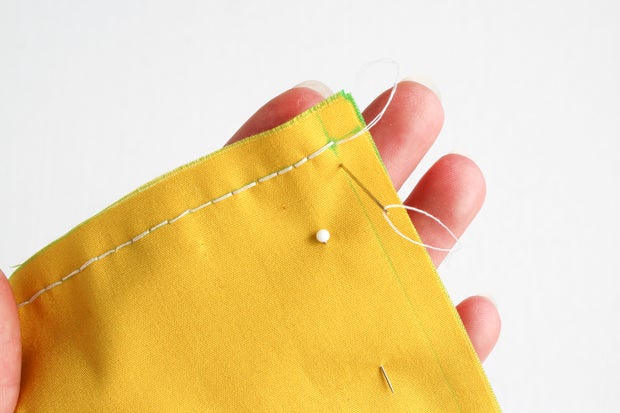
You'll find out your preferred way of sewing as you go, but here's a photo of the way I hold my fabric while sewing. By pinching the fabric between two sets of fingers, I can hold it taut for easier sewing. This position may tire your hands fast if you don't sew often, but I really love it!
Backstitching Around Corners

At the corners, make sure you don't carry the thread ACROSS the corner, so that you retain a 90 degree angle in your stitch line. You may have to slightly change up your stitching to get a nice line that goes around the corner and that's okay. Put a running stitch in there and keep sewing!
What Your Backstitch Should Look Like


Stitches should be nice and consistent throughout your sewing project! As you sew past your pins, remove them. Finish your seam with two stitches just like you began it.

Here's the back of the fabric so you can see how the stitching looks. As you can see, it took four lengths of thread to sew this together.
Step 4: Comparison of Marked and Non-Marked Sewing Lines


I wanted to show you an example of the difference between hand sewing freehand and hand sewing on marked lines.
The fabric on the left was sewn together using only a seam gauge to check if I was sewing in the right place from time to time! You can see the stitches vary more in length and had a tendency to wander off a straight line.
The fabric on the right was sewn using marked lines. You can see that these stitches are very consistent and straight. It also took less time to sew because I could see exactly where the needle should go.
The only negative thing about marking your lines: having to wash them out before you do anything else! But for faster sewing and straighter seams, you can't really beat it. :D
Now that we've learned the backstitch, let's move on to the slipstitch.


