

Introduction: Headless Electric Violin


I had made an electric violin before, and armed with the lessons learned from that build, this is the 2nd, cooler version of this:
https://www.instructables.com/id/Electric-Violin/
Materials:
approx 2 feet of 2*2 inch hardwood (Mahogany, Maple, Teak)
One pre-made violin fingerboard (Ebay)
One pre-made violin chinrest (Ebay)
Four guitar tuning pegs
One piezoelectric violin pickup (Ebay)
One violin Bridge
One 1/4 inch guitar cable
Strings and Bow - obviously
Tools:
Tenon saw
Table saw (optional, helps with removing bulk material)
Chisel, 1/2 inch
Rasp (wood, crosshatched)
Fine rasp (optional)
Sandpaper from 60 to 600 grit (60, 80, 120, 220, 600)
Aerosol Paint and wood varnish (spray cans available in Hardware Stores)
Equipment:
Amplifier
or mixer connected to speaker (in my case)
Step 1: Plan


I had originally planned to make the design in the images, but later switched to a design much like a modern guitar headstock.
I used dimensions from my own acoustic violin for this build, but
you can get a free violin plan from BlueStem Instruments, and modify it as you please:
http://www.bluestemstrings.com/pageEV1.html
The most important things to keep in mind are
1) the angle of the neck to the bridge
2) the angle of the chinrest position (player's chin) to the neck and bridge
3) be aware of the scale length (distance from the 0th fret or nut to the bridge). This is your primary design parameter, depending on how large or small the person is.
Usually, a 5'5" plus person goes for a 325mm scale length, and a 5 foot person goes for 304-310mm scale length.
I suggest you take a printout of the bluestem plans, and copy the drawing to a full size paper, modifying all dimensions according to your scale length.
Then you can modify it to be headless, while preserving key angles.
Step 2: Transfer Drawings Onto Wood


Essential: Get your wood cut by machine so that you have right angled corners, and straight sides.
Essential: Use a setsquare to draw perfect parallel and perpendicular lines. This is not a place to go freehand :).
TOP VIEW:
1) Draw your top view centre line. You must not erase this under any circumstances.
2) Mark position of nut, bridge, and bottom of violin body
3) Draw wings, neck profile and body profile of the top view
SIDE VIEW:
Essential: When you're drawing the side view, keep the top gluing surface of the fingerboard flush with the top surface of your timber. This part of the wood will not me machined or cut at all.
1) transfer nut, bridge and bottom of violin body FROM THE TOP VIEW. How to do this? Just align your setsquare with any edge on the TOP surface of your wood piece, and draw a line perpendicular to the axis of the wood at, say the nut.
Now, using the ends of this line, you can draw lines on the adjacent surfaces , and transfer that exact position of the nut to the side view.
2) Draw the neck profile, keeping the fingerboard gluing surface flush with the top edge of the side view.
3) Draw the rest of the body
4) Rough-draw the head of the violin.
Other sides:
You can make a rough copy on the other two sides of the wood, for ease.
Step 3: Rough Cutting


NECK
Using the tenon saw, cut along the top view of the neck, keeping a 1-1.5mm margin from the drawn lines. Make sure you go as straight as possible, though the tenon saw will make this naturally easy.
ROUGH SIDE CUTS
Using a table saw or regular handsaw, cut down to within 1-1.5mm of the SIDE VIEW lines
BULK REMOVAL WITH CHISEL
Use the chisel to deliver sharp taps at the sides of the cuts you just made. because of the way the wood grain runs, and how hard it is, it will pop off really easily.
Step 4: Finish Cutting, Rasping Neck


BODY FINISHING
Using the chisel, shape the curves of your violin as you please, making sure you stay true to your side and top profiles. Cut off wood with the chisel in layers of 1mm at most, and follow the grain of the wood. This will ensure that you don't gouge or tear the wood.
Keep the beveled side of the cutting edge against the wood, and gently guide the chisel while tapping lightly.
NOTE: Do not cut the neck's top profile down to the drawn line yet. That will be done after it's glued.
NECK FINISHING
This is the most important part of the violin from the player's perspective, so go slow.
1) Do some approximate cuts with the chisel. Go layer by layer, as being too ambitious with the chisel may result in deep gouges and tears in the wood.
2) Using the rasp, shape the neck to a nice radius on both ends. It should be comfortable to hold. Don't worry, you can fine tune it later.
Step 5: Chisel Pockets, Drill Holes

CHISEL POCKETS
Use the chisel to cut pockets for the chinrest (if you're bolting it to the wood) and tuners (tuners need a flat surface to mount onto).
You may use a brad type drill bit to remove excess wood to make your chiseling easier.
To learn the technique for chiseling pockets in wood, search youtube for "chisel pockets wood"
DRILL HOLES
Carefully mark and drill holes for the tuners and for the pickup cable.
My tuner holes were 6mm diameter, and cable hole was 3mm.
Drill small guide holes for the tuner screws using a hand tool, or an old screwdriver. remember, these screws are tiny, usually 3mm diameter.
Step 6: Align and Glue Fingerboard, Finish Neck


FINGERBOARD POSITIONING
Follow the instructions in the video to make the positioning pins for the fingerboard so that it does not slip while gluing.
GLUE FINGERBOARD
1) Use a plane to give a final leveling to the gluing surface.
2) carefully fit the two mating surfaces together such that they fit together almost perfectly. Use the chalk contact method to find out where to sand/level the surfaces.
(rub chalk on the fingerboard, touch it against the gluing surface, and see where the chalk transfers. This are the places where you need to sand a bit more)
3) Apply a thin, even layer of glue, and place the fingerboard on. the positioning pins should slide into place.
4) Apply pressure using a clamp or a heavy weight.
Finish Neck
Using a Chisel, cut the sides of the neck down to the edges of the fingerboard. If you glued correctly, there should be a flush, straight line connecting the wood to the fingerboard. Finish the final profile of the neck with the rasp. Shape the head.
Step 7: Paint and Varnish, Mount Tuners

Essential: Do not paint or varnish the neck. Neck is oiled lightly with tung oil.
Varnish and paint the body to your liking.
Step 8: Set Up the Violin (fitting)


1) Cut grooves with a knife, or fine file, at the top edge of the fingerboard.
2) Put on the strings, and wind up to small tension
3) Cut the bridge down to size, checking string height frequently. Usually I keep the strings about 4mm off the bottom-most edge of the fingerboard.
4) tighten it up, checking tuning by ear or by app (un-amplified, this violin will still make a low volume noise).
Step 9: Wiring


The lead of my piezo pickup was attached to 2.5mm audio jack. I needed a 1/4" standard audio jack.
The signal is mono, so you would choose a mono guitar cable for this.
Wiring instruction:
Tip to tip
Shield to shield
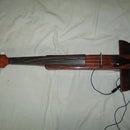
Step 10: Final Product


You can hook it up to an amplifier.
I don't have one at the moment, so I connected it to my mixer, which pre-amplifies and feeds the signal to a speaker system.
I would imagine that directly wiring it to a speaker would already work.


