

Introduction: Helpful Preferences for LectureNotes on the Samsung Galaxy Note 10.1


As always I like to start with the Notebooks Board in Lecture Notes as a jumping off point for Instructables. This set of instructions is a tutorial on setting some beginners preferences in LectureNotes on the Samsung Galaxy Note 10.1.
Like many of you I am learning LectureNotes as I go along, and if I had all of these items set before jumping in, getting used to the feature set would have been much easier.
Beginning at the LectureNotes Board we are going to move into modifying some application settings. I have already created some Notebooks in the application, but it was very helpful organizationally to make some folders for each of the classes I am currently using the app to take notes for.
Step 1:
First we are going to open the application menu (three vertical dashes in the top right corner) and select 'Settings.'
Step 2: Input Preferences

The first menu 'Input' allows you to set some items that pertain to general functions of stylus and finger input.
The first option, 'Use Stylus (Hardware Detection)' only works on the Samsung Galaxy Note 10.1 and other stylus input devices that use active stylus technology. This option disables the rest of the list because it does all of the other options that would otherwise be emulated.
The 'Use Stylus Buttons' box will come in hand later because it allows you to have a one click eraser or other option.
The three options I have checked under 'Gestures' at the bottom of this image detect and allow you to zoom with two fingers while ignoring all other touch input. I like to enable continuous scrolling so it scrolls incrementally instead of page-by-page.
'Allow two fingers zooming' only works when you have checked the zoom tool in the Notebooks drop down menu, but allows you to pinch to zoom.Use
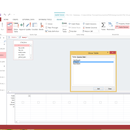
Step 3: Menu Preferences


Image 1
'Enable app's launcher icon menu' is a great feature which gives you a navigation menu under the little red notebook icon in the top left. I leave this enabled and disable the Samsung 'back' button (option under 'Display' > 'Disable Back Key') so my arm doesn't accidentally exit the notebook.
'Hide app name' gives you more space to see icons in the notebook tool tray, and seeing the app name isn't really necessary.
'Hide Zoom Icon' is up to you, but I removed it because I never used it.
Image 2
'Hide Redo Icon' is also up to you, but I removed it because I usually only use undo.
'Hide page backward and forward icons' I would disable these items in the toolbar if you have two finger scrolling enabled, since these become repetitive with that feature.
'Hide Arrow Icon' I disabled this because I never used it.
'Hide Share Icon' I disabled this because I didn't use it enough, and I also use the app menu to export to PDF before sharing something.
Step 4: Handling Preferences

'One time eraser' Here is where the stylus button enabling becomes useful. I enabled this feature so when I clicked the stylus button I could use the eraser quickly and it would snap back to the writing tool. This also works if you click on the eraser icon.
'Use volume keys' allows you to scroll your page with the volume rocker keys.
Step 5: Tools

In the application you can open the writing tools drop down menu and choose 'Show Pencil Toolbox' and the items under that heading are what appear in that toolbox.
'Quick custom pencil settings' allows you to double tap all of your custom pencils and modify their settings without going into the contextual menu for all custom pencils.
Step 6: Import Import PDF Setup


Be sure to modify your PDF settings as you see fit here.
Under 'Import' > 'Import PDF setup' you can modify the way PDFs import into each notebook.
See Image 2 for more options:
I think anywhere between 80-150 dots per inch has worked well for all of my imports, and gives me a good base to work with.
Render pages on a white background is the default option, and I haven't had a reason to have a translucent background.
I did opt to keep the aspect ratio of imported PDF pages because I like to import smaller than A4 PDF slides and write above and below them rather than cropping the notebook to the PDF.
ALIGNMENT
This is going to be the most important option for most people, you can import a slide anywhere on an A4/Letter size sheet and this gives you options for that alignment. I like to have them horizontally and vertically centered so I can write above and below each slide I import. This will also help when your slides are closer to A4/Letter because each slide will be centered rather than leave a white gap on just the bottom.


