

Introduction: Hemming and Seam Finishing


In order to prevent the raw edges of woven fabric from fraying, they need to be finished where they are exposed on seams or hems. There are many ways to do this, some are decorative, and some simply practical. In this lesson I'm going to show you a few of the most common and most useful. Then I'll suggest some simple projects that will help you practice the skills you learn in this lesson.
Step 1: Zigzag Stitching

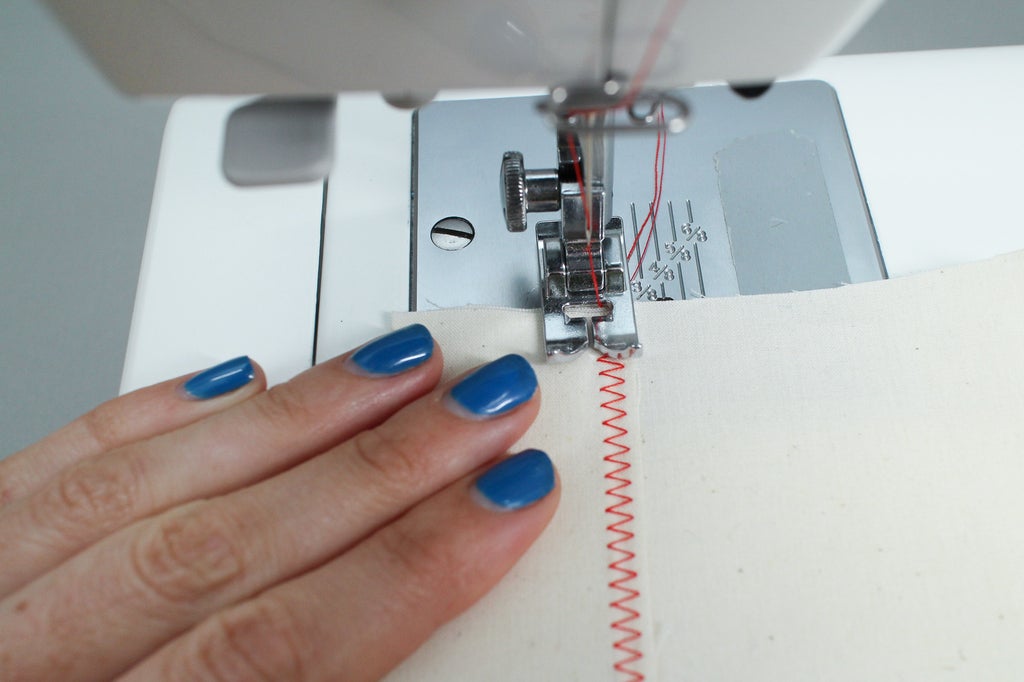
Some of the seam and hem finishing techniques we're going to talk about use another stitch on your sewing machine: the zigzag stitch, so first let's take a minute to learn how to set up a sewing machine for sewing a good zigzag.
Look at the stitch selector on your machine and figure out how to select a zigzag stitch. On my machine you do this by turning the stitch selector dial to the 'C' section which shows a range of zigzag widths. Turning the dial to different points in this range will adjust how wide your zigzag is. Turning the stitch length selector while you are in zigzag mode will adjust how long your stitches are, which in this case means how spread out the zigzag appears (lower numbers will make the stitches look more like a compacted slinky, larger numbers stretch the slinky... if that makes sense).


To see what I mean, put a piece of fabric in your machine in zigzag mode and try sewing.
Now play around with the dials to see how moving each one changes the look of the stitches. Sewing with the stitches extremely close together is better for finishing raw edges or sewing buttonholes, while sewing with them slightly farther apart is better for creating stretch seams (we'll talk about this more in a few lessons).

Adjust the dials until you get something that looks about like this:

When you are sewing a zigzag, the ideal stitch tension will make the bobbin thread invisible on the top of the fabric, but the top thread will show slightly on the bottom of the fabric like this:

If the bobbin thread is showing on the top of the fabric, or the stitches are puckering the fabric, the top thread tension is probably too tight. Try adjusting it until you get a stitch that looks like the two above.
Step 2: Hemming With Zigzag

Now let's try using this zigzag in a simple hem.
To try this, take a piece of fabric with a straight edge, and sew a zigzag stitch 1/4" in from the edge of the fabric, backstitching to lock the stitches on both ends.

Now take your fabric scissors and cut away the 1/4" of extra fabric, being sure not to cut through the stitches.


Press the zigzagged edge up onto itself an even 1 1/2". Use your clear ruler or seam gauge to make sure the fold is consistent.


Pin the hem and then sew it with a straight stitch just below the zigzag.
This is a very simple and quick hem that I wouldn't recommend on projects where the inside of the hem is going to be visible, or on fabric that unravels easily, but it can be a good option for heavy duty fabrics and fabrics that don't fray easily.

Step 3: Folded Hems


One very basic way to finish the edges of fabric, is to press them over twice onto themselves so the raw edge is hidden, then stitch the folds down. You can vary the width of the folds here for different applications, for example, a 1" or 1 1/4" wide fold might look better than an 1/2" fold as the top hem of the grocery bag, but a 1/4" fold would be better for a light scarf. This method is also how you hem jeans.
Another slightly less bulky variation on this technique is to make the inner fold smaller than the outer fold. To try this, take a piece of fabric with a straight edge, and press the edge up onto itself 2".


Then take the raw edge you folded up and fold it under about 1/2", making the resulting hem 1 1/2" wide.

Press this fold, and pin and sew your hem 1/8" - 1/4" away from the fold.


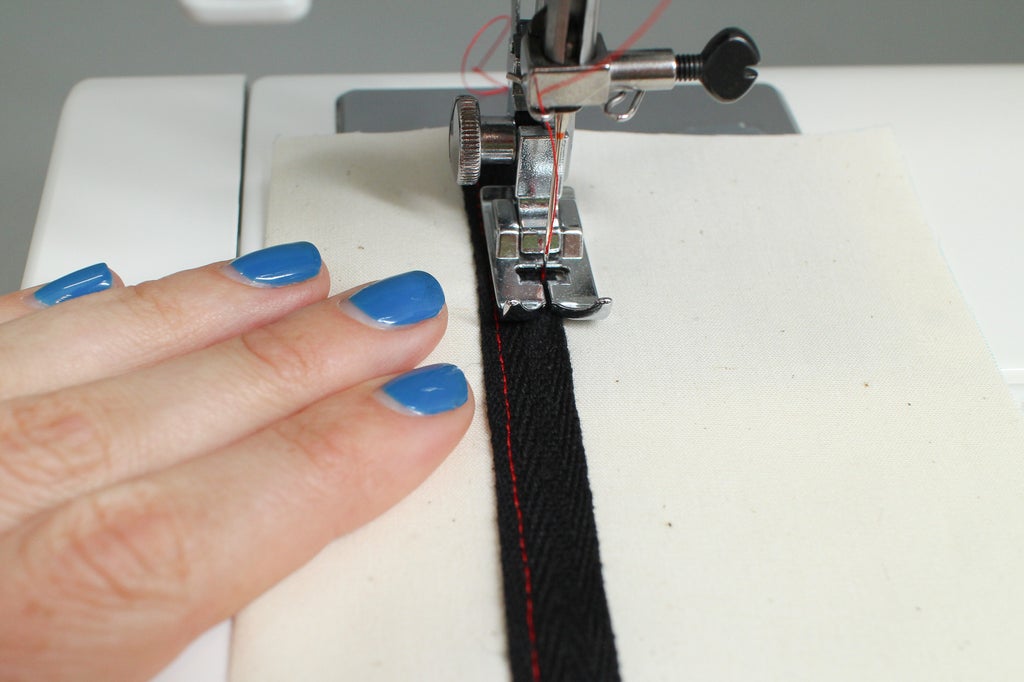
Step 4: Hemming With Hem Tape or Twill Tape

Another way to finish a hem is to use hem tape or twill tape to cover the raw edge. With the right kind of tape, this method is slightly less bulky than a folded hem and can be useful when you don't have a lot of material to hem with, for example if you were lengthening a skirt or pants.
To try this technique, take another piece of fabric with a straight edge, and press the edge up 1". Then unfold and pin a piece of twill or hem tape to the edge of the fabric so it is overlapping by about half the width of the tape.

Sew the tape down to the fabric on the overlapping edge.


Then fold the hem up again, pin and sew the top edge of the twill tape down, enclosing the raw edge of the fabric.

Step 5: Seam Finishing

When you are sewing seams, it's usually a good idea to treat the raw edges of your seam allowances with some kind of seam finishing treatment. When these raw edges are completely hidden, for example, under a lining, seam finishing is mostly done to prevent the fabric from fraying or unraveling. Sometimes, however your seam allowances will be more visible, such as inside an unlined garment, or on the grocery bag we're making, and in these cases, seam finishing is also aesthetic.
I'll show you a few simple ways to finish seams, from extremely simple to slightly more complex.
Step 6: Pinking

The most basic way to finish seams is to use pinking shears to create a jagged edge on your seam allowances. Pinking shears are scissors that have a zigzag blade that cuts a shaped edge in fabric. Cutting the edge this way makes the yarns of the fabric less likely to fray. You should really only use this technique when the edges you are pinking are going to be completely hidden and inaccessible once your piece is finished.

You usually pink a seam after your sew it, so if your seam needs to be pressed open, press it, then pink the edge of each seam allowance separately.


Or, if you don't need to press your seams open, just use your pinking shears on both layers of seam allowance together.


Step 7: Seam Finishing With Zigzag

Another way to finish the inside of seams is to use your zigzag stitch similarly to how we used it on our hem.
There are two ways to do this. One is to use the zig zag to finish each seam allowance separately. To do this, sew your seam and press it open, then sew a zigzag about 1/4" in from the edge of the fabric on each seam allowance separately. Make sure you are folding the rest of the fabric out of the way so you are only sewing through the seam allowance.


Then use your scissors to trim away the extra 1/4" being careful not to cut into the zigzag. This method is good for seams that need to be pressed open.


For the second method, sew your seam, but don't press it open. Then sew a zigzag on the seam allowance right outside the sewing line, sewing the two layers of the seam allowance together.


Trim away the rest of the seam allowance. Now if you need to, you can press open the seam, by pressing the zigzagged seam allowance to one side. Seams finished like this won't usually lay quite as flat as seams finished the first way, so they are good for different purposes.


Step 8: Binding

Using double fold bias tape can be a great way to enclose the raw edge of fabric and add a touch of color to a project. Just as we did with the zigzag finishing, you can use this technique on either each seam allowance separately, or on both of them together.
To finish each seam allowances separately, sew a seam, then press your seam open. There are a few different ways to sew on the bias tape, but I'm going to show you the easiest for now. Take a piece of double fold bias tape and sandwich the edge of one seam allowance between two folded layers, pushing it all the way onto the fabric and keeping it even.


Pin it down, then sew all the layers together close to the inner edge of the bias tape. Repeat on the other side of the seam allowance. (When you are doing this on a real project you would usually want to use matching thread to blend in with the tape, but I'm using contrast thread here so you can see where I'm sewing).

To finish both seam allowances together, sew a seam, but don't press it open. Trim the seam allowance down to about half and inch, then sandwich both layers of the seam allowance inside the bias tape.

Pin and sew. Then press the seam open, folding the bound seam allowances to one side.


We are going to use this technique to finish the seams of our grocery bag, and it can also be a good technique for creating decorative seams on the outside of something.
Step 9: Quiz
{
    "id": "quiz-1",
    "question": "Cutting with special scissors that create a zigzagged edge is called:",
    "answers": [
        {
            "title": "dagging",
            "correct": false
        },
        {
            "title": "pinking",
            "correct": true
        },
{
            "title": "greening",
            "correct": false
        }
    ],
    "correctNotice": "Well Done!",
    "incorrectNotice": "Try Again"
}
{
    "id": "quiz-2",
    "question": "True or False: You need to finish the edges of woven fabric so it doesn't fray.",
    "answers": [
        {
            "title": "True",
            "correct": true
        },
        {
            "title": "False",
            "correct": false
        }
    ],
    "correctNotice": "Well Done!",
    "incorrectNotice": "Try Again"
}
Step 10: What's Next?

If you want to practice the binding and seam finishing techniques we just learned, there are a lot of simple projects you could try, in fact almost every sew item uses some kind of seam finish! My Easy Cloth Tote Bag Instructable is also a great project for seeing how these techniques are applied, so if you’ve started that project, you can continue it to practice the skills from this lesson!
In the next lesson we'll break out of the straight seam box and learn how to sew curved seams!


