

Introduction: Hodgepodge Cabinet


Years ago, I constructed a cabinet with a hodgepodge of cabinet doors I found at the Habitat Restore and several random shelves that were displaced after another project. My goal was to not purchase any new materials. I both loved it and hated it. It reminded me of one of those childhood toys that's just covered in different latches, locks, and doors. Some of the doors opened into very practical spaces that held specific items while others were very impractical and were likened to a junk drawer. Some were chopped to fit and others were false doors made of particleboard shelving. My goal of not buying anything new was successful, but as I've grown older and filled my home with more refined items, I wanted to take the concept and elevate it.
Supplies

Old Cabinet Doors
I got mine on sale for a $1 a piece at the Habitat Restore. When I went to pick them out, I obviously looked for a range of colors and styles, but I also looked for ones that had convenient measurements. See step 3 for more details.
You also want to avoid partial overlay doors with a lip. They're far more difficult with this type of project. You'll see later. For now, just trust me.
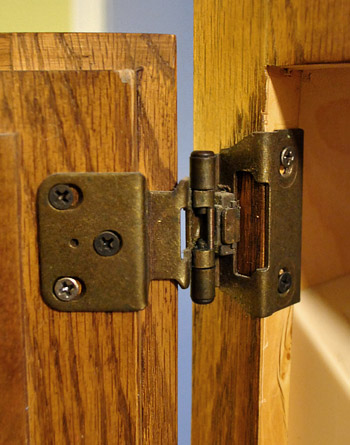
Hinges
Make sure your hinges are a good fit for the door. Those lipped doors require a different hinge than the flat ones. If they have large fancy hinges, you'll likely need some simple ones. Some of mine came with hinges, but for those that didn't or had ones that needed replacing, I was also able to get those at the Restore. Seriously, if you have a Restore in your area and haven't been, you're missing out.
1x4 Quality Lumber
Screws
Wood Filler
Sander
Drill
Pocket Hole Jig
Stain
Polyurethane
Clamps
Speed Square
Duct Tape
Step 1: Version 1


Before I get into the new cabinet, I thought I'd give a quick look at the old cabinet.
It's like two instructables in one!
If you want to do what I did and use some old/cheap materials to create your own version of my first attempt, I'm going to show how it was constructed by disassembling it.
I've reordered the pictures so it looks like it's being assembled to make more sense of the process.
First, I screwed the shelves together in a staggered way to create more spaces for shelving between the different shelves. These are primarily cheap particle board shelves from big box stores. I think the one to the far left was a kitchen cabinet I got at the Restore.
After stacking them, I installed shelves wherever I could. In some places that meant screwing them in place for stability. In others, I drilled holes and used pegs leftover from past Ikea furniture.
Once it felt sturdy and all the shelves were installed, I I used 1/4"x2" boards to add a frame to the front that would cover the gaps between doors and give me a place to screw in the hinges. I stapled them together and screwed them into the front of the shelves as I went. This step was just a lot of trial and error to get all the doors to fit and framed them out.
Step 2: Version 1 Part 2


Once the frame was in place, I screwed all the doors on. There were some awkward spaces that I filled in different ways.
One way was to cut a door whose edge faced the wall. This made it less obvious that it was cut. Another was a couple "plugs" I created to fill very small holes. These were what I liked least about this older version of the cabinet and I vowed to avoid these this time around, though they could be done in a prettier way if needed.
Step 3: New and Improved Planning Phase


I decided to use the Ikea Ivar system as the bones of the cabinet. It was simple, all wood, and very modular, so it was easy to fit it to the space.
I used Adobe Illustrator to plan out the placement of the doors and shelves. This program or any other vector based drawing program will let you draw shapes that are exact measurements to the physical object.
So, first draw out the Ivar shelves as they will be built with the width of the posts (1.75"), and space between them (14"). I used the 17x20 shelves, but regardless, be sure to measure the distance between them. There is a gap between the shelves when it's constructed, so I had to guess on that distance until it was assembled.
Then draw each door with it's exact measurements. I color coded mine based on whether they were new doors, old doors, or spaces I need to find a door to fit.
I got mine for a $1 a piece at the Habitat Restore. When I went to pick them out, I obviously looked for a range of colors and styles, but I also looked for ones that had convenient measurements. If they were within an inch of the width between posts, half, or double that space, then I bought them. I even laid them out on the floor of the store to visualize how they would fit together. I also looked for two cabinets that had one measurement in common and would add up to a convenient measurement. There's an example of this at the bottom of my cabinet plan. The two doors are similar heights, and when put together they cover three shelves.
Once all your components are drawn, you can map out the whole thing precisely and ultimately get an idea of how it will look when it's done with different combinations of doors or paint treatments. I considered painting a lot of the doors some colors to go with the room, but ultimately decided against it based on what it looked like in this planning stage.
Step 4: Bones


Follow the included instructions to assemble the Ivar shelf.
Step 5: Physical Check and Hinges


Lay out the doors to be sure you haven't made any glaring mistakes with your plan.
Now remove any old damaged hinges and make sure your hinges are on the right side for their configuration.
Step 6: Frame


Cut your lumber to match your diagram.
Drill pocket holes into the ends and assemble the outside edge, all the vertical posts, and one horizontal piece between each of them.
I cut my horizontal pieces quite thin to keep the shelf openings as wide as possible. This made putting two pocket holes on each side difficult to fit. Therefore, I staggered the pocket hole on each side to attempt to give it more stability. this is just about the only thing I regret about this project. You need two pocket holes at every joint. Do what you have to do to make that happen.
Be sure to use a speed square or other tool to ensure everything is square.
Step 7: Frame Part 2


Now that the frame is starting to take shape, clamp it to the front of the Ivar shelf and make sure it fits.
Then, one by one, take each cabinet door, hold it up where it belongs, and tape the horizontal boards where they belong. You could use your diagram for this, but I trust my eyes more than my brain when it comes to measurements.
Once all the horizontal pieces are in place, work your way from top to bottom or vise versa. Make note of the distance from a board that is already screwed in to the first taped piece. Mark that measurement on each side. Remove the taped piece, drill pocket holes, then screw the piece in place using the measurement you made to ensure it is straight and square.
Step 8: Frame Part 3


Once you have the frame assembled, you may want/need to make a few adjustments.
Clamp it in place on the Ivar shelves, check, and double check that all your doors will fit as they're supposed to.
This is where those cabinets with lips gave me trouble. The opening for the door has to be pretty exact in order for it to fit correctly and look right. Therefore, I marked and cut some of the frame to create larger spaces for these doors. I also had a spot where two doors came together that were different heights, so I cut a space for those as well. These can look very awkward without the doors on them, and they will continue to look awkward when the doors are opened, but who cares what the inside looks like, right?
Step 9: Fill Sand and Stain

Fill any large gaps in the frame with stainable wood filler, sand and stain.
I used a stain and poly combo to keep it one step. Unfortunately, I didn't get pictures during this phase. I was in a rush to beat the sun and didn't win.
Step 10: Moveable Shelf


There were a few places where I wanted to keep the shelves moveable. Therefore, the frame needed to be moveable in these areas. By creating a false front that could be removed, I kept the flexibility of these shelves.
Cut a strip of wood that fits in your frame where you'll be using one of these moveable shelves.
Find a scrap of wood that is the same thickness as the Ivar shelf.
Attach four L brackets as shown. Use the scrap of wood to ensure that the brackets will fit onto the shelf.
Sand and stain these pieces as you did the rest of the frame.
Step 11: Endcaps


Because the end of my shelves is exposed, I also needed to create some endcaps. I wanted them to compliment the appearance of the front, so I used more cabinet doors for these.
Because they don't need to open, simply use scraps to screw them together on the back. I opted not to stain the shelf on this side because I wanted to keep the integrity of the Ivar shelf in case I ever wanted to remove the doors and use the shelf alone. I somewhat regret this decision, so feel free to stain any part of the shelf that will show before attaching the endcaps.
Use the cross beams on the Ivar shelf to screw the endcaps on from the inside. You can also use small L brackets or the peg system to keep them in place.
Step 12: Attaching Frame


Clamp the frame into place one last time.
Screw from the inside of the peg holes through the back of the frame. Be sure to pick a screw with a head large enough that it won't go into the peg hole.
Add your moveable shelves and their moveable framing pieces.
Step 13: Doors


It's time to add the doors. Carefully square up each door and screw then into place.
Step 14: Enjoy


Fill your new cabinet with odds and ends knowing you have a one-of-a-kind piece of furniture for your on-of-a-kind home.

Participated in the
Home and Garden Contest


