

Introduction: Hot Glue Injection Moulding


I'm currently in the process of upgrading my printer to work with flexible filaments, but earlier it had a regular bowden system that meant most flexible materials wouldn't print properly, if at all.
Since most printers can't easily print with flexibles, I'd done a series of experiments involving heating hotglue with a stove and casting it for larger parts. However, my brain and my lungs are in agreement that burnt glue isn't a great medium to work with, and a regular hotglue gun is already a decent extrusion machine, so why overcomplicate it?
With that in mind, Here's how you make flexible parts with a hot glue gun and 3D printed molds. You could also use plumber's putty to create the molds, but that's a separate topic for another day.
Supplies
- A hotglue gun (40-60w)
- Access to a 3D printer
- Alternative: Plumber's putty & a model to mould
Step 1: Creating the Mould


For my model I chose a Pachimari model I found online (Oaklandishh on Thingiverse). I imported into Fusion 360, and made a simple mould body around it and used the Combine tool to create the internal cavity.
Things to remember when creating moulds-
- Keep it simple, 2 part moulds are much easier than 4 part moulds.
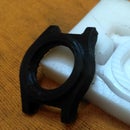
- Remember registration keys to align the mould parts (the hemispheres & hollows in the above picture).
- Think about how the material will flow into the mold, from the sprue to the farthest tips. Try to avoid convoluted paths or dead ends.
- Material being forced into a mold has a surprising amount of force, think about how you'd clamp the mold shut.
- Trial and error can be reduced, but is inevitable :)
Step 2: Printing

I printed my moulds out of PLA at 0.1mm layer height, which worked surprisingly well. I half expected the mould to melt, but was pleasantly surprised that it didn't.
That said, PETG or ABS would likely be better choices, especially if you vapour smooth ABS for a glossy finish on your parts.
Step 3: Prep for Injection

Turn on your hot glue gun and keep it aside, then get your mould parts ready for clamping together. I'd initially thought I could just stick a single rubberband on the mold to hold it together and boy, was that a bad idea. The rubber band was too weak, and hotglue instantly forced the mold parts apart.
The second time I went with non-elastic paper tape, but ideally you want to use a C clamp or a weight.
You can also apply some sort of lubricant here, to ease the injection process and in releasing the part. I used a silicone spray, but even a drop of cooking oil with a brush would work.
Step 4: Injection Moulding

By now your hot glue gun should be sufficiently hot, and be oozing with glue. Place the nozzle against the injection hole, and grip the trigger as hard & fast as you can, repeatedly pumping until the pressure feels substantial.
It might take a few tries to get the hang of it, too little force while pumping and it won't fully fill, too much and you might force the mold apart and cause it to ooze like in the picture.
Once that's done, switch off the gun and let the mould sit for around 10 minutes to cool down. You can dunk it in water if you want it to cool down faster, but the internals might still be warm even if the exterior feels cool. 3D prints are decent insulators of heat.
Step 5: The Moment of Truth


Once it's been 10-20 minutes, carefully pry open the mould and check out your results. While my part had a fair amount of flashing due to some overenthusiastic trigger pumping, it can be easily trimmed off with a hobby knife.
That's all there is to it, but there's so much more potential for how you can make flexible parts using this. Try it out, and let us know your results, and thanks for reading.
Participated in the
Hot Glue Speed Challenge


