

Introduction: How to Connect Load Cell to Arduino?


Source: https://theorycircuit.com/arduino-projects/how-to-connect-load-cell-to-arduino/
Electronic weighing machine uses load cell to measure the load or pressure produced by the load, here most load cells are follows the method of strain gauge, Which converts the pressure (force) into an electrical signal, these load cells have four strain gauges that are hooked up in a Wheatstone bridge formation.
When we apply load the strain gauge resistance will change and hence the output voltage from the load cell get changes by the way we can measure the load value.
Step 1: Wheatstone Bridge Formation of Load Cell

Lets Do it!
Step 2: Instrumentation Amplifier
The output voltage changes from the load cell may vary between millivolt range, so that we need to magnify the changes occurs in output voltage, here we used instrumentation amplifier INA 125.
This is a low power, high accuracy instrumentation amplifier with a precision voltage reference. It provides complete bridge excitation and precision differential input amplification on a single integrated circuit.
Step 3: Load Cell Interfacing Schematic

Connect load cell pins to the instrumentation amplifier as shown in the schematic diagram.
RED : Excitation +
WHITE : Signal +
GREEN : Signal –
BLACK : Excitation –
The Resistor 10Ω connected between pin 8 & 9 is responsible for Gain of INA 125 instrumentation amplifier, the output is taken combined from Vo and Sense (Pin 10 & 11) and it is fed into Arduino analog pin A0. Here the need of power supply for load cell and instrumentation amplifier solved by Arduino power pins.
This circuit is designed for getting reading at serial terminal if you need to add display refer LCD interface with Arduino.
Step 4: Arduino Code for Load Cell
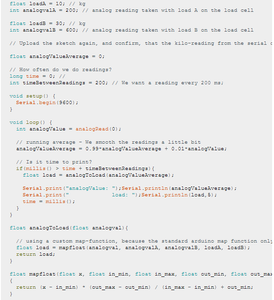
Get Arduino Code for Load Cell here: https://theorycircuit.com/arduino-projects/how-to-connect-load-cell-to-arduino/
Step 5: Hookup Diagram


![Tim's Mechanical Spider Leg [LU9685-20CU]](https://content.instructables.com/FFB/5R4I/LVKZ6G6R/FFB5R4ILVKZ6G6R.png?auto=webp&crop=1.2%3A1&frame=1&width=306)


