

Introduction: How to Make a Clock of Clocks Using JavaScript


In this instructable, I will describe the theory and application behind the "Clock of Clocks" concept I've been thinking about for some time. In essence, a clock of clocks is just as it sounds - using the hour and minute hands of smaller clocks to outline the shape of digits, forming a clock itself! The code is written in JavaScript to display the clock in an HTML canvas object; in other words, you can embed this clock in any webpage!
The following video highlights my particular implementation of this concept. All of the code used in this project is provided in my GitHub repository linked at the end of the introduction, so feel free to tinker with the code and please share what your idea looks like!
What is my motivation behind this project?
This is another example of a project that I thought would be "fun to do." I keep a project binder where I write down all of my concepts and ideas, and this happened to be project I selected for this weekend. My language selection was driven by the desire to make this maximally useful for the community, and since HTML/JavaScript are universal, JavaScript was a natural selection.
Resources/Links:
Supplies
For a basic implementation in a webpage only, no supplies are needed besides the src/webpage/static/clock_of_clocks.js file. If you wish to copy the code and run it from the repository directly, you'll need:
- A Python distribution (I used the Anaconda Python 3.8 distribution)
- Flask (included in most distributions)
Step 1: Theory
Ever since its creation, the seven-segment display has been ubiquitous, appearing everywhere from your microwave to your alarm clock. Its role in displaying number in a simple way has gone mostly unchallenged, and as such, it was what I initially investigated for use in this project.
As a reminder, a seven-segment display looks like this:

The ON or OFF state of each segment controls which number is being displayed.

Extrapolating this concept to our "clock of clocks" idea, you would need miniature clocks at the intersection of each segment to represent digits like a seven-segment display. After playing around with the layout of the miniature clocks, trying to represent the number eight, it becomes quickly apparent that this doesn't quite work with only two hands.

Since the miniature clocks cannot overlap, the only way for this method to work is if you added a second hand to the clocks, but that quickly becomes cluttered! Clearly, we require another approach.
Step 2: One Possible Solution - Block Numbers


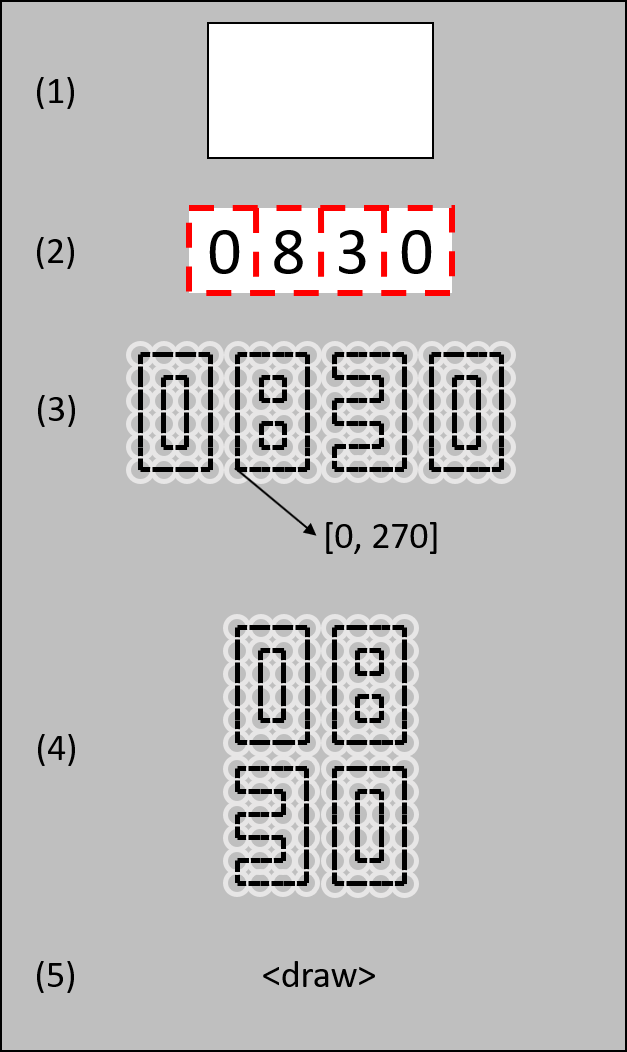
Now that we have a general idea of what we want to do, we can start to tinker with number shape variations. As it turns out, using the two hands on miniature clocks to trace out block numbers works perfectly! The only downside is some clocks aren't used with some numbers, but we "solve" this problem by defining an unused state for the clock.
Other than simply working with two clock hands per miniature clock, what makes block numbers an excellent solution is the fact that each number can be constructed using a combination of seven clock states assembled into six rows and four columns.

At this point, we have every building block we need to formalize the theory into an application.
Step 3: Application
At its core, we want this clock to be useable as universally as possible. The decision space is basically three options: a desktop application, a mobile application, and a web application. A desktop application affords the greatest flexibility for programming language choice, but that application would require too many prerequisites before a user can run it. A mobile application is a little more constrained on language choice, but access to the application assumes the user has a compatible mobile device. It turns out the best option for application deployment is web, as every internet-enabled device has some web capability. Therefore, I decided to target a web application, writing the core code in JavaScript.
Taking this one step further, I thought it would be best for testing and deployment to launch a locally-hosted server, and since I know Python very well, I wrote a simple Flask server to host a simple HTML webpage, which itself contains the canvas object upon which the JavaScript draws the clock of clocks animation. The added benefit of a locally-hosted server is it allows me to view the animation on any device connected to my network - all phones, computers, tablets, and gaming consoles.
Step 4: Programming!
At this point, we know everything we need to know to start programming. The first step is creating the shell - we need a Python file for the server code, an HTML file for the webpage, a CSS file for the webpage style, and a JavaScript file for the core code.
Server Code (app.py):
from flask import Flask, render_template
app = Flask(__name__)
@app.route('/')
def index():
    return render_template('index.html')
if __name__ == '__main__':
    try:
        app.run(host='0.0.0.0', port=5000, debug=False)
    except Exception as e:
        print(e)
Webpage (templates/index.html):
<html lang="en">
  <head>
    <meta> charset="utf-8">
    <meta name="viewport" content="width=device-width, initial-scale=1.0">
    <title>Clock of Clocks</title>
    <link rel="stylesheet" href="static/style.css">
    <script src="static/clock_of_clocks.js"></script>
  </head>
  <body onload="start_canvas();">
    <canvas id="clock-canvas"></canvas>
  </body>
</html>
Style (static/style.css):
@charset "utf-8";
html {
  padding: 0px;
  border: 0px;
  margin: 0px;
  width: 100%;
  height: 100%;
}
body {
  padding: 0px;
  border: 0px;
  margin: 0px;
  width: 100%;
  height: 100%;
  overflow: hidden;
  background-color: #000000;
}
canvas {
  padding: 0px;
  border: 0px;
  margin: 0px;
  width: calc(100% - 2px);
  height: calc(100% - 2px);
  border: 1px solid #ffffff;
  background-color: #050505;
}
JavaScript (static/clock_of_clocks.js):
function start_canvas() {
    // Do something
}
In terms of the shell code, that's all you need to create a server that hosts a basic webpage with a canvas that's the size of your screen. Pretty impressive, right?
The "hard part" of this application is in drawing the clock of clocks animation - as it should be! You can refer to my GitHub for the specific code, but the JavaScript performs the following functionality in an animation loop:
- Clear the drawing surface
- Break up the current time into an array of four digits
- Create a 16x6 array of clock minute & hour hand angles
- Each digit is an array of miniature clocks four across and six tall
- A clock at this stage is represented by two angles [minute-hand-angle, hour-hand-angle]
- Compute the "transition" angles (more on transitions in the next step)
- Reorder the angles array based on the canvas dimensions - if the canvas is taller than wide, we prefer to stack hours on top of minutes, creating an 8x12 array of angles.
- Calculate clock center points and draw the clocks
Step 5: The Transition
There are effectively two ways to transition from one minute to the next. With the first method, the clock is always in flux; that is, it's always changing. The animation of this looks very cool, but it defeats the purpose of a clock - you can't read the time if you can't tell what numbers are being displayed!
With the second option, we choose to transition from one minute to the next over a defined transition time. The time I selected was three seconds, although you can choose anything between zero and sixty seconds. The longer your transition time, the less readable your clock will actually be! Three seconds for me was the perfect mix of cool and readability.
To perform this transition, I create two times: the current time and the current time plus your transition time. I then compare the hour and minute digits of each, and if there's a difference, I linearly interpolate the angles of the current digit and the next digit based upon the point in the transition the current time is. I also force the clock hands to rotate clockwise since we are drawing clocks after all!
Step 6: Conclusion / Wrap-Up
So that's it! You now have all of the tools you need to deploy this animation for yourself. Feel free to deploy this in any way you so choose!
After completing this project, I've been contemplating other applications of this methodology. Besides performing simple changes to colors and line widths, you could completely customize the clocks to be ornate, steampunk, or another unique style, and you could even increase the number of miniature clocks to draw letters instead of digits. I only scratched the surface of possibilities here, so I'm excited to see what this project inspires!
Thank you for reading my Instructable, and please let me know in the comments if you have any questions!
Participated in the
Clocks Speed Challenge


