

Introduction: How to Make a Remote Control Car


Remote Control toys can be seen in hands of every next door kid. The market these days is flooded with variety of toys and gadgets yet there is no more fun than to build your own remote control car.
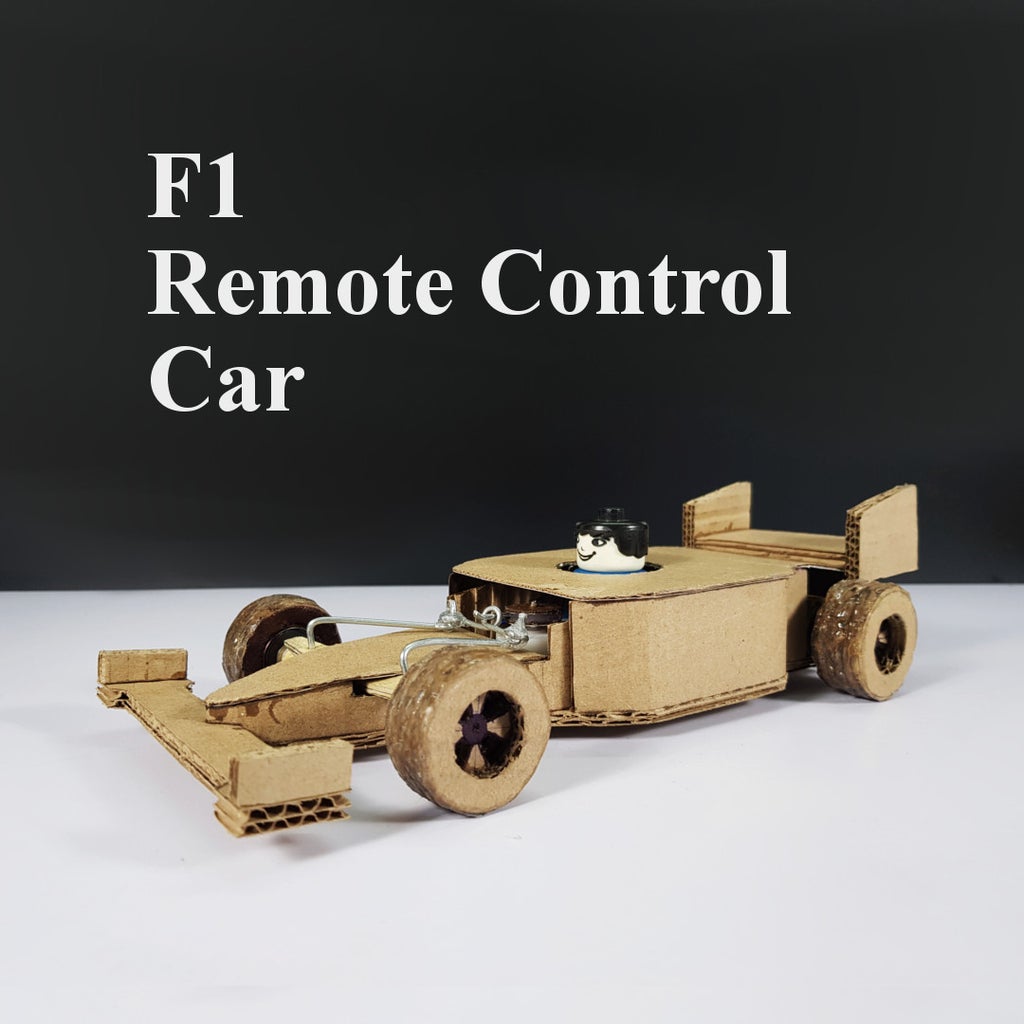
In this instructable, i decided show you how to make a Remote Control Car at home. Instead of making a simple remote control car, this time i decided to build a F1 RC car using cardboard. The cardboard is most easily available and makes it feasible for almost everyone to make this car at home.
All the materials used to make this car are easily available, however, i have also mentioned online links for the necessary parts.
Step 1: Watch the Video
A video is a wonderful tool that provides deep insight to the procedure and makes it easy to understand. However, it is also recommended to visit next steps for additional details and images.
Step 2: Order Parts
Ebay.com
- High rpm DC motor - https://rover.ebay.com/rover/1/711-53200-19255-0/1...
- Geared DC motor - https://rover.ebay.com/rover/1/711-53200-19255-0/1...
- TP4056 Module - https://rover.ebay.com/rover/1/711-53200-19255-0/1...
- Li-Ion Battery - https://rover.ebay.com/rover/1/711-53200-19255-0/1...
- Switch - https://rover.ebay.com/rover/1/711-53200-19255-0/...
- Plastic Gears - https://rover.ebay.com/rover/1/711-53200-19255-0/...
- Ball Bearing - https://rover.ebay.com/rover/1/711-53200-19255-0/...
- Ice cream Stick - https://rover.ebay.com/rover/1/711-53200-19255-0/1...
- Hot Glue Gun - https://rover.ebay.com/rover/1/711-53200-19255-0/1...
- Stationary Knife - https://rover.ebay.com/rover/1/711-53200-19255-0/...
Amazon.com
- High rpm DC motor - http://amzn.to/2DVaDNo
- Geared DC motor - http://amzn.to/2BVhvxm
- TP4056 Module - http://amzn.to/2qcIACn
- Li-Ion Battery - http://amzn.to/2GEMb4v
- Switch - http://amzn.to/2xUtkjS
- Plastic Gears - http://amzn.to/2FEHiaf
- Ball Bearing - http://amzn.to/2DX1bJy
- Ice cream Stick - http://amzn.to/2Fzwbj5
- Hot Glue Gun - https://amzn.to/2Sf7oad
- Stationary Knife - http://amzn.to/2q879jK
Amazon.in
- High rpm DC motor - http://amzn.to/2wdEyQS
- Geared DC motor - http://amzn.to/2BTHKUZ
- TP4056 Module - https://amzn.to/2R97Mu3
- Li-Ion Battery - https://amzn.to/2L5cljl
- Switch - http://amzn.to/2wu3K1P
- Plastic Gears - http://amzn.to/2DUgMxj
- Ball Bearing - http://amzn.to/2rE0Xo0
- Ice cream Stick - http://amzn.to/2vL5pmD
- Hot Glue Gun - http://amzn.to/2rjNE9r
- Stationary Knife - http://amzn.to/2q1kb6M
From Home & Local Store: Cardboard, wooden stick, tape, Toothpick, Rx & Tx Circuit board and connecting wires.
Note: The Rx & Tx circuit that i used was extracted from an old broken RC car. However, you can also refer to the tutorial to make a receiver and transmitter circuit easily at home.
Step 3: Prepare Base & Rear Axle


- Cut a cardboard piece of about 4" x 10".
- Refer to the image above and cut the base for the F1 car.
- Cut a wooden stick of about 4" and mark three points as shown in the image.
- Take a plastic gear and drill a hole equal to the diameter of the wooden stick.
- Fix the gear at the second marked point and seal it with super glue.
- Fix ball bearings at the other two marked points and secure them with super glue.
Note: You can use tape to increase the diameter of wooden stick for fixing the bearings.
Step 4: Make Steering Mechanism


- Cut few circles from a cardboard and paste them together over eachother like a stack.
- Drill a hole at the center and fix a toothpick in the hole.
- Paste the circular cardboard with toothpick at the nose of the car base as shown in the image.
- Insert another piece of cardboard over the toothpick and secure it with super glue such that it is free to rotate.
- Take a piece of thick steel wire (from wall calender) and bend it at an angle of 90° at a distance of about an inch.
- Cut a wooden stick and make a hole at the center using mini USB drill.
- Insert the thick wire through the hole and fix it using super glue.
- Cut few pieces of ice cream sticks as shown in the image and make holes at the 3/4th center point.
- Assemble the pieces together and attach it to the car base as shown in the image above.
Note: Make sure to watch the video to avoid any errors.
Step 5: Make Cardboard Wheels


- Draw three circles equal to the diameter of 1.5" on a piece of cardboard.
- Place the bearing at the center and mark the circle around it.
- On on of the circle draw few spokes.
- Cut all the circular pieces and paste them over eachother to make a thick wheel.
- Attach the bearing at the center of the wheel and secure it with super glue.
- Make two wheels with bearings and make two wheels without bearings.
- Attach the wheels to the F1 Car and secure with super glue.
Step 6: Make Electronic Steering


- Using pliers, bend both the thick wires as shown in the image.
- Take a geared DC motor and attach a circular cardboard to the motor shaft.
- Paste a piece of thick wire over the cardboard.
- Apply hot glue and sandwich the wire between the cardboard pieces.
- Attach the motor to the steering mechanism and test it to make sure it works well.
Note: It is not possible to explain everything properly in writing, so it is recommended to watch the video in order to avoid any doubt.
Step 7: Connect the Components


- Take a high rpm DC motor and attach a small plastic gear over the motor shaft.
- Place the DC motor over the car base and secure with hot glue such that the motor drives the rear axle of the car.
- Place the TP4056 at the back of the car.
- Place an ON/ Off switch adjacent to the charging module.
- Extract the receiver circuit from the old broken RC Car or make one yourself at home by referring to the tutorial mentioned in the earlier steps.
- Refer to the connection diagram above and connect all the components accordingly.
Step 8: Make Body Parts


- Make the Front fender from the cardboard and attach it to the car using super glue.
- Similarly, make the back fender and paste it to the car.
- Complete the car body using various cardboard pieces and secure them with super glue.
- Refer to the images above for visual clarity.
After pasting all the cardboard pieces, our remote control car is now ready. Connect a 5v mobile charger to completely charge the battery for the remote control car. Take the transmission remote and get ready to have fun with this amazing remote control F1 Car.
So Friends, this here concludes the instructable, stay tuned and follow my instructables profile for regular updates. In case you might have missed, watch the video and see how i made this wonderful Remote Control Car at home.
Make this amazing gadget yourself and contact us or share your experiences on our facebook page, twitter and Instagram. You can also SUBSCRIBE to our Youtube Channel GOODTECH - Creativity And Science, where i frequently post new and creative content.
I made many remote control toys on my channel, one of a very creative toy that i made is Remote Control Snake. Have a look at the instructable here or watch the video below.
Thanks For Your Support..!!

Third Prize in the
Remote Control Contest 2017


