

Introduction: How to Texture Foam


How to transform XPS foam into wooden boards, old mossy weatherworn stone bricks, and rough rock.
Supplies
- XPS foam
- A stiff wire brush
- Pliers
- A dull tipped pencil
- A rough rock
- Acrylic paints
Step 1: Wood: Grains


First, using a dull pencil or something like that, draw horizontal lines across the piece of foam that you're working with, pressing into the foam to make a teeny trench. Next do the same vertically, staggering it so it looks like long, spaced out bricks as shown in the pictures above. Using the wire brush you can then scrape the wood grains horizontally along the foam. Press lightly at first, making thin, soft grains, then press harder for a few deeper grains. Finally using the dull pencil again make a few slightly curvy lines along the board. You can also add a few knots and swirls into it as well, all the while following the grain.
Step 2: Wood: Paint


To paint the wood first cover the entire thing in black acrylic paint. Make sure to get this coat into all the crevasses. You can water down the black paint to make this easier. When the base coat is completely dry, heavily drybrush over it in brown going against the grain. When the brown is dry, cover it in a light bone-white drybrush to really accent it and bring out the texture.
Step 3: From Foam to Wood!
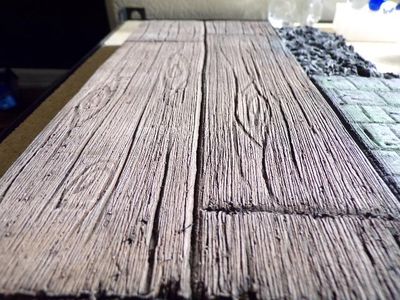

Done! This is a relatively easy way to make a beautiful rustic wood aesthetic. I have used this for enhancing bookshelves and it makes for a great bulletin board, as the foam is great for putting thumbtacks in!
Step 4: Rock: Carving

Making a rough rocky texture in foam is very simple. Using pliers, pinch out random sections of foam an voilà! You can make the rock very rough like lava rock, or relatively smooth. For rocks with more texture, pinch deep and grab out more. For a more subtle rock look, pinch shallowly and grab out less, keeping the extracted areas looking flat.
Step 5: Rock: Paint


Like with the wood texture, first coat the whole thing in black. When the base coat is completely dry, heavily drybrush on a coat of dark grey. When the grey is dry, lightly drybrush on a coat of lighter grey. Progressively get lighter in dry brushing until you get to a final dusting of almost white.
Step 6: From Foam to Rock!


The rock is finished! I used this technique to make a small rock that I could stick my tiny swords in for display. I have also used this with a sealed waterproof finish for the background of terrariums and vivariums.
Step 7: Bricks: Drawing the Details

Again using the dull tipped pencil, draw a grid, but make sure the vertical lines don't match up with the ones above and below. For the really old worn look find a rough stone and roll it on the foam, pressing on the edges and giving the foam the rock's texture.
Step 8: Bricks: Paint


Again, coat the bricks in a black base, getting into all the nooks and crannies. When the black is completely dry, heavily drybrush on a coat of dark grey. As with the rock texture, progressively brush on lighter greys until you come to a final dusting of almost white. You can leave this as is and it will look good, but for some extra pizazz you can add a light dusting of green paint around the edges of each brick.
Step 9: From Foam to Brick!

Done! I have used this technique for dioramas, and it works really well! I think it looks very nice, especially with the green mossy bits.
Step 10: Finished

I hope you learned something cool and enjoy using these techniques!

Runner Up in the
Sculpt & Carve Challenge


