

Introduction: How to Knit and Purl


These two stitches are the most important parts of knitting. The knit stitch is of obvious importance, given the naming choice. In stockinette stitch, the knit side looks like columns of interlocking vs, each v being one knit stitch. When you work with straight needles, you will need to turn your work at the end of each row. In order to keep the knit stitches on one side of your work, you will need to purl. This is nifty because a purl stitch is a knit stitch from the back of the fabric. Not to be confused with a tink stitch, which is simply what you do when you must knit backwards to a booboo.
Step 1: Cast on Your Stitches

I like to use a long-tail cast on. I have an instructable that can help you cast on 15 stitches for a cable swatch that I am making. By whatever means you choose, cast on 15 stitches.
Step 2: The Knit Stitch


This stitch comes before the purl stitch because it's used rather more. A fabic made with knit stitches on the front and back is called garter stitch.
However, if you are making the cable swatch that is to come, go on to the purl stitch first. The swatch features a border of three purl stitches on each edge with one purl stitch running down the center, between two cables.
To knit, hold the needle with the cast on stitches in your left hand, with the yarn leading behind your work and off to the right. You should feel comfortable holding the needles like bike handlebars.
Take the other needle in your right hand and insert it into the stitch at the end of the left needle from left to right.
Wrap the yarn around in a clockwise fashion. I like to wind the yarn end around my right middle finger once or twice to keep control of it.
Pulling the yarn end taut to keep the loop in place, pull the needle back out of the stitch on the left needle.
Slide that stitch of the left needle and gently tighten your first stitch.
Repeat for as many knit stitches your pattern requires. Repeat endlessly if you like, it's good practice.
Step 3: The Purl Stitch


The purl stitch is most commonly used to work the back of a piece in stockinette stitch when it must be turned at the end of each row. It is also used as a background behind cables to accentuate the twists of the columns of vs.
To work the purl stitch, first move the yarn to the front of your work. Then insert the right needle into the next stitch on the left needle from right to left.
Wrap the yarn around the right needle in a counter clockwise direction.
Slide the tip of the right needle back through the first loop, carrying the new loop with it.
Slide the old stitch off the left needle.
Complete as many purl stitches as your pattern requires.
Step 4: Continuing Onward


If you are knitting for the first time, I suggest casting on stitches and simply practicing the knit stitch until you get the hang of it. Knitting on both sides of your work produces garter stitch.
Once you are comfortable knitting, and you can avoid accidentally increasing or decreasing the number of stitches you have on your needles, try the stockinette stitch. With this stitch, you knit on the "right side" (or the outside of your finished piece) and purl the "wrong side" of your work. If you are confused about which side is knit and which side is purled, look for either a v or a horizontal bump on the row below where you are working. If you see a v, knit above it If you see a bump, purl above it. If you are confused, you can guess and compare what your stitch looks like to the row below. If they don't match, undo the stitch and try again.
When I learned to knit, I first cast on about 30 stitches, and then just started knitting. It started out really bad. I dropped stitches and made new ones in all sorts of places that I hadn't meant to. But by looking at your work and comparing it as you go, you can really figure out what's working and what isn't. If you have a horrible polygon of a swatch, don't get discouraged. Just keep going and eventually you will figure it out.
It may also be a good idea to practice the seed stitch, aka moss stitch, before trying out cables, as it will help you switch between purl and knit stitches in the same row. For an even number of cast on stitches, simply follow the pattern *K1 P1* for odd numbered rows and *P1 K1* for even numbered rows. For an odd number of stitches, you will repeat *K1 P1* but end each row with another K1. Repeat this pattern on all of your rows. You should be knitting into purl stitches and purling into knit stitches.
Watch out for the yarn end, as you will need to move it to the front of your work for each purl stitch, and move it to the back of your work for each knit stitch. If not, you will have lots of little holes from your inadvertent "yarn overs". With practice, you can use these accidents to make lace. Instructable to come.
Step 5: Practice Before Cabling: Seed Stitch


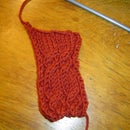
The seed stitch alternates knit and purl stitches to give a really nice, textured fabric that looks like little stars. The reason it's useful for learning to cable is that you will have to keep track of where the leading yarn is coming from. You must pull the yarn in front to purl, and put it in back to knit, so you'll get a lot of practice moving it after every stitch.
For an even number of cast on stitches, simply follow the pattern *K1 P1* for odd numbered rows and *P1 K1* for even numbered rows. For an odd number of stitches, you will repeat *K1 P1* but end each row with another K1. Repeat this pattern on all of your rows. You should be knitting into purl stitches and purling into knit stitches.
Watch out for the yarn end, as you will need to move it to the front of your work for each purl stitch, and move it to the back of your work for each knit stitch. If not, you will have lots of little holes from your inadvertent yarn overs. With practice, you can use these accidents to make lace. Instructable to come.
Participated in the
Craft Skills Contest


