

Introduction: How to Make Moss Graffiti (%100 Working Method)


First time I saw the picture of a moss graffiti wall art I thought that it was quite unique and it would be nice if I tried to do it by myself. Then I started my research on the internet, hoping to find a working method to establish moss art in my neighborhood.
The recipes using blended moss mixtures like this one yielded disastrous results upon my initial tries and I had no success. I've also seen others who tried this kind of methods and didn't succeed (mostly on youtube) like me. Than I've realized that this recipes weren't logical at all. Why should someone need beer, sugar or yogurt to grow mosses on walls? They were all useless materials that had no scientific effect on moss growth biologically.
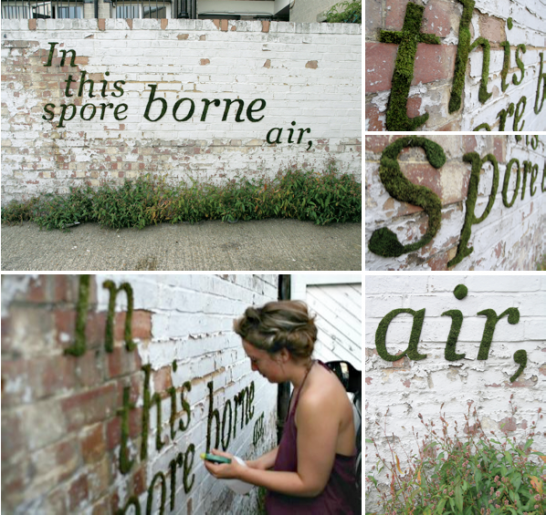
So I've decided to create my own method in my quest against misinformation on moss graffiti online. I've found out that professional moss graffiti artists who made artworks like this use sheets of moss, and not the aforementioned blended moss mixtures. In this instructable I tried to imitate their methods.
Step 1: Materials

- Liquid fertilizer (optional) & Water
Moss is a plant, not an animal, so it won't need any carbohydrates like sugar in the traditional recipes seen online. It needs plant food. Beer is also useless for moss growth, as it has no nutritional effect on plants. It contains alcohol so its probably harmful to the moss too.
- Water retaining agent
Agar-Agar and gelatin are very great at storing water inside them unlike buttermilk given in other recipes. Also they will make the soil more formable, so that it will be more easy to apply on the walls. I was out of gelatin and made it with starch for easier application. These materials are biodegradable so this makes the life of your art limited. Water retaining gels can be used as a better long-term substitute.
- Cotton
- Non water soluble glue (like epoxy)
- Soil
- Pencil or chalk to sketch
Step 2: Finding Moss


Unless you are living in a very hot and dry area, you can find moss almost anywhere around you. Mosses can be found on rocks, trees and soil if the humidity is optimal.
In temperate regions autumn, winter, and spring are the best seasons to do moss wall art. Don't do moss graffiti during the dry and hot season, as it can be pretty hard to find healthy moss and even harder to make it live on a wall.
I live in İstanbul, which has a humid subtropical and oceanic climate according to Köppen classification, so it is not that hard to find moss here. You should look for local moss species that grow near your area so they can survive alone in the future.
Step 3: Sketching

If you are new to moss graffiti and also not a very talented artist like me, small and not complex shape like ying yang, moon, recycling symbol or something similar would be a great initial design for your wall art. It doesn't have to be perfect.
Step 4: Gluing the Cotton


Cotton can absorb and retain water quite good so the base of the artwork must be cotton or something similar to it. In this step just find a wood piece to apply the glue and put the glue on the surface of the wall. After doing that immediately glue the cotton on the wall. It won't wash away during rainy periods, as the glue used is not water soluble.
Step 5: Making the Soil


I've used normal potting soil and added water with very little fertilizer (optional) later. Then I added starch slowly, so that the mixture had become thicker and thicker. At the end it had become very "paste" like. Agar or water retaining gels should be used for the best result because they can absorb huge amounts of water compared to alternatives. Then I took the paste and gently covered the cotton layer. I haven't stopped applying it until the new layer had become c. 0.5 cm thick.
Step 6: Shaping and Applying the Moss


In this step collected moss must be trimmed and cut down into the desired shape of artwork. It doesn't have to be perfect and you can always cut them into smaller pieces and put them on the soil as 3 or 4 different pieces. From my experience this method is much easier compared to putting 1 whole piece.
I think blended moss recipes or dried moss can work, as dusk moss mix is a thing used by terrarium hobbyists. BUT I've tried it and didn't succeed. Also terrariums are very different compared to open air. That's why I believe this "cut and paste" method is a lot of easier than others as moss is one piece and doesn't need to regrow itself. Also this recipe works under minimum care.
Step 7: Finished

Don't forget to spray water on it once a day. For the initial weeks the moss graffiti will need special care to survive. After that time they can live without your special care during humid and rainy seasons. Also don't forget to shape and trim it once a month to conserve the design, since they can grow really fast. If you have made any kind of moss graffiti with this method (or the blending method, I've never seen a really successful one) post the picture of it!


