

Introduction: Knex Cross Bow


This is a knex croosbow i built about 1 year back, its not as good as the others on this site but try and give it a go.
Pro's
Actual Trigger.
Sturdy Handle.
Strong bow (to a good content).
Con's
To actually load you have to press the trigger.
The body tends to wobble.
The piece count is rather long so i took pictures for the beginning of most steps.
Go forth and build a croosbow!
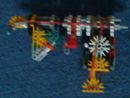
Step 1: The Front


This is the front of the Cross Bow.
Pic 1: Piece count.
Pic 2: Make
Pic 3: Add
Pic 4: Add
Pic 5: Add
Pic 6: Finished Product
Step 2: The Under Side


This part of the Cross bow is the part you should hold when firing the weapon.
Pic 1: Piece Count.
Pic 2: Make.
Pic 3: Add.
Pic 4: Add.
Pic 5: Add bits at the end. Finished product.
Step 3: The Handle


This is the grip at the back of the bow.
Pic 1: Piece count
Pic 2: Make
Pic 3: Stick together
Pic 4: Finished Product
Step 4: Firing Mechanism


This is the part that will fire your arrow/projectile.
Pic 1: Piece count
Pic 2: Make and the finished product.
Step 5: Trigger


Simple trigger design, but often breaks if pulled to hard. This fires the weapon. (Sorry forgot to make a piece count)
Pic 1: Make
Pic 2: Add Parts
Pic 3: Add more parts
Pic 4: Even more parts.
Pic 5: Rubber band 1
Step 6: Bow Supports


These parts support the bow so it doesnt snap easily.
Pic 1: Piece count
Pic 2: Make
Pic 3: Add
Pic 4: Attach Together
Pic 5: Other angle/Finished product
Pic 6: Finished product
Step 7: The Bows


These parts bend when the rubber band is stretched to create tension. It also allows the Cross bow to fire.
Pic 1: Piece count
Pic 2: Make
Pic 3: Add Rubber band
Pic 4: Add/Finished product
Step 8: Putting It All Together


Now is the time to put all the parts together. Once you have done this you will be done.
Pic 1: Add the Bow supports to the front
Pic 2: Add the Bows to the supports
Pic 3: Add the Firing mech and the under side to the end of the Front
Pic 4: Add the handle to the firing mech and the Under side.
Pic 5: Add the trigger to the handle
Pic 6: Other angle
Pic 7: Finished Product
Step 9: Rubber Bands


These are the rubber band positions on the weapon if you get them wrong the Cross bow could break.
Pic 1: Rubber band from bows to firing mech.
Pic 2 and 3: Rubber band on the trigger.
Step 10: Loading and Firing


To Load and fire the Cross bow you have to go through some simple steps
1. Make a bullet.
2. Pull back the red triangle with the band on it.
3. Put the bullet through the hole on the firing mech
4. Press the trigger


