

Introduction: LED Computer Case Lighting


I wanted to make my computer case light up, but after reading some bad reviews on cold cathode lights I decided to make my own LED lights instead.
These lights only cost me about $15 to make. I had most of the materials on hand though. The only thing I bought was the LEDs and the drivers.
Custom LED bars for a computer case.
6 Watts of Blue LEDs
300 Lumens
Step 1: Parts & Tools


Parts:
6x 1W LEDs
2x 3x1W LED Drivers
28" of 3/4" x 1/16" 90 Degree Angle Aluminum (could use 1/2" x 1/16")
Molex Connector
Wire Scraps (about 4 ft.)
4x Pop Rivets
Super Glue
1/8" Expandable Sleeving (optional)
Heat Shrink (optional)
Tools:
Soldering Iron
Drill
Hot Glue Gun
Wire Cutters
Needle Nose Pliers
Pop Rivet Tool
Step 2: Testing the LEDs


The cheap LEDs I ordered didn't have the polarity marked, so I tested the LEDs with a coin cell battery. It's connected to the test leads with magnets. Then I marked the cathode with a marker.
Don't run the LEDs at full power without a heat sink, they will burn themselves up.
Step 3: Straiten the LED Leads

These LEDs are made to be surface mounted, so the leads are bent down.
The leads need to be straitened and bent slightly upwards so that the wires can be soldered to them without touching the aluminum heatsink.
I used needle nose pliers to carefully bend the leads.
Step 4: Mount the LEDs

Cut the aluminum into two 12" pieces, the rest of the aluminum will be used to make the mounting brackets.
Mark the center and 2" from both ends.
Mount the LEDs with a small amount of super glue. Don't use the super glue gel, it's too thick.
Thermal epoxy would work too, but it's expensive.
Make sure the leads all go the same direction.
Step 5: Solder the LEDs Together


Solder 3 LEDs in series. Then attach about 6" of wire to one end and 18" to the other.
Drill holes just past the LEDs on the ends to pass the wires through.
Secure the connections with hot glue, or silicone to prevent them from breaking.
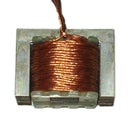
Step 6: Prepare the LED Drivers


Solder wires to the inputs on both drivers.
These drivers work with AC or DC so there is no polarity on the inputs.
The power cable was made from a case fan power adapter.
I removed the extra connector to save space because I have plenty of molex connectors on my power supply.
Only the 12V wire and one ground wire are needed (Yellow & Black).
I put the drivers in a small plastic case and drilled two holes for the wires.
The white wires are LED ground and the pink wires are LED positive. They are all connected to the 4 conductor wire.
I connected a 2 pin header connector in the line. It goes to a switch in my case.
I slipped the last of my expandable sleeving, which I had left over from building the computer, over the power wires and put some heat shrink over the connection in the middle.
Step 7: Check for Smoke (Testing the Lights)


I tested the lights out by connecting them to my ATX Bench Power Supply .
The LEDs are blindingly bright. They light up the entire room.
These LEDs don't have a greenish tint to them it's just my camera.
Warning: Don't Look Into The LEDs
Step 8: Prepare for Mounting


Measure out the spacing between the mounting holes on your case. Mine was about 8 7/8" apart.
If your case doesn't have any suitable mounting holes, you may have to get a bit creative with some zip ties.
The mounting brackets are made with the rest of the aluminum. There are four 1" pieces.
They have holes drilled on both sides, and are pop riveted to the LED bars.
Step 9: Mounting


The LED bars are bolted to the water cooling mounts in my Coolermaster HAF X case.
The LEDs are connected to the switch on the front panel that normally controls the front fan LED. I inserted a bent header pin into the fan LED connector so that it still lights up.
The LED drivers are mounted to the back side of the case with double back tape.
Be sure that the LED bars are attached securely, it would be bad if they fell into other components in the case.
Warning : Always wear an anti static strap when working inside your computer.
Step 10: Finished


Now that the LEDs are installed, power them up and the case will be filled with bright blue light.
The LEDs run cool even after several hours, all six LEDs could be mounted on a single 12" piece of aluminum.
They light the inside of the case very well. They also light the area around the computer, however it's not too bright.


Participated in the
LED Contest


