

Introduction: Lego GLaDOS Figure (to Scale)


This will not be a how-to. I have enough common sense to not take her apart piece by piece again, I've tried =]
I will, however, be showing her body parts individually, showing how the bricks and plates are stacked.
From what I could tell, not enough people build their gladoses (gladosi?) with simplicity in mind, and they end up looking like nothing more than a mess of wires. Mine is a bunch of small ball joints (not the massive Bionicle ones everyone seems to use) layered with a series of bricks and plates to look like wires and electronic components. The only "specialized" pieces are used in the head and to connect her to the ceiling.
I did the math; each stud is about 1 foot, so each minifig is 5 ft tall, meaning GLaDOS is 26 ft long from back shell to eye,
This project fully assembled was, needless to say, FAR too large to reasonably fit on the graph paper.
The first image gives scale to a minifig if clicked on.
Also, unless requested, this will be my last Portal project for Instructables.
Supplies
Whatever you deem necessary, really.
I will also take the time to say that this is as perfectly to-scale as she will get (especially with her most recent update); she is vastly upscaled in Dimensions, she's not really that big.
This video covers it fairly well. My math was based on this video, and yes, I did doube-tripple-check the math. https://www.youtube.com/watch?v=rduFWRUgHe4
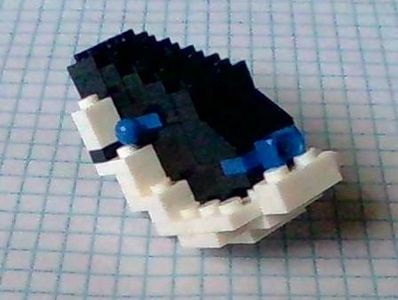
Step 1: Head and Neck


This is a fairly simple design, using a jumper and a yellow stud for the eye, and a black grill piece for the top of the neck, and to make sure parts of the head are flush with each other.
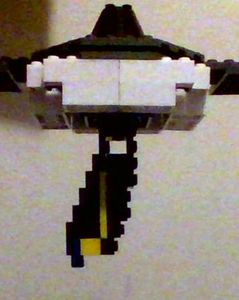
Step 2: "chest" Section and Cable "arms"


The cables are straightforward. The chest section is layered so that it appears round. The slanted piece over the ball socket is to ensure maximum mobility.
Step 3: Back Section


This is one of only two pieces that should by asymmetrical; there should only be a wire attachment (ball socket) on one side. The long side connects to the chest, and has a matching slope. The short cable connects to this segment.
Step 4: Wires and Rotational Mechanism


The control mechanism is simply a knob with an axle, and the wires have a single cable port and a connector for GLaDOS's body to hang from. The video below shows what she looks like "in action" rotating from the ceiling.
Feel free to modify this design (if you build it) any way you like, for instance adding a motor onto the rotator piece. Design partially inspired by Dragonator's robotic glados lamp, check his out if you haven't seen that yet.
https://www.instructables.com/A-fully-3D-printable-GlaDOS-Robotic-ceiling-arm-la/


