

Introduction: Make an ARDUINO on Your Own...!!!


ARDUINO platform is today's most popular platform in the world used for embedded projects.
Programming an Arduino is very simple than any other system.
Just plug it to your PC and get started...!!!
But as the standalone projects based on Arduino increases, more number of Arduinos are required for getting over a new project. And this becomes very costly solution to keep on buying more and more Arduinos.
So, as an alternative, you can also construct a custom Arduino on your own for cheap at your home. Also, you get a chance of adding own own extensions and attachments.....
This instructable tells you about the steps of making an Arduino for cheap on a perforated board.
And if you have good PCB making skills, you can also make it out on a printed board of your choice....
Happy Making ....!!!
Step 1: Getting Your Required Components


The required components for making an Arduino for yourself are given below :-
1) Atmega 8 / Atmega 168 / Atmega 328 (any of your choice, most people prefer buying Atmega 328, as you also get it with the Arduino Boot-loader pre-loaded in it.)(Here, in this Instructable, I have used Atmega8 for boot-loading)
2) Crystal Oscillator (16 MHz) x 1
3) Capacitors - { Electrolytic capacitors - (1000 uF , 100 uF) x 1
{ Ceramic capacitors - (22 pf x 2),(0.1 uf x 4)
4) Resistors - (10k,1k,330ohms) x 1
5) Perforated Board (Zero PCB) x 1
6) LM7805 x 1
7) ISP male header(10-pin or according to your ISP Programmer) x 1
8) Female headers (get some extra)
9) 28 - pin IC holder x 1
10) LED x 2 (Any color of your choice)
11) Small push button x 1
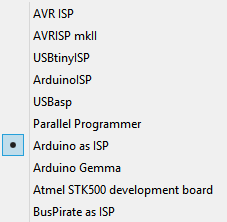
12) An old Arduino or an ISP programmer ( necessary !!! )
- For ISP Programmer refer to the supported programmers by the Arduino IDE. ( Refer the images above)
13) USB to Serial Converter module (used after burning the Boot-loader)( CP2102 based) ( Or else the one with 'DTR' output works well ) ( you can also use your Com port of PC using MAX232.)
14) Wires for connections
15) Soldering iron and solder
Step 2: Let's Start It...!!!


Before making the circuit, let me tell you that, you are building a custom Arduino.
In which you can add different custom circuits of your choice.
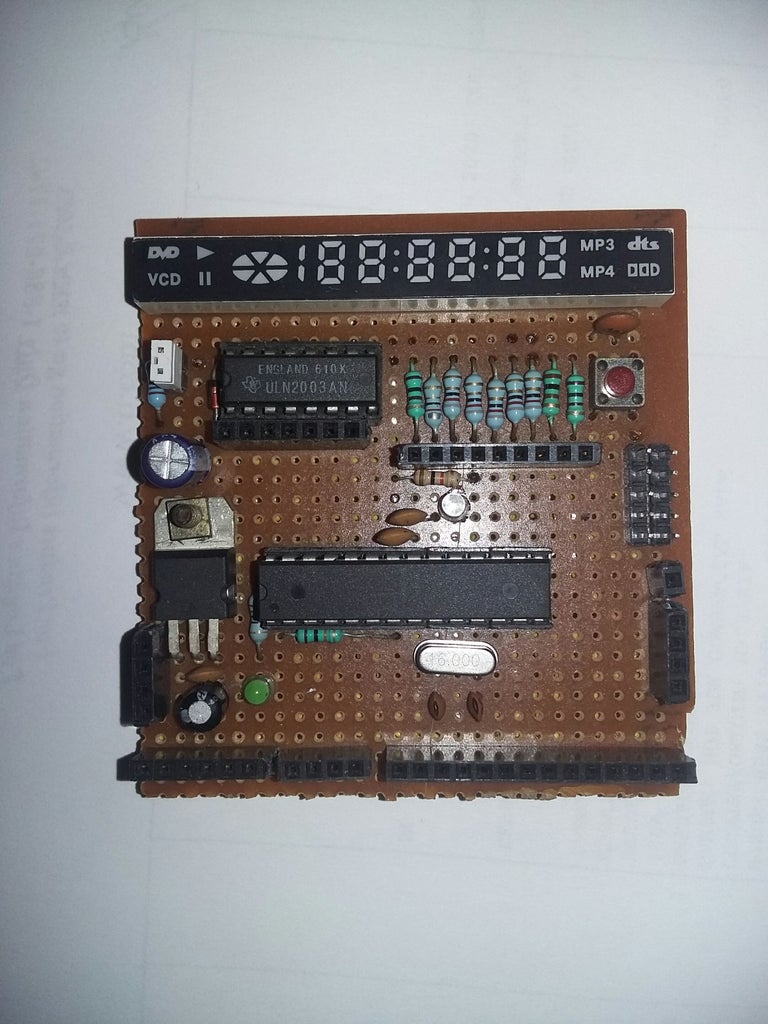
For example - In my Arduino, I preferred attaching it a on-board multi-7-segment display that I scavenged out of an old DVD, for displaying digits/ numbers for any application as per my requirement. It becomes very handy when you have such attachments.
No need of attaching seven segment displays externally.
Try out for yourself...!!!
Make sure, that you have all the required components for making the custom Arduino.
1) Get your perforated board / PCB. Cut it according to the size you require. Cut it carefully...!!!
2) Solder the 28-pin IC holder to the center of the perforated board.
3) Refer the circuit given above and start soldering all the remaining components on the perforated board.
Solder them one by one with the help of connecting wires. Adjust all the components properly on the perforated board, for giving it a nice look...
4) Don't fix the Atmega 8 / 168 / 328 in the board while soldering...!!! or else it may get damaged.
5) Don't forget to connect up the connections to the ISP header. It's required for starting it up....for the first time....
6)Check the soldered connections on the board properly using a Multi-meter or a Continuity Tester. Remove the shorts in the circuit, if any.
7) Refer to the next step after you complete the soldering and Board testing work.
Step 3: Burning the Bootloader...!!!


Well, you will feel good after knowing that you have completed 80% of your custom Arduino.
If you purchased Atmega 328 with boot-loader pre-loaded, then move onto the next step.
This step is for those Atmega without any Boot-loader .......................
I have one more secret to tell you, and that is -
"If you have knowledge about using AVR Atmega Micro-controllers, then you can also use this board also as a mini-development board. Search over the Internet about it to know more."
***Before moving on, make sure that you have -
1) An old Arduino or an ISP programmer ( USBasp or similar) for burning the boot-loader to the Atmega.
2) USB to serial converter module for serial communication with the PC.
These two are the most important ones for getting your Arduino board ready.
1) Now connect the Atmega8/168/328 to the custom Arduino board.
2) Connect the Arduino or the ISP Programmer(USBasp) to your PC.
3) If you prefer to use Arduino as ISP refer below to instruction number 5 & If you prefer to use ISP for burning the boot-loader refer to instruction number 4.
4) For USBasp or similar ISP programmer -
A) Connect the ISP Programmer to your custom Arduino board.
B) Connect the board to a power supply or connect the power supply ( VTG ) Jumper on your ISP programmer.
C) Open Arduino IDE and select the Board as follows :-
- If you use Atmega 8 / Atmega 168 then select the Board as 'Arduino NG or Older' with Atmega 8 / Atmega 168.
- If you use Atmega328 then select the Board as 'Arduino UNO'.
D) Select the Programmer as per as your ISP programmer, and Click on 'Burn Boot-loader'
E) Wait for some time, you will be notified after uploading the boot-loader successfully.
5) For Arduino as ISP programmer -
***Don't connect the Arduino to the custom Board first....!!!
A) Open Arduino IDE and from Examples select the 'Arduino ISP ' sketch and open it.
B) Compile it and upload to the Main Arduino board which we are using as ISP.
C) Now refer the above images for the connections of the Arduino with the Custom Arduino Board.
D) Connect the board to a power supply or power it using the 5V out pin of the Main Arduino connected to your PC.
E) Open Arduino IDE and select the Board as follows :-
- If you use Atmega 8 / Atmega 168 then select the Board as 'Arduino NG or Older' with Atmega 8 / Atmega 168.
- If you use Atmega328 then select the Board as 'Arduino UNO'.
D) Select the Programmer as 'Arduino as ISP', and Click on 'Burn Boot-loader'
E) Wait for some time, you will be notified after uploading the boot-loader successfully.
Check the above video for more info. about selecting board and programmer or else you can check out it here -
*** If you get any error while burning the boot-loader into the Atmega, then re-check your circuit connections and try burning it again with Arduino IDE 1.0.1
You have almost done it...!!! Congratulations....!!!
Step 4: Let's Test It....!!!
It's time to test your custom Arduino Board for the first time.
Get your USB to Serial Converter module.
1) Connect the module to PC and Connect the following pins of the converter to the custom Arduino pins as follows :-
Of the Converter | Of the Board
A) RX --------------------------- TX
B) TX --------------------------- RX
C) GND ----------------------- GND
D) DTR ------------------------ DTR
2) Select the Board that you selected while burning the Bootloader to the Board.
3) Select the appropriate Com Port, and select 'AVR MKII' from the programmer list.
4) Open the Blink code from Examples and Upload it to the Board.
5) And if you get a green flag after doing this...........then you are completely done...!!!
Good work....!!!
Thanks for checking it out....

Participated in the
Arduino All The Things! Contest


![Tim's Mechanical Spider Leg [LU9685-20CU]](https://content.instructables.com/FFB/5R4I/LVKZ6G6R/FFB5R4ILVKZ6G6R.png?auto=webp&crop=1.2%3A1&frame=1&width=306)


