

Introduction: Make a Hybrid Instrument Case


There are hard-shell instrument cases. And there are instrument bags. Lately, though, a lot of manufacturers have been putting their musical instruments (and other gear) into padded cloth-sided cases that have some internal structure and rigidity. They achieve this through formed plastic and expanding foam. But it turns out you can achieve a similar effect with more DIY materials.
I'm going to show one approach. I'm also going to show some of the ways you can -- and in fact I did -- go wrong.
The key idea here is the same one leveraged by the mass manufacturers. And that is distributive load. The same principle demonstrated when MIT students build scale suspension bridges out of uncooked spaghetti. No single element is particularly strong by itself, but the way the thing is constructed the stresses are spread out over enough area to make it work.
And it does work. With all the mistakes I made in my first one, I am still completely comfortable zipping my bass up in it and throwing it over my shoulder or in the back seat of my car to transport it.
Step 1: Design the Case

First, draft the case.
My example project here is for a Kala U-bass. And here's the first lesson learned; keep it simple. You don't need to match all the curves of the instrument. You are just making more work for yourself. A lot more work. Every curve and, especially, every change in the thickness of the outside wall adds more complexity to every following step.
As part of your planning, think about where the hinge and the zipper will run. You need a straight edge for a hinge. You also want the least zipper you can get away with; remember, you will be running that zipper each and every time you pull out the instrument to practice or play.
Step 2: Cut the Foam


I had pink expanded foam and particle board available for my build. It cut easily and glued up strongly enough with Spray-77. My strong suggestion, however, would be to use EVA foam; available at craft stores like Michael's and Joann Fabrics, and also in the form of interlocking floor mats at many hardware and home supply stores, the stuff is stronger and dense enough that you don't need any additional material to give the necessary stiffness to your bag. That's what I'll use in my next build.
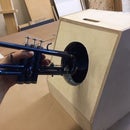
In any case, it is pretty straight-forward; transfer your pattern, cut layers, layer them up. Notice in the examples how there are several different depths happening. That is because the headstock bends back well below the plane of the back of the base. Therefore the lowest part of the case is under the headstock.
The other trick here is the bass is supported just below the nut; the rounded piece of foam you see there presses against the fretboard at the top of the neck and pushes it into a cradle shaped to exactly fit the neck. This takes all the stress off the headstock and those exposed tuners.
Step 3: Line the Interior


Find a plush fabric, like a velvet or a short-hair fur. This is what is going to be against your instrument when it is in the case and you don't want anything that will scratch it.
This is just like lining a box; the big difference is it isn't a rectangular space; you can't use typical parcel-wrapping technique. You need to separate into horizontal planes and the curved sides separating those planes.
First, cover all the flat surfaces. Cut oversize, spray or spread adhesive (I used Spray-77 once again) then snip the edges to grade them over the edges.
Next, cut long narrow strips and stick those along the vertical surfaces. These strips hide where you snipped and folded over the other fabric to make a completely covered surface.
On my version, I hemmed the side pieces then stuck them in with fabric glue. But, actually, wrapping them around strips of cardboard or plastic gives a vastly superior finish (something I realized too late). You don't even have to stitch them; just glue to the cardboard strips then glue those to the sides. I cut up the backs of pads of legal-sized paper in the few places I remembered to do this. Manilla folders would also work.
Two more lessons learned; make sure to allow for the thickness of the lining when cutting out the space for the instrument in the first place. And don't use a patterned fabric if you don't have the patience to match patterns (in my defense, there wasn't any solid color I liked at my local store.
Step 4: Stitch the Outer Cover


The first step in making the outer cover is making the sides. Measure the height and the distance to the split (if your foam pieces are of equal thickness this step is simpler and, as additional bonus, the case will lay flat when opened).
This is the step I erred in most grievously. I did the sides as separate strips then tried to marry them later. That alone was bad enough, but I also neglected backing the zipper with an inner layer. This meant it fouled up on the inner lining and, worse, the glue I used to secure the sides got all over the zipper and I was forced to tear it out and replace it.
Instead, borrow a technique from proper zipper setting; baste your inner pieces together, press flat the seam, then stitch that flat. Place the zipper over this, centered on the seam. The outer cover then goes over the zipper tape, hemmed back well short of the zipper, and is top-stitched down.
The next steps are done with the bad side out. Fortunately the case is mirror-symmetrical; you can reverse the top and bottom or merely flip it over.
Wrap the completed side around the entire case and hold in place by driving pins through it, making sure the zipper is again centered on the seam. A simple lap joint is sufficient where the edges meet, because there is an additional thickness of material used to reinforce the hinge; this goes over the ends of the zipper and extends along the entire straight edge.
Now pin the top and bottom fabric in. I chose for simplicity to add the hinge piece after assembling the rest of the shell. This could be done more neatly by stitching "in the ditch" (aka running stitches into the seam) but it works well enough with a top stitch close to the hemmed edge. It would be even neater to assemble the cover with the hinge inside, closest to the case, and stitch it all in one go. In any case, stitch both at the outer edge and close to the inside edge, leaving just enough space in the center seam to make a smoothly opening hinge.
Step 5: Add Accesories


Your bag really needs handles. Straps are also nice. I chose to do a single fixed strap and a single carrying handle on mine, and no external pockets. For the latter, patch pockets are quite sufficient.
For the former, there are essentially two styles of handle. The most common is a pair of strap handles each attached to the faces of the bag, which when brought together across the zippered side both create a carrying handle and help reinforce the zipper.
The other is a single handle. For my case, it was deep enough that I could set a handle into the side. I found the balance point by picking up the whole thing between two fingers. The handle itself is a strap folded and stitched with a sleeve of black pleather stitched into a tube and turned inside-out to cover it, and additional decorative patches of pleather hiding where the strap is stitched to the side of the case.
To reinforce the connection here and on the back strap I used split bolts, set in under the lining with both washers and cardboard inserts to spread the load over as much of the foam as possible. Neither stitching nor bolt takes all of the load, instead they work together to transfer the forces of being carried to the case as a whole. What keeps the foam from tearing is that it is contained in a tough cloth bag. And what keeps the whole case from deforming is that it is tucked around a musical instrument.
Step 6: Glue In


When the outer shell is completed, glue it around the case. Again, the outer shell hides where the inner lining was snipped and folded over the corners of the foam. The edge only needs enough support to keep from flopping open in an unsightly way when the case is open; when closed, the zipper holds it snugly around the contents.
I chose to use more Spray-77 to tack the top and bottom faces, then hot glue to stick the sides down properly. As I mentioned before, I'd neglected to properly protect the zipper. Rather than take the whole cover apart I glued a layer of cardboard down, glued the new zipper to that, then used fabric glue to tack the original hemmed edges of the cover to the zipper. It isn't as pretty as I wanted but it is secure enough.
On some commercially made bags, since expanding foam is placed in a vacuum-formed shell the outer cover can be secured by small wood screws driven into the plastic shell. There are probably options related to this that are worth exploring. In any case, I recommend adding a thin layer of some smooth material like thin plastic to even out the edge of the interior foam construction and provide a more consistent gluing surface and a better finished look.
And that's it.
Step 7: Second Try


This is my "lessons learned" bag.
I cut the foam in simpler patterns, and designed the foam shell so it would hinge into equal halves thus lying flat on the table when opened.
The lowest part of the lining was glued on before I glued the bottom piece to the rest of the foam. That saved on cutting and darting and most of all from having to mask off the lining when gluing on the other layers.
The side lining was stitched over brown butcher paper to give it structure, then hot glued in to hide where the top layer of lining is folded down over the corner. The mistake I made again, though, was not allowing enough in the original foam cut for the thickness of the lining. It is a tight fit, but it still works.
The side of the bag was stitched as one continual piece; down the middle and pressed, then zipper, then two more pieces hemmed back to expose the width of the zipper. That was wrapped around and secured into a band that I then pinned into the front and back of the shell. The very last step was to rip open the center seam.
There was minimum glue; I just pulled the edge back and threw hot glue in there. It would make the hinge much stronger to bury bolts in there, underneath the side lining, but it is holding up okay without.
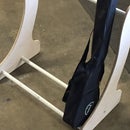
This was also a much simpler strap arrangement, and I didn't even bother with a back strap on this one. The handles are a loop of webbing simply stitched to the shell fabric before it was glued around the foam, folded over on itself at the top to make handle shapes.
This is actually cordura nylon, but I don't like working with it; even at maximum heat I couldn't press the hems before stitching them, making that part a lot more onerous. I also thought the cute corners would be easier to clip in than curves but the actuality proved me wrong.


