

Introduction: Make a Ticklish Robot


I'm a huge fan of combining simple DIY electronics with common household materials to make fun STEM projects. Lately, I've been playing around with paper robots as a way to make robotics more accessible to kids (and grown ups too!). The Ticklebot was my first prototype.
That said -- there’s no one right way to make a Ticklebot! Here is how I made mine, but feel free to get creative.
(Note that the instructions assume some very basic knowledge of using development boards like the micro:bit and how to connect components, but drop a comment if you've got any questions!)
Supplies
Development board
I used the micro:bit v2, but the Circuit Playground Express is also a great option. If you use the micro:bit v1, make sure to check the note at the end of the guide about resistive vs. capacitive touch.
Micro Servos
You'll need two (plus the included servo horns). Make sure they're the regular kind and not continuous rotation servos. You can get these on almost any DIY/hobbyist electronics websites.
Grove Servos (if you're using the Grove Bitmaker)
A way to attach the servos:
I used the Grove Bitmaker Lite, but it was a bit tricky since I had to use the logo for the touch sensor. I would suggest looking at a different option that has more pins accessible. There’s tons of expansion boards I haven’t tried that should work (I've listed a handful below). You can also attach the servos using a breadboard or directly with alligator clips.
Grove Bitmaker (you’ll need to use their compatible servos)
Kitronik Compact All-In-One Robotics Board
Aluminum Foil (Tin Foil)
This will be used to make the foot ticklish (in other words, for the touch sensing).
A way to attach to the touch sensor:
I used an alligator clip, but conductive tape, like this or this would probably work as well, I just didn’t have any on hand to try.
Cardstock or Construction Paper
You can also use regular paper, but it'll be a bit flimsy.
Glue
Scissors
Step 1: Template
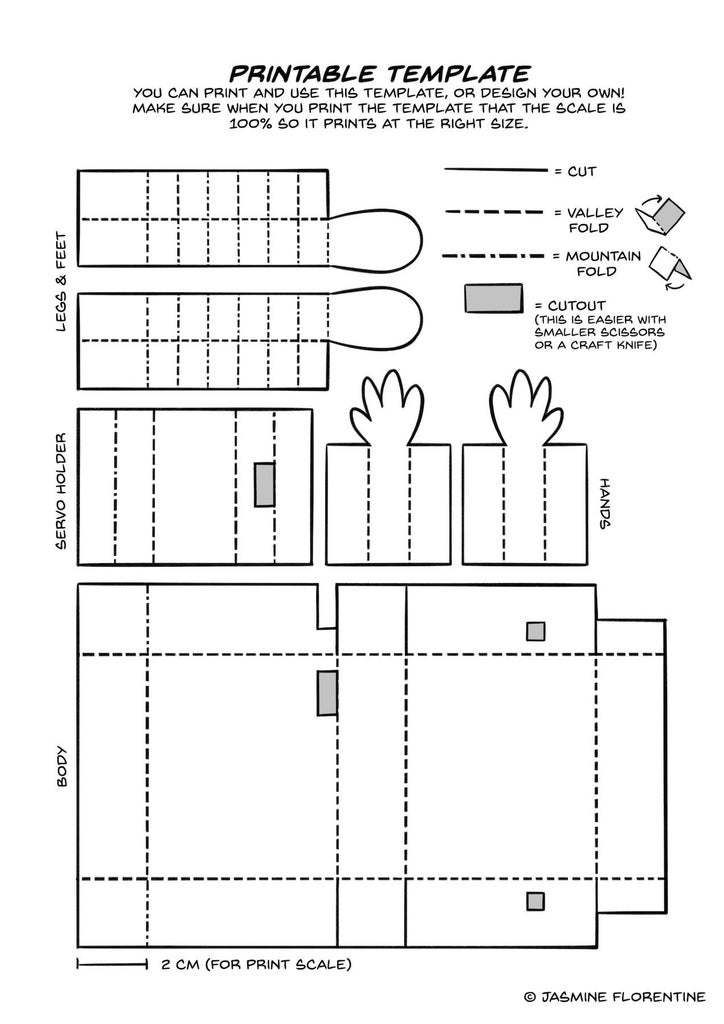
You can print and use my template, or design your own! If you do use mine, make sure when you print it that the scale is at 100% so it prints at the right size.

Step 2: Making the Body, Part 1
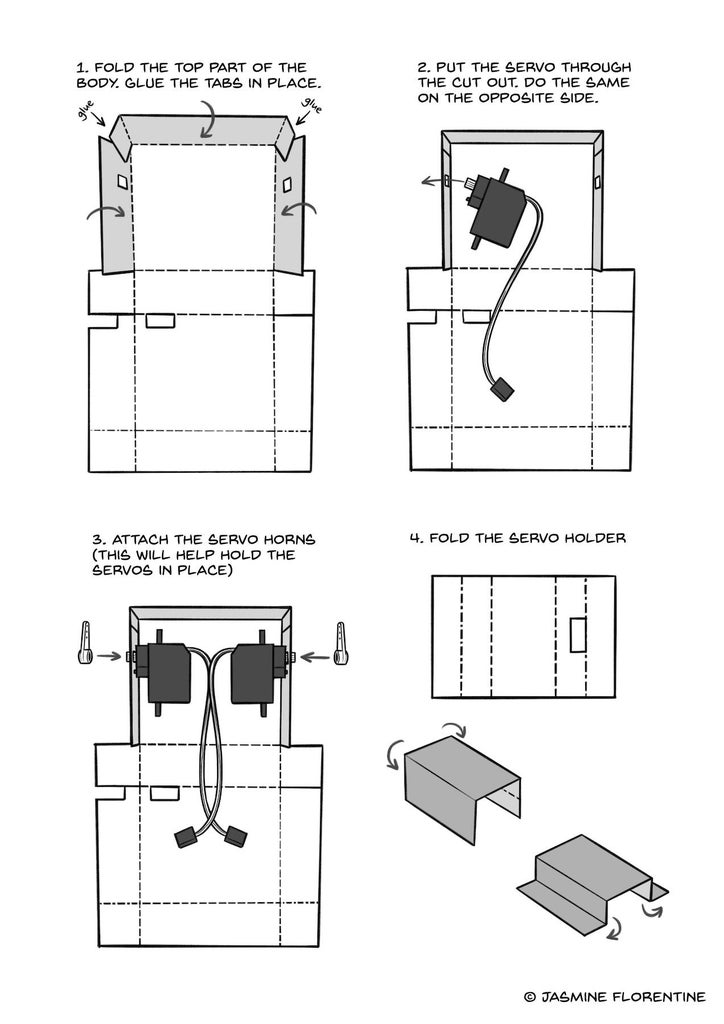
1. Fold the top part of the body. Glue the tabs in place.
2. Put the servo through the cutout. Do the same on the opposite side.
3. Attach the servo horns (this will help hold the servos in place).
4. Fold the servo holder.
Step 3: Making the Body, Part 2

5. Thread the servo cables through the cutouts in the servo holder and in the body.
6. Glue the servo holder on so it holds the two servos in position. (You only need to put glue where the servo holder tabs attach to the robot body, not on the servos themselves).
7. Fold the bottom as shown.
8. Assemble and glue the middle tabs as shown. Fold the back in to close the body.
Step 4: Making the Legs
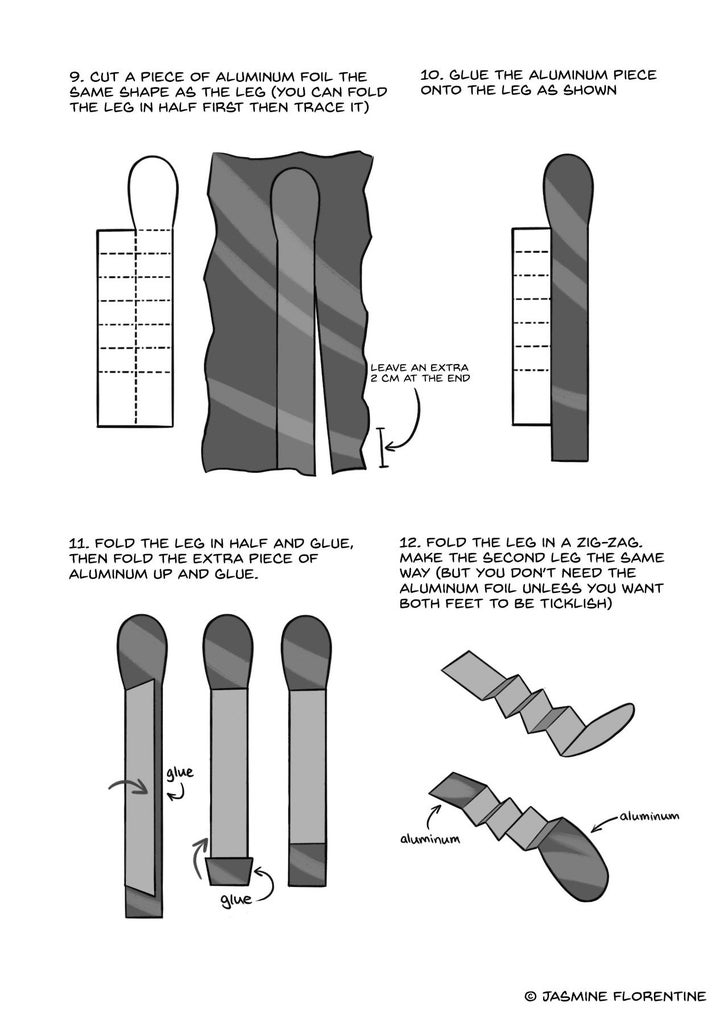
9. Cut a piece of aluminum foil the same shape as the leg (you can fold the leg in half first and trace it).
10. Glue the aluminum piece onto the leg as shown.
11. Fold the leg in half and glue, then fold up the extra piece of aluminum and glue.
12. Fold the leg in a zig-zag. Make the second leg the same way (but you don't need the aluminum foil unless you want both legs to be ticklish).
Step 5: Making the Arms

13. Fold the arms. Only glue the top flap down. This will leave a pocket in the middle.
14. Glue the legs on. Make sure that the side with the aluminum foil is on the outside.
15. Slide the arms onto the servo horns. You can also put a drop of glue if the arms don't stay in place.
Step 6: Code & Connections, Part 1

16. Attach the alligator clip to the cutout in the back, making sure it's touching the aluminum foil. Conductive tape would also work here!
If you want both feet to be ticklish (and you put aluminum foil on both legs), try putting a strip of foil at the bottom to electrically connect the two legs.
17. Connect the servo cables and the alligator clip to the development board and flash the code onto it! See the next step for more detail.
Note: I used the logo as the touch sensor, and taped a small piece of aluminum foil to connect the logo and the alligator clip. I don't recommend this, since it's quite finicky.
18. Personalize your robot and give it a face. Then tickle the foot with the aluminum foil and see what happens!
Step 7: Code & Connections, Part 2
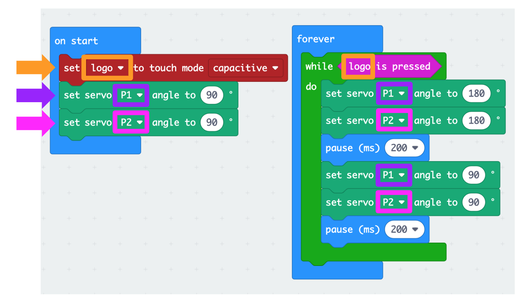
You can get the Makecode for the micro:bit here: TickleBot
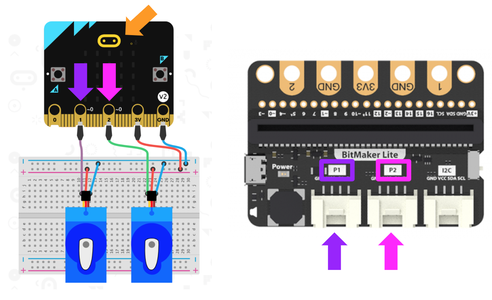
If you've never used the micro:bit before, here's an intro for how to transfer your code onto it. You'll want to update the code to whichever connections you're using. In my code, I used the logo as the touch sensor (which I don't actually recommend, but you'll see why I did it in a moment), and P1 and P2 for the servos. P1 and P2 correspond to the pins on the micro:bit.
You can see in the second picture, the micro:bit with the breadboard has the servos attached to P1 and P2. If you're using an expansion board like I did, the pin numbers should be written somewhere on the board. If you look closely at the picture of the expansion board, you'll see that there isn't a way for me to access P0 on the Bitmaker Lite! Since only P0, P1, P2 and the logo can be used as touch sensors, and I was already using P1 and P2 for the servos, this only left me the logo for the touch sensing. What I actually recommend doing is using P1 and P2 for the servos, and P0 for the touch sensing. Then you can attach an alligator clip directly to P0 for a much more stable connection. (And don't forget to update the code to match.)
Since using the logo as the touch sensor is not very reliable, why didn't I use a breadboard or alligator clips to connect the servos directly? I could have, but I wanted to make this a project I can easily teach over Zoom, and trying to explain how to connect all the different wires with breadboards, or adapting the connector on the servo is tricky to do virtually.
I'll actually be receiving a few of the other expansion boards and conductive tape to try, so I'll update the instructions if one of them works particularly well for this project!
Step 8: Tickling & How It Works
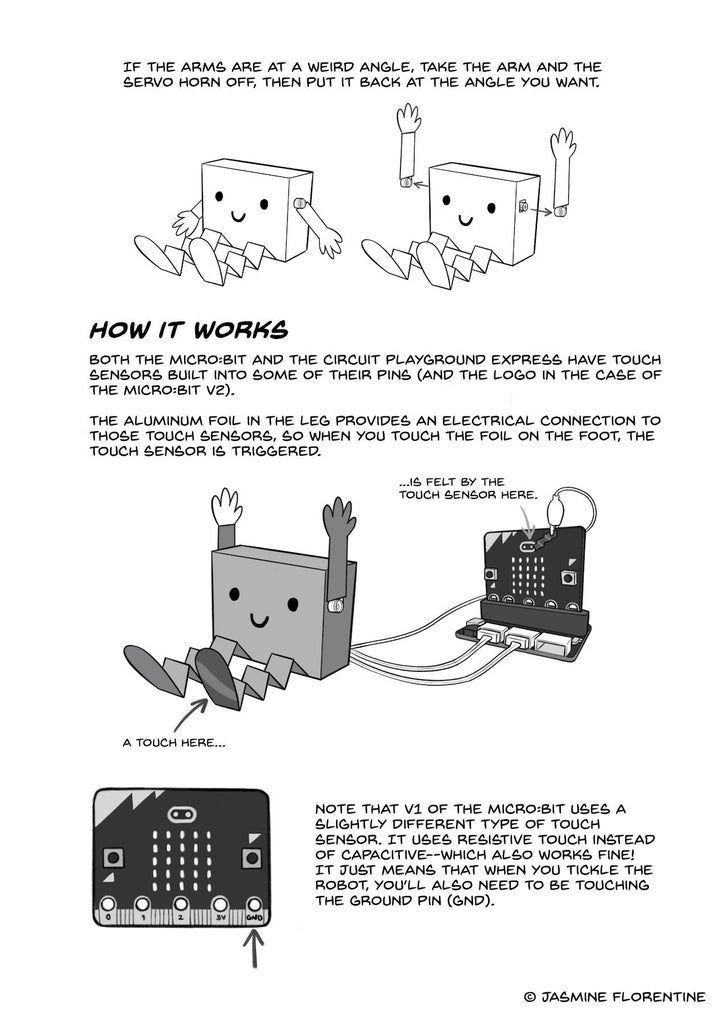
If the arms are at a weird angle, take the arm and the servo horn off, then put it back at the angle you want.
HOW IT WORKS:
Both the micro:bit and the Circuit Playground Express have touch sensors built into some of their pins (and the logo in the case of the micro:bit v2).
The aluminum foil in the leg provides an electrical connection to those touch sensors, so when you touch the foil on the foot, the touch sensor is triggered.
Note that v1 of the micro:bit uses a slightly different type of touch sensor. It uses resistive touch instead of capacitive--which also works fine! It just means when you tickle the robot, you'll also need to be touching the ground pin (GND).

Participated in the
Tinfoil Speed Challenge


