

Introduction: Make a Wooden Nameplate


In a business environment, it seems like everyone has to have a name plate. But the name plates that companies give out are often kind of crappy. Here’s a way to make a distinctive, handsome name plate that you design yourself.
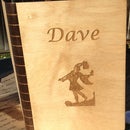
This nameplate is made from wood which gives it an artistic feel and yet it’s very professional and appropriate. You can pick out a font for yourself and perhaps add an icon.
Materials
Laser Etcher
Coreldraw
Wood
I made it at Techshop! http://techshop.ws
Step 1: Cut Box

First off, you will want to decide the size of the whole thing. For various reasons (in part having to do with the fact that a 24”x12” board is not really 24x12”) I make my nameplates 7.8”x1.9” – just a bit smaller than 8”x2” to leave space for cutting off wood on all sides.
Create a box (using the box tool -- 7th tool on the left, shaped like a square) of the correct dimension. Be aware that, whatever size you pick, the WHOLE name plate will be the size of this box. Nothing can be outside this box (it will literally be cut off).
Make sure the line is hairline so it will cut instead of etch and that there is no fill (you can do this by setting the object properties using alt-enter or by using the outline and fill tools on the left hand side, they look like a pen nib and and a bucket).
Step 2: Etch Box

The nameplate we’re making is white letters on a dark background. In wood, the etched part is dark, so we want to make a black box that will etch around our characters. This box should be smaller than the cut box so there is a border.
I like a 1/10” border around it but that’s just an arbitrary number. I made my box 7.7”x1.8”. Set the box to have no outline but to have a solid fill of black.
Center the new box on the old box.
Step 3: The Name

Select the text tool (the 11th tool on the left that looks like an A or F8) and type the name. Select the text and change the font and size (I like Lucinda Calligraphy and most people’s names will work well at 55 or 60 pt type) and make it bold (which I recommend) and italic if you want. For Mona Lisa, I increased it to 72 because the name is so short. For really long names you’ll need to make it smaller, perhaps 48 or even 40.
Now select it and use the fill tool (18th tool, looks like a paint bucket) and set the fill to uniform fill and the color to white.
It’s important that the name show up. If you can’t see it, select the etch box and select Arrange->order->to back of page to push the etch box behind the name.
Center the letters in the other two boxes (select everything and then hit "c" and then "e" which center everything selected horizontally and then vertically).
Step 4: Your Logo

If you just want a name on your name plate you don’t need to do anything else but if you want some kind of a graphic now is the time.
Any white part will be raised and any black part will be etched and somewhat dark.
Step 5: Etch It
Now that we've painstakingly constructed the coreldraw file, all that remains is for you to etch it. Hopefully, you know how to do that (or, put another way, "this is an exercise left to the student").
I have left you the two CorelDraw files I came up with; you can just edit them (NOW he tells me!).


