

Introduction: Make a Microphone Flag


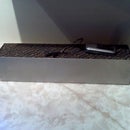
The thing under the microphone in the photo above is a microphone flag. It's purpose is to be a visible reminder of which television program the person wielding the microphone represents. In my case, I have an audio podcast, so the use of a mic flag isn't so important, but there will be times when its existence will be helpful. For instance, I sometimes take photos of my guests and I while we're recording. Or, when I'm recording in a public place as I sometimes do, I like to make sure everyone knows who we are.
So, let's make one.
Step 1: Materials and Tools
Here are the materials I used:
- Foam core
- tape (I used clear packing tape)
- adhesive (I used spray adhesive)
- paper with your printed design on it
Tools include:
- Paper cutter
- X-acto knife
- ruler
Step 2: Design

This mic flag is triangular. The outside, which will be the surface upon which your logo or other image is shown, is a strip of foamcore 9-inches by 2.5 inches. Dimensions will differ depending on your needs.
This strip will be folded so that it forms a 2.5-inch high isosceles triangle. Inside we'll place a triangular piece of foam core with a hole in it which will allow the flag to be attached to the microphone.
Step 3: The Outer Portion of the Flag


This is the visible portion of the flag, containing your logo or image.
I've decided on a three-sided flag. My sides will be 3" long, and 2.5" high. So I'll start by marking the foam core to cut a strip 2.5" high and at least 9" long (picture 1), and make the cut (pic 2).
Next I'll layout the sides, making a mark every 3" along the long edge of the strip of foam core (pic 3). The first two marks will represent folds; the last mark will be a cut. This will give us a strip 9" long.
At each of the fold marks, first score (pic 4) and then fold (pic 5) at those first two marks. You'll end up with something like those shown in pic 5.
Finally, using tape, fasten each end of the strip to each other to form your triangle (pic 6).
Step 4: Wrapping the Outer Portion With Your Logo or Image.


Using Illustrator or some other image editing program, lay out a document whose dimensions match your triangle. So, a document that is 2.5 inches tall and a little more than 9 inches long. Why more than 9 inches long? I assumed that the act of folding the triangle would stretch the outside of the triangle a bit, so I added an eighth inch for each fold.
Add your images, and print it out (pic 1).
Trim your print so that you can wrap it around your flag, making sure the paper will extend past the top and bottom edges of the flag. Also, trim the ends of the strip so that one edge is longer than the true size of the flag (pic 2).
Using spray adhesive attach the strips to the flag. I wish I had pictures of this, but I had to move quickly and also wanted to protect my phone from spray glue. But, pick one side of your triangular flag and place it on the back side of the strip making sure your image is centered. Fold the strip around the triangle and make sure everything will line up after it's glued on permanently.
When you're happy with the placement, spray the strip with glue, and re-wrap the strip around the flag; make sure that there is enough extra paper on the top and bottom edges of the flag, because you will wrap these around and into the interior of the flag to make a finished edge (pic 3).
Cover the outside of the flag with packing tape to protect the surface.
NOTE: I figured out later: you may be able to save some work by:
- making the folds in your strip of foam core as in the last step, but don't fasten the ends together yet.
- gluing on the strip of paper, making sure it's lined up properly, and with extra paper at the top and bottom.
- putting tape over the outside making sure to leave enough extra tape at the top, bottom, and one end of the flag so you can...
- fold the top and bottom edges of the tape (and paper) onto the back side of the flag and...
- fasten the ends together of the flag together with the extra tape at the end.
Step 5: The Triangle Insert.


We need to make the triangular insert for the microphone flag (pic 1).
Take your finished outer flag and place it on a piece of foam core. Mark a triangle on the foam core using the inside of the flag as a template, and cut that out (pic 2). Make sure it's a friction fit into the interior of the flag.
Make a circle in the center of the triangle. The diameter of the circle will fit your microphone. In my case, I used a flange that my microphone came with that screws into the bottom of the mic and attaches the microphone to a holder (pic 3, 4, 5) If yours will be a hand-held microphone, you'll want a circle equal to its diameter (pic 6). Either way, when you cut out the circle (pic 7) you'll aim for a friction fit (pic 8).
In my case, I wanted the insert to sit just below the top of the flag. I set the flag upside down on top of a spacer (pic 9), then pushed the insert into the flag and attached it to the inside of the flag with some tape. I'd have used a glue gun if I had one handy. Tape is fiddly in tight spaces like this.
Step 6: Finished!

There you go, a snazzy microphone flag. If you have any questions, leave a comment. Thanks for reading!


