

Introduction: Making a Light Box, Version 2


After making my first instructable, Turn Your 12V DC or 85-265V AC Fluorescent Light To LED, I dressed up the cheap/generic fluorescent fixture with a bamboo light box using L-brackets. My RV has 4 of these fixtures and I only had enough scrap bamboo to do the one box. Not wanting to spend $180 on another sheet of bamboo plywood, I decided to find an alternative. I also wanted to try out my new toy, a Kreg Pocket Hole Jig.
Step 1: Tools & Materials


Tools:
Kreg jig
C-clamp
Screwdriver (I use a $15 corded drill from Harbor Freight)
Saw
Step Drill Bits
1/16" & 5/32" Drill Bits
Wood (I used 1x2 pine from Home Depot)
12 Self-tapping screws (I use the Kreg screws)
1 Acrylic sheet (I always go to Ace Hardware, where they cut it to the exact size you need and charge by the square inch)
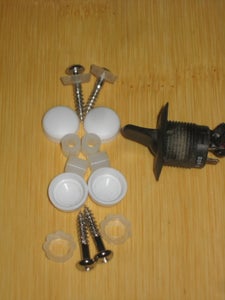
4 Wood Screws
4 Nylon Spacers
4 Screw Covers
4 Screw Cover Bases
1 Switch (I used RadioShack #275-648)
Wire
Frosted Glass Spray (I've included photos of the two products I've used; either works)
Step 2: Measure & Cut Wood
Measure the light fixture you are covering up and cut your wood to be slightly larger when assembled. My boxes were made with two 1x2s 6.25" long and two 1x2s 19" long, assembled for an overall outer dimension of 6.25"x20.5"x1.5".
Lay the pieces together in the way that they will be attached and make sure everything looks square. I made four boxes, measuring every piece 3 times before cutting and still ended up with two pieces 1/4" longer than they were supposed to be.
Step 3: Drill Pocket Holes


Use the C-clamp to clamp the Kreg jig in place and drill out two pocket holes in each end of the longer wood pieces. After you have four end holes (two on each end), add two more oriented 90-degrees from the other four for attaching the box to the ceiling (see photo below). Once you have both long pieces of wood drilled, attach them to the short pieces of wood to assemble the box.
Step 4: Prepare Acrylic & Attach

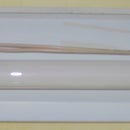
Remove the protective plastic from one side of the acrylic sheet and spray with the frosted glass spray. I waited 10 minutes between coats and did three coats. Allow to dry a couple hours.
Center the sheet of acrylic over the wood box on the side that it will attach to (i.e. not the side with the pocket holes drilled in it for attaching to the ceiling). Drill 1/16" holes in each of the four corners approximately 1/2" in from both sides (so that the screw cap won't extend beyond the edge of the acrylic). Drill far enough to both go through the acrylic and into the wood. The holes created in the wood will be good for the wood screws but you'll have to enlarge the holes in the acrylic slightly (after it's been taken off the wood box) so that the screws will pass through without needing to be screwed in. I believe I used a 5/32" bit for this. After drilling all four corners, go ahead and place the nylon spacers between the wood and the acrylic, place the screws through the screw cap holders and into the acrylic/nylon spacer/wood, and screw into place. All four should look like the photo below.
Step 5: Install Box


Remove the screws you just screwed in and remove the acrylic. Place the box over your light fixture and screw in the last four pocket holes to secure it in place.
Step 6: Install Switch


Place the sheet of acrylic over the wood box, carefully aligning it to the existing holes. Decide where you want the switch located and mark it or start to drill a small hole in the exact center. Remove the acrylic and drill the hole with a 1/16" bit. Then drill the hole out to the exact size you need for your switch (I needed something like 19/32") using the step bit(s). Place the switch in the hole and wire up the light fixture's switch to go through the new switch. You may need to use new wire to do this or you may be able to simply re-use what is already there.
Step 7: Re-install Acrylic and Test Switch
Re-install the acrylic using the nylon spacers and screw cap holders. Test the switch. If you are happy with everything then snap on the screw caps and enjoy!


