

Introduction: Making the Archtop Guitar Style Mandolin


I recently made a video series on how I made my Archtop guitar style Mandolin. I thought it might make an interesting Instructable. Let me know what you think and I welcome any questions.
Step 1: Making the Ribs

In this step I cut the corner blocks and bend the ribs to the inside mold. I used a silicone heating blanket to heat the wood and linings and I made the bending jigs using fusion 360 and the are all cut on my CRP2448.
Step 2: Cutting the Top


this video is the process of milling the top soundboard of the mandolin. I have created integrated bracing in this top as an experiment. I was very impressed with the tone of this instrument and I quite like how these integrated braces ad stiffness and efficiently a produce big sound.
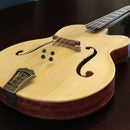
Step 3: Attaching the Ribs to the Top Plate and Cutting F Holes


The highlight of this video is the tool path for cutting the F holes. I have enlarged them and moved the bracing position to accommodate the lager F holes (they where smaller on the prototype and seemed to choke off the tone). Several Autodesk Fusion360 Instagram accounts where kind enough to share portions of this video.
Step 4: Milling the Neck

Lots of CNC footage for this video of the process of milling the neck.
Step 5: Making the Babinga Back Plate

the process of milling the babinga back plate.
Step 6: Dovetail


milling the neck and compound body dovetail joint on the cnc. this probably the most stressful part of this build, with this much time and effort one slip or miscalculation can destroy the parts. watch carefully for the movement when the neck dovetail is cut, the clamps slip and I thought i would have3 to remake the part. I was able to save it luckily.
Step 7: Gluing on the Back Plate and Making the Fretboard.

finally closing the box, it will soon be a somewhat complete instrument.
Step 8: Headstock and Fretboard

Making the head stock veneer and fretting the fretboard.
Step 9: Done! It's Time to Play!
this video is a tome sample of the instrument along with some of the finished stills. let me know what you think of the tone. I haven't been able to put this thing down, its been preforming well at gigs and I really enjoy playing it. Thanks for watching!


