

Introduction: Mars Rover: Smartphone Controlled Stair Climbing Robot Using Evive- Arduino Based Embedded Platform


Till now, we’ve made robots that can zoom around but only on the ground level. This time, we thought of taking their moving ability a bit further and make them capable of reaching new heights. Thus came into existence the *drum roll* SMartphone-controlled stair-climbing robot! Program it in PictoBlox - a versatile graphical programming software with advanced capabilities, and control it with Dabble - our ingeniously developed project-making mobile app.
In this project, we’re going to show you how you can make your own DIY stair climbing robot. This robot is based on the rocker-bogie mechanism, a suspension arrangement that has been used in NASA’s Mars rovers. We’re going to program is using PictoBlox - a graphical programming software with advanced capabilities and are going to use Dabble - our ingeniously developed project-making mobile app - to control it.
You can download PictoBlox from HERE and get Dabble on Google Play.
Step 1: List of Components Required
Hardware
- evive
- HC05 Bluetooth Module
- Dual Shaft DC Motors
- Wheels
- Motor Driver
- Lithium Polymer Battery
- Nuts and Bolts
- Jumper Cables
- Glue Gun
- MDF Sheets
- Cable Ties
Software
Note: You can find most of the above listed Electronic component in the Starter Kit.
Step 2: Understanding the Design

Before we begin, let’s first understand the design. The structure of the robot is made up of the MDF sheets. The labels on the image indicate the followings:
- The Base Plate
- The Front Leg (x 2)
- The Back Leg (x 2)
Attachments

Step 3: Making the Structure of the Rover-bogie


The rover will have a total of six legs where the front four acts as Rocker and the two behind wheels is said to be Boogie. Now, let’s fix them by aligning their holes together using M4 nuts and bolts as shown in the below figure.
Once done, take the base plate as it acts as the axis onto which we will fix the rocker and the boogie to it. Fix the rocker and the boogie to the base plate using M3 nuts and bolts. With this the basic structure of our robot is complete.
Step 4: Adding Motors and Wheels


Before we attach the motors to the robot, we need to attach standoffs to the motors so that there is some distance between the robot legs and motors.
Take six DC motors and attach M3 bolts of 25mm length to the motors. Now fix 8mm female-to-female standoffs to the motors.
Once done, fix motors onto each leg using 3 nuts as shown in the image above.
Take the wheels and make lines on them using Hot Glue to add extra friction. Fix these wheels on the free shaft of the motors.
Note: Before you attach the DC motor, test the motors using evive’s firmware. Switch ON evive, choose Controls, select Motors, select the Motor Channel you have attached your motor too and control its speed using a potentiometer and the direction using slide switch.
Once done, we are going to attach the stub-axis(a bit different from the rocker-boogie) to give our robot the stability it needs. Take
Step 5: Mounting Evive

Take evive and mount it on the base plate using M3 bolts.
Step 6: Connecting the Motors Parallelly

Now, we need all the motors on one side to rotate in the same direction. Thus, we need to connect them parallelly. Extent the wires attached to the motor with the help of other male-to-male jumper wires and connect them on the breadboard as shown in the image.
Step 7: Connecting Motor Driver With Evive

As we are going to make six motors run, we are going to use the motor driver to provide enough power supply to each motor.
Fix the motor driver on the base plate using double-sided tape. Once done, make the connects as given:
- Connect GND-A, PWM-A, INA1, and INA2 pins of the left motor driver to MD1 port on evive
- Connect GND-B, PWM-B, INB1, and INB2 pins of the right motor driver to MD2 port on evive.
- Connect VCC and GND of the motor driver to the VCC of evive.
- Connect OUTA1 and OUTA2 to the left motor and OUTB1 and OUTB2 to the right motor.
Step 8: Completing the Robot


As we are going to control the motion of the Stair Climbing Robot using a Smartphone, thus we got to a Bluetooth Module. Fix HC05 in the slot given on evive.
Once done, we need to power up the motors and evive. Take a Lithium polymer battery and attach it under the base plate using double-sided tape and connect it to VIN of evive.
With this, our entire assembly is complete.
Step 9: Graphical Coding Section
We are going to script our entire program in a graphical programming software- PictoBlox. You can either write the following code or can upload the file given to evive.
The below code is the main code that will call the required blocks when the condition in the if arm is true.
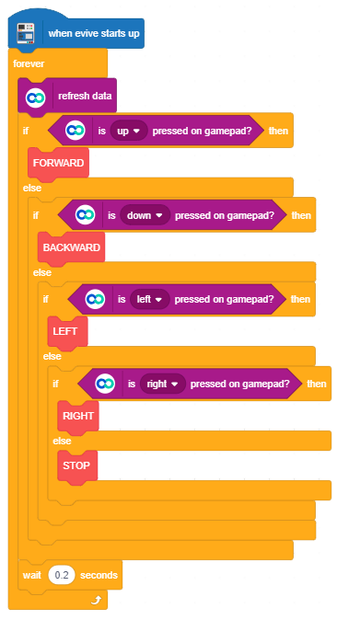
The following shows the set of blocks from which anyone will be called from the main code. The robot will perform the actions according to the code written under the called block.

Attachments
Step 10: Arduino Code
The Arduino Code for the stair climbing robot is given below.
Also, the libraries for the same code are attached at the end of this step.
Step 11: Working of the Stair Climbing Robot
Stair climbing robot works on the concept of the rocker-bogie mechanism except we have stub axels to make the robot more stable. The robot can climb onto any obstacles stairs, bumps, etc. It can move along any surface be it sand, rocks, concrete, or grass as it has suspension arrangments. The front wheel of the robot hits the obstacle real hard and as the friction of the wheels is more, it lets the robot to climb the obstacle.
Dabble lets you connect your smartphone to evive. The buttons of Gamepad are used for the following function:
- Up: Move the robot forward
- Down: Move the robot backward
- Right: To turn the robot right
- Left: To turn the robot left
Step 12: Conclusion
With this, your Smartphone-controlled stair-climbing robot is all set to reach new heights! ;)


