

Introduction: Mash Paddle With With Hop Shapped Cutouts (with Bandsaw and Router Template Tips)


I noticed that there wasn't an Instructable on making a Mash paddle(of course I always look here for tips on such things), so I decided to document my process of making a mash paddle. This Instructable includes some tips on using a fence on a band saw to make straight cuts and instructions on how to make a router template for a bushing guide in Photoshop. If you don't have a router or band saw, these steps can be easily done with other methods or greatly simplified in the case of the paddle cutouts. Cutting out a fancy shmancy shape with a router is completely optional. A jigsaw is another great tool for cutting out the basic shape of the paddle.
Step 1: Layout and Cut a Basic Shape


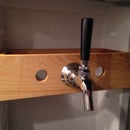
I found a piece of oak with some holes drilled in it. This wood will have even more holes in it very soon, so that didn't bother me. I also figured out that I could get two paddles apposing side by side from this one piece of wood.
Go ahead and lay out the size and dimensions of the paddle right on the face of the board. It's also a good idea when making your first rough cuts to allow 1/8"+ extra to account for the blade width and mistakes, etc. If you have any tight or close cuts between multiple items, draw out where the blade should go. I made the cut to separate the two paddles with a jig saw.
Step 2: Cuts Made on a Band Saw.


With the two pieces separated I headed to the band saw for the other cuts. The main reason I used a band saw at this point is because it can cut very straight if set up properly. A jig saw can make straight cuts but it's more challenging to do so at longer lengths.
A good technique to remove wood from a corner where you need to start a cut is called nibbling. Cut several parallel cuts to remove enough wood to get your blade in perpendicular to the nibbles. Put up a backstop behind the blade to make perfectly even nibble cuts without worrying about going past the line.
With the T in the handle cut out on one side, the fence needs a spacer to keep the wood all parallel to blade.
After the it's cut out, it ok to do some real basic cleaning up of the edges and make sure they are all straight and square.
Step 3: Making the Paddle Cutouts With a Custom Made Router Template (or Just a Drill)


Here is where you have the option of simplifying the paddle or cutting out a fancy schmancy design. For the design option I made another Instructable on how to design and make a template for a plunge router in Photoshop because there are so many applications for that part. You don't really need Photoshop to make the template but is does make quick work of the design part.
**The simple option is to drill through several times and then smooth out the cuts. One approach is to drill evenly spaced holes laid out in grid. Another approach, which I tried out on my second paddle, is to use several different sized drill bits and scatter the locations to create a carbonation bubbles look. Whatever you decide, just remember to make it easy to clean grains out of it.
The final shaping of the paddle is all up to your preference. On the first paddle I made I used a round over bit to make smooth edges on everything. The second paddle I used a file to take a minimal amount off. I think I like the hard edges of the second one though. The hop design looses it's form when the round over is used. Although the 30 deg cuts look nice on the paddle.
Most mash paddles I have seen do not have a finish. If you do want to use a finish, make sure it is food grade of course.

Participated in the
ShopBot Challenge


