

Introduction: Miter Sled


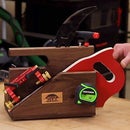
Early in my woodworking journey, I wanted to build picture frames. Just like many woodworkers, I struggled with making mitered corners.
This sled greatly improves accuracy and repeatability by eliminating the constant need to make 45 degree angles. Like many other woodworkers, I spent way too much time trying to make 45 degree corners when I should have been focusing on making a 90 degree corner.
This sled may be a degree or two off on one side or the other but, the combined corners match up to make that perfect mitered corner. Because of that, the human eye can't tell if they're not perfect 45 degree angles.
This video should fill in any missing information for this build. Plans are available at the end of this instructable as well as on my website.
Special thanks to mtairymd for the plans included included in this build as well as the assistance with the actual write up for this Instructable!
Step 1: Tools and Materials

Tools:
- Table Saw
- Track Saw (Optional)
- Drill Press (Optional)
- Router Table (Table saw with Dado Stack is another option)
- Drill
- Squares
Materials:
- Plywood
- Wood Screws
- Hardwood (Stop Blocks and Runners)
- T-Track and Knobs
Step 2: Drawings


Although you will be building to detailed drawings, it’s important that you take actual measurements from your build and equipment so that any error created isn’t compounded throughout the remainder of the build (Relative Dimensioning). The spacing for the runners on my table saw will probably be different than your table saw. All dimensions are in inches unless noted.
Step 3: STEP File


A STEP file is included for those that would like to look at the details of the miter sled.
Attachments

Step 4: Base


The base is made from 3/4" plywood. Cut to the dimensions shown. Ensure that your plywood is square and equal dimension on all sides. This is important because the cut off will become the inner bed for this jig.
Step 5: Runners


Cut the runners from Hardwood material (HDPE plastic or aluminum would work as well) and fit them to your table saw. Should be a good fit without any side to side slop that still allows a nice easy sliding action.
Step 6: Attach Runners


Use washers or pennies under the runners in the table saw tracks to lift the runners just barely above the surface of the table saw. Apply CA glue to the runners and set the base ply on at a 45-degree angle with one corner directly in the path of the table saw blade. Do your best to make it 45 degrees but perfection is not required.
Allow the glue to set up and remove the sled from the saw. From the underside, pilot drill, countersink, and install wood screws to permanently attach the runners. Trim excess material after attachment. See video in the introduction if this isn't clear.
Step 7: Shaping the Sled


The next step is to cut the back corner of the sled off. Although I used a track saw for this task, a straight edge and circular saw would work just as well. Verify the path of the blade and ensure that there are no screws in the path that were installed in the previous step.
Put the sled back on the saw and cut a Kerf about 1/3 of the way down the sled. Do not cut all the way through. This will be used to help align the inner bed.
Step 8: Attaching the Inner Bed


Using the off cut made earlier, install this piece on top of the sled using glue and 1 1/4" wood screws. This will create the base for the fences and also dictate the width of frames that the sled will support.
Cutting a piece of scrap to the desired width is an easy way to ensure that the inner bed is mounted in the correct location. I chose 4 1/2" for my sled.
Once the inner bed is installed, it's time for a test cut.
It's important to cut each side of the miter on the opposite side of the sled. This will ensure that when the 2 pieces come together, they form a perfect 90 degree angle.
If you jump to the 5:30 mark in this video, I discuss how these cuts work.
Step 9: Fence Build Up


Next step is to cut 2 pieces of hardwood that will be attached to the leading edge of the inner bed increasing the overall fence height.
Rout a groove in these pieces to accept T-Track.
Attach these pieces to the front of the inner bed using glue and brad nails. Install the T-Track ensuring that they are not in the path of the blade.
Step 10: Handle & Burry Block


Handle
The handle or push block can be just about anything of your choosing. I chose a piece of scrap 8/4 maple that I had in the shop. I rounded over the top to make it more comfortable and sanded it smooth.
Attach with glue and add screws from the underside of the sled. Ensure that the screw heads are not proud of the surface or they will scratch your table saw.
Burry Block
Cut a piece of scrap Harwood to fit behind the fences and in the line of the kerf. Attach with glue. This piece is added to ensure that your hands are always protected from the blade.
Step 11: Sliders


Next, cut hardwood strips that will slide on the T-Track installed on the top of the fences.
I notched each side of the strip creating a small tenon that fits inside the track. This ensures that this strip doesn't rack when being slid on the track.
Drill 1/4 holes about every 5.5 inches. This allows more flexibility for sliding these strips on the fences.
Step 12: Stop Blocks


Install T-Track to the leading edge of the strip. This will be used to install stop blocks as needed to ensure that cuts can be repeated with a great deal of accuracy. Create stop blocks from material of your choosing. I notched these stop blocks just as I did the strips in the previous step to ensure that my stop blocks remained 90 degrees from the bed.
Step 13: Final CAD Images


Step 14: Closing


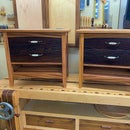
If you made it this far, you now have a sled that will generate perfect 90 degree mitered corners. Because of the stop blocks, repeatability is greatly enhanced. These 2 items are the biggest set backs for many woodworkers trying to make mitered corners.
I use this sled for nearly every project that requires mitered corners. You will see it often in my videos on more than just picture frames.
Plans attached here as well as my website.
I recently published another Instructable detailing a jig for adding splines to these corners created on this sled.
Thanks for viewing!
Some links are affiliate links so making a purchase helps support my work.
Attachments


Participated in the
Woodworking Contest


