

Introduction: Morse Code With the Micro:bit


Sending wireless signals from one Micro:bit to another using the onboard radio is a pretty cool superpower. You can use radio signals to make all sorts of interesting things happen. In this project we will use radio signals send the dots and dashes of Morse code from one device to another.
An printable graphic of Morse code as seen in the photo above here:
https://en.wikipedia.org/wiki/Morse_code#/media/File:International_Morse_Code.svg
Fun Fact: Morse code is named after the famed inventor of the telegraph, Samuel Morse.
My very first idea ( a real stinker) was to put the code to send the strings on one Micro:bit and the code to receive the strings on another. It worked, but it didn't allow for two-way communication. By adding both the sending and receiving codes to each Micro:bit in the group, the communications system became conversational.
I wanted to develop this program in Tinkercad specifically. In addition to Tinkercad's well known 3D modeling environment you can now simulate circuits and write downloadable working code for a number of development boards. Imagine designing 3d components with any necessary circuitry (and working code) needed for a prototype in a single development environment? You have access to the Micro:bit, Arduino, all sorts of motors and other stuff. Go check it out, it is like having hundreds of dollars worth of parts at your ready.
Notice of Extremely Limited Liability
We take absolutely no responsibility for any nefarious plots that come about through secret message sending. That's on you Bub.
Supplies

2 BBC Micro:bits
Tinkercad
Step 1: Create a New Circuit in Tinkercad

www.tinkercad.com allows you to create simulations with and generate code for the Micro:bit. Just click 'Create new Circuit' under the 'Circuits' tab to get started.
Step 2: Add a Micro:bit Into the Tinkercad Simulator


Select the Micro:bit from the components bin and drag it onto the main stage. Then click on the Code button to get started 'writing' your code.
Step 3: Set Radio Group

Add a radio set group block to the on start block. In order to communicate with each other, all the Micro:bits need to be set to the same group number. You can use any number between 1 and 255 as your radio group number. A student who was working on this project noted that this step was like making sure all the walkie-talkies are on the same channel.
Step 4: Basic Inputs

We need a way to send the two basic units of Morse code; the dot and the dash. We can also use the A + B button pushed function to send the string that notes the end of a letter. The A button sends the string "dot". The B button sends the string "dash". The A + B button sends "letter_space".
Step 5: What to Do With the Strings Received

Using the on radio received string block to register the signal sent and process it into a graphical representation is our next task. These dots and dashes will make up the secret message you will receive and decode with the second Micro:bit. A series of If/Then statements determine the graphical image to display based on the string received. When the string "dot" is received, a dot graphic displays, "dash" displays a line and 'letter_space" displays the up arrow icon to indicate the end of a letter.
The next two steps go into further detail as to how this part of the code is created in greater detail
Step 6: Nested If/Then Statements

Here is a more isolated view of the nested if/then statements so you could follow along with the underlying logic. Two if/then...else blocks with a final if/then in the second blocks else statement to accomplish the goal of turning the three possible text strings ,"dot", "dash" and "letter_space" into a graphic dots, dashes and up pointing arrows. It is important to observe the order the statements are nested in, this is what enables the logic to work.
Step 7: Creating the If/then Statement Part 1

This section breaks down how the statement was created. Direct your attention to the green hexagonal statement area, defaulted to 'true' in the previous image. We need to fill that green hexagonal space with our statement. Go to the Math blocks, grab an operator block (equals) and drag it into the hexagonal space in the if/then statement. Note that it is also hexagonal in shape. This means it will fit into the like-shaped space of the if/then block.
Step 8: Creating the If/Then Statement Part 2

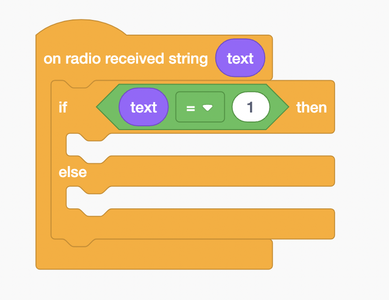
The purple oval 'text' element is the graphic representation of our variable. If we right click on it and use the Duplicate function a copy of the purple variable oval will stick to our mouse pointer. Place the purple oval in the first oval spot in the operator block. This part of the Tinkercad user experience is well thought out, I really enjoy using it. Try right clicking on different parts of your code blocks and see what you can duplicate and how you can use the duplicated items.
note: rounded components generally fit into any other rounded component.
Step 9: Creating the If/Then Statement Part 3

Indicate what string of characters you want the variable text to be equal to before it displays a dot or dash graphic. Make sure the words match the same letters in the strings sent on A/B button push and remember to put your string inside of "quotes".
Step 10: Creating the If/Then Statement Part 4

Now that you have finished your setting your condition - add a consequence if the condition is met. In this instance we will show a dot graphic if the text string received is "dot". Add the "dash" and "letter_space" choices to finish off the program.
Step 11: Test Your Code

Upload your code to two Micro:bits and now you can send and receive coded messages between them. Try to send a single short word like 'purple' or 'window' to the decoder for the first transmission. Then move on to more complex sentences once you've established enhanced communication abilities.
Step 12: The Engineering Design Process

This graphic from NASA illustrates the basic Engineering/Design Process. You dream, plan, create, test and then begin the cycle anew and ask the essential questions all over again to continually refine the execution of your idea. This is also known as Iterative Design, because of the number of iterations or revisions your concept goes through to reach the final form.
Step 13: First Improvement: Graphic Indicator Vanishes After Set Amount of Time

The program worked but it took too long to convey the message. By adding a wait for one second block and then appending a clear screen block beneath that, it became much easier to send and decode messages. After a real world test the wait time was shortened to 200 milliseconds. This adjustment made the user experience even more efficient.
Step 14: Second Improvement: an Indicator to Note the Beginning of the Next Word

Further research into Morse code revealed the use of a word separator to clearly indicate a word ending. In traditional Morse code the length of time this separator lasts is three times that of a dot or a dash. An on shake block activated the word separator indicated by a check mark graphic. One last If/Then statement to handle the "word_separator" string was nested into the existing code. I made the check mark graphic display for 600 ms as opposed to the other 200 ms graphic durations to reflect that 3X time indicator used in Morse code.
You may think of further enhancements, I encourage you to try out all that you can dream up. Then share it with the rest of us.
Step 15: The End of the Line...For Now

There are currently 10 versions of the program in my Downloads folder. Some were to just make it work, I forgot to put my strings in quotes in one of those versions. Some made it work better, like adding the word separator feature. Some iterations were simple spelling or labeling changes. I felt that using terminology like '"letter_space" and "word_separator" would make those labels clear to anyone looking at the code and that the enhancement was worth the effort.
What could change in the future?
Maybe adding sounds as additional indicators, perhaps having the brightness of the display will react to the ambient light in the room, there are still many avenues to explore.
Step 16: The Code

Here is a link to the current hex file available from the Tinkercad site.
https://www.tinkercad.com/things/kK5m6ojb6DI-morsecoder/editel

Runner Up in the
First Time Author Contest


