

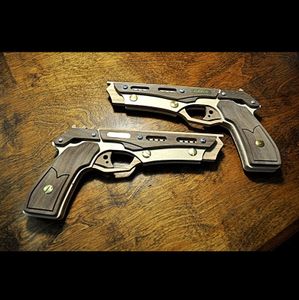
Introduction: NOT JUST ANOTHER RUBBER BAND GUN


For Christmas, I wanted to make a couple of rubber band guns for my two grandsons. This being my first real CNC project, and because the kids are special, I also wanted the guns to have a touch of class. I was inspired by the designs of ZumA2 and in particular the Fenrir.
Step 1: Materials

I used a limited variety of wood species that I had on hand. Future builds may use some exotics such as rosewood, zebrawood, padauk, and or bubinga. All available from Rockler.
Materials:
- Barrel and Trigger Guard: 0.250 inch oak
- Trigger: 0.240 inch MDF (sanded down slightly from 0.250 material after machining)
- Wheel: 0.240 inch MDF (sanded down slightly from 0.250 material after machining)
- Side Frames: 0.125 inch Baltic birch
- Grips: 0.280 inch Walnut
- Barrel Trim: 0.19 inch Walnut
- Wheel Support: 0.19 inch Walnut
- Name Tags: 0.02 brass sheet
Hardware: I was able to find all my hardware in local stores.
- 2 each 1/2 inch brass binding posts
- 1 each 7/8 inch brass binding post
- 2 each threaded spacers 1/2 inch long, 1/4 inch diameter threaded 4-40 through. Available from Mouser if you cannot find locally.
- 1 each 3/16 diameter spring similar to McMaster Carr #9657K44.
- 8 each pan head phillips screws 4-40 x 1/4 inch long. I would suggest brass or black oxide finish.
- 4 each F-440-2 Pem Self Clinching Flush Nuts available here PemNuts.
- 2 each dowel pin 1/8 inch diameter by 1/2 inch long. May be wooden.
- 1 each dowel pin 3/16 inch diameter by 3/4 inch long. May be wooden.
Step 2: Process
- I made the grips from 3/4 inch stock that I cut in half on a band saw. This yielded two grain and color matched pieces. These were then flattened and brought to thickness on the CNC. The design pattern was then engraved using a 20⁰ engraving bit about 0.09 inches deep. Then the hole and 0.020 inches deep c’bore were added. Next the surface contour was cut which gave the engraving a varied depth. This step was followed with the profile cut. I then hand sanded a slight chamfer on the outside profile edge.
- The Side Barrel Trim and Wheel Supports were done in a similar fashion. The c’bores are 0.050 deep and the blind holes in the wheel supports are 0.125 deep (a bit deeper may be desired to allow some end play for the pin).
- The Wheel and Trigger/Escapement were made from MDF because I thought that a tooth may snap off if the wood grain was tangent to the direction of rotation. Sand the teeth on the Wheel to remove sharp edges that may cut the rubber bands. These parts were also sanded to be a bit thinner than the barrel allowing them to slip easily between the Side Frames. During assembly, the spring may have tendency to go flying. I found that by tying a piece of colored thread to the spring, it is much easier to find. After the Side Frame is in place, the thread may be cut and removed before tightening the screws. A hole through the Trigger/escapement in front of the spring space may be handy to place a narrow dowel to act as a spring keeper during assembly. (See hidden lines in the drawing file).
- The right and left Side Frames have 4-40 captive nuts glued in to fasten the Wheel Supports. On the first two units, I used a small pattern 4-40 nut with a c’bore 0.10 inches deep. My later units will use a 4-40 PemNut with a c’bore only .020 inches deep. The nuts must be flush or recessed from the Side Frame surfaces to prevent interference with other moving parts. The step file c'bores are for the PemNuts.
- The Barrel and Trigger Guard are made from stock .0250 inch material available from the big box building supply stores. Because of stock material width, you may elect to split the Trigger Guard into two (upper and lower) pieces. This is shown in the supporting documentation.
- I also made a brass name tag with the names of my grandsons. I first set up a small block of wood in the CNC and trued it parallel to the x and y axis. Then attached the brass blank with double sided tape. After engraving and profiling the name tags, I removed the block and cut off the nametags with the band saw leaving about a 32nd inch of wood still attached. This was dropped in a bowl of solvent for a few minutes until the parts separated. This part is optional and may be added by the builder.
- I would suggest you dry fit the entire assembly before deciding what edges and how far to apply any chamfers.
- A clear finish may be applied to all parts before final assembly. Also, a small 1/2 inch diameter piece of double sided tape may be applied to the back side of the grips near the top to prevent their rotation about the binding post. A coat of paste wax rubbed on with #0000 steel wool, then buffing with a soft cloth adds a nice satiny finish. Waxing the Wheel and Trigger/Escapement helps them slide easier between their mating parts.
Step 3: Assembly

Assembly:
Refer to the X311 assembly drawing file to see how the parts fit together. It is best that the 0.188 dowel pin thru the Wheel be a tight fit or perhaps glued in place. It should protrude equally on each side. The blind hole in the Wheel Supports should allow free rotation of the Wheel and pin. A bit of paste wax in each hole is suggested.
The dowel pins may be wood or metal. Wood allow you to easily adjust their length if required.
I chose brass for the binding posts to dress it up a bit. Aluminum is also available. I would also suggest brass or black oxide for the 4-40 screws.
I use Size 16 rubber bands for ammo.
To load, hook a rubber band to the tip of the barrel and stretch it back and hook the other end over the highest tooth on wheel. Rotate the wheel towards the rear one tooth with your thumb and repeat until six rubber bands are loaded. This gun is meant to be a six shooter.
Caution:
Safety is always an issue while working with tools and also when handling devices that may launch flying objects. Be sure to wear safety glasses and use reasonable precautions.
It is also recommended to apply a blaze orange color to the muzzle end of the barrel to denote it is not a real gun.
Step 4: Documentation

The docs file contains drawings in dxf and pdf formats. There is also an exploded animation showing all the parts.
Attachments
 X311Docs.zip
- Barrel.STEP
- Left Barrel Trim.STEP
- Left Grip.STEP
- Left Side Frame.STEP
- Left Wheel Support.STEP
- Nameplate.STEP
- Right Barrel Trim.STEP
- Right Grip.STEP
- Right Side Frame.STEP
- Right Wheel Support.STEP
- Trigger Escapement.STEP
- trigger guard split lower.STEP
- trigger guard split uppper.STEP
- Trigger Guard.STEP
- Wheel.STEP


Participated in the
Woodworking Contest


