

Introduction: Octoprint Easy Setup


While this is written for the Monoprice Select Mini 3D Printer (that for example you can find here on Amazon,) it should work for any 3D printer with a USB port.
You will need:
- A Raspberry Pi 3B (for example here on Amazon.)
- A micro USB power supply for the Raspberry Pi (for example here on Amazon.)
- A 32 GB micro SD card (for example here on Amazon.)
- A micro USB to USB 2.0 cable (for example here on Amazon.)
- A computer with a SD card slot or reader.
The Monoprice Select Mini 3D Printer is an amazing, inexpensive 3D printer which has significant improvements in more recent models that overcome many of the problems of its predecessors. Only 2 really significant problems remain. One is that after enough traverses of the bed, the thin thermistor wires under the bed that tell the printer what temperature it is will get clipped. In my opinion, that's where the real fun begins as you'll need to figure out how to fix that, and there's a ton of great fixes on the web. The other problem is that the micro SD card that comes with the printer is often bad, and you'll discover that in the middle of a long print, which is very frustrating. You can get another SD card, but if you're doing that, why not get a Raspberry Pi to go along with it so that you'll never need to plug and unplug the micro SD card into your printer again, and you'll have a much better way of controlling your printer even from a web browser of any WiFi connected computer or device. In fact, if you connect a cheap USB camera, you can watch your prints being made remotely and even take timelapse movies! This is insanely easy to set up, and this instructable will take you through it, step by step. These instructions are written for a Mac computer, but the steps and programs are pretty much the same for any computer.
Step 1: Download OctoPrint

Go to https://octoprint.org/ and download OctoPrint. This is the image of the operating system that you'll put on your micro SD card. If that sentence makes no sense, don't worry: just know that you'll be putting this file on the SD card, but that you'll need to do it in a special way that makes the SD card a computer's operating system.
Step 2: Unzip OctoPrint

The OctoPrint disk image is huge and will take a while to download. It comes in a compressed zip file, and you'll need to unzip that. On a Mac, double click on the zip file. When it's done, you'll have another file that ends in .img. This is the file that you'll put on your SD card. But you can't just drag and drop it on to your SD card, you'll need a special program to do that. (There are other ways to do that, but this is the easy way.)
Step 3: Get and Install Etcher

Go to https://etcher.io/ and download the Etcher program for the operating system for your computer and install it on your computer.
Step 4: Put the Micro SD Card Into Your Computer


Most computers have an SD slot and you'll be using a micro SD card, so most micro SD cards come with an adapter. If your computer has an SD slot, put the micro SD card into the SD adapter, and put the adapter into the SD slot in your computer. Make sure that the micro SD card is well seated in the SD adapter.
Step 5: Using Etcher, Put the OctoPrint Disk Image on the Micro SD Card


Open the Etcher program on your computer, click on the Select image button and find the file ending in .img on your computer. Typically it will find the SD card automatically, but it's a good idea to look below the disk icon in the middle of Etcher's window and make sure that the size is about 32 GB. If it's not, you can click on "Change" and find your SD card. You wouldn't want to overwrite your computer's operating system with OctoPrint ? Finally, click on the Flash! button and wait until writing is complete. Etcher will show you it's progress and let you know when it's done, and it can take a while.
Step 6: Remove the SD Card From Your Computer and Then Reinsert It

You now have a full operating system on your micro SD card, but your computer needs to recognize the boot partition so that you can edit a file on it. Remove the SD card from your computer and then reinsert it. You'll see a new device named boot. Open it, on the Mac by double clicking the icon in Finder.
Step 7: Find the File to Add Your WiFi Network

You want to add your Raspberry Pi with OctoPrint to your WiFi network. The way that you do this is to update a file called octopi-wpa-supplicant.txt on the boot partition. Find that file and bring it up in your text editor. On the Mac, you double click on it and it comes up in TextEdit.
Step 8: Edit the File to Add Your WiFi Network


There are 4 lines that you need to change in this file. First, you need to "uncomment" the lines by removing the '#" in front of them. Just remove the first # from the 4 lines under the line "# 'man -s 5 wpa_supplicant.conf' for advanced options". You then need to insert your SSID (the name of your WiFi network) and your WiFi password. The first picture in this step shows the unedited file. The second picture shows the file if your SSID was Guardians and your password was IAMGROOT. (I sincerely hope that your password is a lot stronger than that.) Note that those 4 lines starting with "network={" and ending with "}" have the # removed. This is really important. Save the file in the text editor and then eject the SD card. On the Mac, you do that by pressing the ⏏️ in front of boot in the Finder. Remove the SD card.
Step 9: Fire Up Your Pi


OK, now things are getting really cool. You have an operating system on a micro SD card and are about to use it. (Feel free to take a break, grab friend or family, and shout, "my Linux OS is getting ready to run my 3D printer.") If your micro SD card is in a SD adapter, remove it and insert it into the Raspberry Pi. Then plug the power cord into your Raspberry Pi.
Step 10: Open a Web Browser on Any Computer in Your WiFi Network, and Browse to http://octopi.local/


Your Raspberry Pi with its new OctoPrint operating system is now joining your WiFi network. You will need to talk to it. On your computer, bring up a browser, and browse to http://octopi.local/. If after a few minutes, that doesn't work, then you'll need to find your Raspberry Pi on your local network. There are lots of ways to scan your local network, and strangely the best ones might be with your cell phone. Fing is one that I like, but there are a ton of others. When you find the address of "OctoPi.local", type it in to the web browser of your computer if octopi.local doesn't work. When you connect, answer the questions. Pick a user name, password, and answer the defaults.
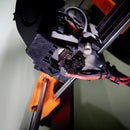
Step 11: Plug the Raspberry Pi Into Your Printer

Once your computer can talk to the Raspberry Pi through a browser, it's time to connect your printer. Just plug the USB 2.0 (the big end) into your Raspberry Pi (any of the 4 USB ports will work) and the micro USB end into your printer. Turn on your printer.
There's now a plugin that fixes the connection problem! If you don't want to do the steps below (and I suggest that you don't,) press the little wrench icon at the top of the OctoPrint window in your browser, and scroll down on the left side until you see "Plugin Manager" under "OCTOPRINT", and click on that. Search for "Malyan/Monoprice Connection Fix" (just the first few letters will do) and install it. Then everything works like magic!
If you don't want to install the plugin fix, browse to http://octopi.local/ on any computer in your network and press connect, disconnect, and connect in succession. This wakes up your printer, and now you're ready to go. (If this irritates you, and it should, Brandon Battis describes Bernd Zeimetz's great fix at https://bzed.de/post/2017/11/octoprint_autoconnect_printer/ that will connect your printer automagically.) You can also set up the Monoprice Select Mini through the Pi by following the instructions at https://www.reddit.com/r/MPSelectMiniOwners/comments/6ky6jj/octoprint_setup/. If you buy a cheap USB camera and connect it into another one of the 4 USB ports on the Raspberry Pi, you can view your printer as it makes neat stuff, and you can do time lapses of your prints. Have fun!


