

Introduction: Old Lens, New Camera


The idea.
Basically, I want to put an old lens on a new camera.
M54 would need an adapter. but as I have not or could not buy what fabriqué ..... but...HOW??
I show you how!!
Step 1: Dismounted


The lens is going to change (ZENITH HELIOS 58mm).
Remove the back of the 58mm.
on the picture you can see a 300mm lens that dismounted the back so you can place IN the 58mm.
Step 2: Plastic Rings


In this step, we will cut 2 plastic rings (for this I used two cds) for them to act as a seal between the adapter 300mm (Silver) and 58mm adapter (black).
measured with caliper and see which gives us a measure of 1.18 mm. this means that we have to cut it after sanding and reduced to 1mm.
well! we already have our rings, now sanded. well sanded! (remember. .. each with 1mm)
Step 3: Lace and Cut

Now we will fit one of the rings on the outside 58mm adapter.
the other ring cut into 3 parts so that we can create a lift and screw the adapter 300mm.
Step 4: Locking the Diaphragm


before closing (black cap 58mm adapter) we will lock the diaphragm.
we do this with an elastic band so that we can open and close the ciafragma manually later.
(this is because the anchor will be completely covered and we will not be able to work it from the command of the camera) is obvious! hahaha
then to lock it with a rubber band we get from the outside aperture control ring light we can have it in "semi-automatic mode" hahaha
Step 5: Glue

OK, now we can screw the lid and then to paste the plastic ring.
embedded and cut once, we will measure the position of the screws 300mm adapter and paste parts of ring cut into the other ring is positioned on the 58mm adapter.
Step 6: Measuring and Pasting


300mm lens has some rather fine metal rings. they serve so that if by mistake lack 1mm or 0.5 mm from the outside to the inner lens we can fix it.
As expected .... I miss 1mm
but I could be well solved with these metal rings.
so I took 2 of 0.5 mm and I stick to the 300mm adapter.
in Photo 1 we can see the metal rings and plastic ring. together are 2 mm. oh yeahh!
Step 7: Fire, Measure & TRY

into pieces of smaller ring ... I measured the location of the screws. With heated on fire really small screwdriver and create a hole so you can create a thread with the screw itself.
the new distance measurement from the outer lens to the second database adapter 300mm. really gave 44mm! that's good!
once done, screwed the adapter for Canon camera and once I certify that I was well fixed, I decided to TRY!
Step 8: Really Fixed


check that it is really fixed. any noise.
The aperture ring really works.
Now let's test the image!
Step 9: 1 Pic

this photo was made with the normal lens of my Canon T3i. 18-55mm
we can see the depth of field and lighting for comparison with the other later.
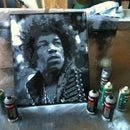
Step 10: 2 Pic

VOILÁ!
observe the depth of field.
excellent sharpness and exactly how far we were right!
(none of the 2 pictures, treatment has color, sharpness or contrast to programs)
--------------------------------------------------------------------------
Thank you very much for viewing this little project.
I hope to provide knowledge or can build your own project these ideas.
no matter the visual. mind the expected result!
Pablo Maritorena


