

Introduction: Origami Instructable Robot


Designed by: Nathan Nash
I would recommend that this model is folded from a 25cm sheet with colour on both sides (unless you want white antennas) or 14cm at a minimum.
Difficulty: intermediate (Please note that this is no beginners model and if you do have any difficulties ask in the comment for help and i'll try my best to help)
Attachments

Step 1:

1. Start with the coloured side up and valley fold to the right, repeat behind.
2. Valley fold the side to the left and repeat behind.
3. Unfold both sides, so that it's the same as step 2.
4. Fold the top edge along the center crease as shown.
5. Fold the left edge along the center crease.
6. Unfold everything, the result should be coloured side up.
7. Fold accordingly to the creases ( mountain and valley) and collapse the model.
8. Flatten the model.
9. Turn over.
10. Fold the two corners along the center crease.
11. Fold the edges to the center and unfold.
12. Turn over.
13. Rotate 180.
Step 2:

14. Valley fold in half and unfold.
15. Valley fold the top and the bottom to the crease made in step 14 and unfold.
16. Valley fold in between the existing creases as shown.
17. The result of steps 14-16
18. Make four creases at 45 degrees to the center crease.
19. Fold along the creases shown, collapsing the model.
20. Turn over.
21. Valley fold along the shown crease.
22. Result of step 21.
23. Fold along the creases shown, collapsing the model.
24. Result of step 23.
25. Fold the two edges to the center crease and unfold.
26. View changes to the side of the top flap.
27. Open up the side of the flap, as shown and fold along the creases shown, collapsing the model.
28. Repeat on the other side.
Step 3:

29. Fold the top three flaps upwards along the crease, the model will not lie flat.
30. Flatten the arms down.
31. Fold over the very top layer, the model will not lie flat.
32. Raise the two flaps to 90 degrees, then rotate the model 180 degrees.
33. Gently push the two points inwards turning them inside out. The model should not lie flat. Raise the two flaps upwards.
34. Fold along the creases shown.
35. Rotate 180 degrees.
36. Fold the two flaps upwards.
37. Fold the two flaps down at an angle slightly smaller than 45 degrees.
38. The result of step 38.
39. Gently fold along the shown crease, allowing the lower area to open up then flatten.
40. Fold the flap over.
41. Repeat steps 39-40 on the other side.
42. Valley fold along the crease shown and flip over.
43. The result.
Step 4:

44. Mountain fold the top slightly and shape the antennas.
45. Mountain fold the tip of the legs slightly.
46. Shape the legs.
47. Fold along the creases shown.
48. The result.
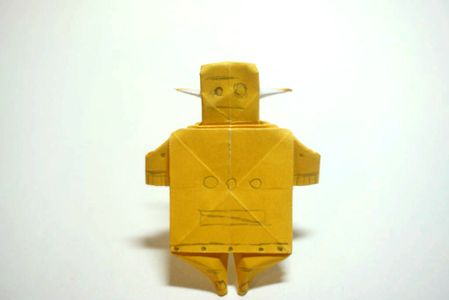
49. Finished Instructables robot.
Step 5: Finishing Touches


To finish off the robot copy the details from the instructable robot on with a black pen or pencil, or just go crazy and add whatever you want.
To display the robot you can use a piece of wire or even make it into a fridge magnet.
Thanks for reading.

Participated in the
On a Budget Contest

Participated in the
Homemade Gifts Contest

Participated in the
Papercraft Contest


