

Introduction: PIvena Assembly Instructions (B+)


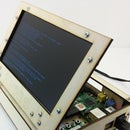
This instructable is going to show you how to assembling the PIvena Raspberry Pi Case! Head over to my website WildCircuits.com to read more about the PIvena or to thingiverse to download all the design files and make your own.
Step 1: What You Need


Before start building you will need to get all your parts together.
- A set of lasercut 1/8" baltic birch plywood parts (Thingiverse)
- A set of 3D printed parts (Thingiverse)
- (36) - 5/16" length 4-40 screws
- (11) - 1/2" length 4-40 screws
- (2) additional 1/2" screws are included in the Model B+ kit
- (4) - 5/8" length 4-40 screws
- (6) - 4-40 nuts
- (2) additional nuts are included in the Model B+ kit.
- (3) - 1" length standoffs
- (4) - 1/4" length unthreaded standoffs
- (1) - micro usb cable
- (1) - 2.1mm barrel jack
- (1) - 2.1mm barrel connector for the LCD screen power connection
Step 2: Assemble the Base


- Get the base plate, (4) 5/16" screws, (4) 3D printed corners
- Set the base plate down in the orientation shown in the first picture.
- Insert one of the 5/16" screws from the bottom side of the base plate in a corner hole
- Screw it into the bottom of the 3D printed corner piece
- NOTE: the bottom of the 3D printed corner is flat, while the top has a bump up that is used to align the top pieces.
- Repeat for the remaining 3 corners
Step 3: Right Side


- Grab the side plate (has a large rectangle cut out with a step in the top), (3) 5/16" screws
- Slide the side plate between the 2 3D printed corners.
- If it isn't fitting on nicely you may need to rotate the 3D printed corners slightly.
- Use (3) 5/16" screws to secure the side plate to the 3D printed corners.
Step 4: Raspberry PI B+


- Get (4) 5/8" screws, (4) 1/4" unthreaded spacers, (4) 4-40 nuts, Raspberry PI B+
- Insert the (4) 5/8" screws from the bottom of the base plate
- Slide the (4) 1/4" unthreaded spacers onto the 5/8" screws
- Set the Raspberry PI model B+ onto the screws. It should be held off of the base plate by the 1/4" spacers
- Use (4) 4-40 nuts to secure the Raspberry PI
- There isn't much space around the nuts when they are screwed down. Be sure that they aren't touching any solder or components on the Raspberry PI.
Step 5: Attach the LCD Button Board


- Get (2) 1/2" screws, (2) 4-40 nuts, LCD button board
- Insert the (2) screws from the bottom of the base plate in the holes for the LCD button board. (See the first picture)
- Set the LCD button board on the screws.
- Secure the LCD button board with the (2) 4-40 nuts.
Step 6: LCD Main Board and HDMI Cable


- Get (6) 5/16" screws, (3) 1" standoffs, LCD main board, HDMI cable.
- Insert (3) 5/16" screws for from the bottom of the base plate.
- NOTE: There are 4 holes in the base plate for the LCD main board, but you are only going to use 3. Putting a standoff in the hole closest to the Raspberry PI interferes with the Raspberry PI HDMI connection. But don't worry, the three posts hold things nice and sturdy.
- Screw the (3) 1" standoffs onto the screws
- Plug the LCD button board cable into the LCD main board, as pictured.
- Plug the HDMI cable into the Raspberry PI and run it underneath where the LCD main board will be.
- Set the LCD main board on the 1" standoffs.
- Use (3) 5/16" screws to secure the LCD main board to the 1" standoffs
- Plug the HDMI cable into the LCD main board.
Step 7: Wire the Power Plugs


- Grab the back plate, Barrel Jack, USB Cable, Barrel Plug.
- Heat up your soldering iron.
- Insert the Barrel Jack into the back plate. Pay careful attention to orient the connector so that the side you insert the power plug to is the side of the back plate with "5V 2A" engraved on it. The solder connections will be on the side of the back plate opposite the engraved text.
- Thread the nut onto the Barrel Jack so that it is firmly secured.
- Cut the micro USB end of the USB cable so that you have a 9" long cable.
- Carefully cut back the insulation by an inch-ish
- You only need the red and black wires, the white and green ones can be cut off
- Strip back a 1/4" of the insulation from the red and black wires
- Grab the Barrel Plug. Twist the red wire of the Barrel Plug together with the red wire from the USB cable.
- Twist the black wires together
- Solder the wires as shown in the last picture. The red wires will go to the connection that has a rivet holding the solder lug, the black wires will go to the opposite solder lug. The center connector remains unconnected.
- IMPORTANT!!!! Use a continuity meter to check your work. The center pin of the of the Barrel Jack should have electrical connection to the center pin of the Barrel Plug. The outer pin of the Barrel Jack should have electrical connection to the outer sleeve of the Barrel Plug.
- MORE IMPORTANT!!!! if you wire this wrong you can fry your PI and your LCD. Double check your work. I claim no responsibility for anything that goes wrong here.
Step 8: Back Plate and Power Connections


- Grab (3) 5/16" screws and the back plate you just wired.
- Install the back plate so that the rectangular cutout lines up with the GPIO pins of the PI.
- Use (3) 5/16" screws to secure the back plate to the 3D printed corners.
- Plug the micro USB connection into the Raspberry PI.
- If you have trouble running the USB cable under the LCD main board, remove the LCD main board, run the cable, then reinstall it.
- Plug the Barrel Plug into the LCD main board.
Step 9: Side With Kickstand


- Grab the side plate with the curved slot, (1) 1/2" screw, (3) 5/16" screws, Kickstand arm, Kickstand spacers (two small wood circles that at joined together)
- Separate the Kickstand spacers. They should break apart easily.
- Slide one of the Kickstand spacers onto the 1/2" screw.
- Put the 1/2" screw through the curved slot in the side plate. Refer to the third picture to make sure you get the orientation correct.
- Slide the second Kickstand spacer onto the 1/2" screw
- Use a screw driver to thread the Kickstand arm onto the 1/2" screw.
- The Kickstand arm has an "S" engrave onto it. You should screw into the hole OPPOSITE the S. The hole marked "S" is larger so you won't be able to thread into it.
- Make sure that the screw is loose enough that the arm can slide in the curved slot.
- Lastly, install the side plate with Kickstand onto the left side of the case.
- Use (3) 5/16" screws to secure it in place.
Step 10: Top Back


- Grab (2) 5/16" screws and the Top Back piece (it looks very similar to the Top Front piece, but it is narrower and only has 2 holes)
- Set the Top Back piece on the top of the 3D printed corners such that it is over the Raspberry PI.
- Use (2) 5/16" screws to secure it to the 3D printed corners.
Step 11: LCD Installation


The rest of the assembly is the same as the PIvena Model B case, so head over to that instructable and pick up at step 11. https://www.instructables.com/id/PIvena-Assembly-Instructions/
That will take you through assembling the LCD in the bezel, mounting it on the PIvena, connecting the LCD flex cable and installing the front panel.


