

Introduction: Paper Mache Brio/IKEA Rails


IKEA rails (also known as brio rails) are wooden toy railroads, which are great fun and my son owns a ton of them.
One day my wife was not at home and me and my son agreed, that we should build a railroad that connects all rooms in our flat. Project this big unfortunately failed, due to lack of wooden rails. I didn't want to give a budget for buying new rails and 3D printing them would take a lot of time and precious filament.
After some thinking we came up with an idea, making them from paper mache!
Supplies
- Filament for mold
- My 3D model
- Old newspapers or paper
- PVA glue
- Vegetable oil to grease mold
- 10x M3x40 screws matching nuts
- Drywall joint compound
- Water
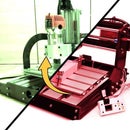
Step 1: Designing Mold


I designed mold in Fusion 360 by modeling the negative of the brio rail. It consists of two parts, the main part, and the lid. The main part of the mold has modeled holes on the sides, so the excess water can escape through them. It also has holes for the M3 screws, so we can stuff the whole thing with a mache and screw it tightly together (which will press the mache into form). The lid has snap in holes, for the M3 nuts.
You can download my model from below link:
https://www.prusaprinters.org/prints/142736-brio-ikea-rail-mold
Step 2: 3D Printing Mold


I printed the mold from transparent PETG, I hoped I could see through the mold, where more stuffing of the mache is needed (I could not see anything). The print itself took around 3,5 hours (first try, yay!).
Step 3: Paper Mache

For the paper mache I was inspired by paper mache clay I found on a lovely page named Ultimate paper mache. I tweaked it a little bit, for our needs.
Recipe:
- 1 1/4 cups soaked paper/newspaper (all we could find in our paper bin)
- 1 cup premixed drywall joint compound in a plastic tub (but not DAP brand joint compound)
- 3/4 cup Elmer’s Glue-All or any PVA glue
The soaked papers were mixed smooth in our blender, the rest of the stuff was added later in a bowl. Mixed with a hand mixer
Step 4: Grease the Mold

I used the vegetable oil, to grase the mold, to prevent sticking.
Step 5: Let's Close It!

Close the lid and screw the screws. I recommend doing it in a sink, or somewhere waterproof. Also, I wouldn't use a cordless drill for screws, It might cause plastics to tear.
Step 6: Enjoy!


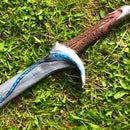
It took a few days for the rail to completely dry. Because of my impatience, I tried to unmold it too early and the outer connecting piece broke off. The great thing about this rail is, that kids can paint it to their liking!
I do not recommend using the oven for quicker drying, since it might warp the mold. If you are impatient like me, you can enclose the whole mold into the airtight box with a good amount of silica gel.
Step 7: Bonus


We also tried to mix sanitary silicon sealant with red food coloring and cornstarch. The resulting putty was molded as well and the result is flexible rail, which is great for hardly manageable turns, or ramp transitions. My son even uses it as a bath toy :-).
Thanks for reading my instructable!
Kudlas

Participated in the
Paper Challenge


