

Introduction: Part Printed Dip Pen


I really love dip pens, I have made lots and lots of them and I am always iterating on designs in order to make the ultimate dip pen.
Seen as we are in the middle of #inktober its a dam good time to release a dip pen instructable!
I have one design which is incredibly ambitious and requires 3d printed parts but in order to make sure everything will work out as planned I have created a few intermediate steps to prove concepts and make sure everything should work out as expected.
This design was intended to prove that a 3d printed part could be re-enforced with a brass tube and reduce the likelihood of delamination during turning (where stresses will be introduced which would be very uncommon for a standard 3d print)
I also wanted to see how nice Translucent Red PLA could look when burnished on a lathe.
Whilst creating this project I learned a few things which I should have been expecting but wasn't. Mainly that turning printed parts should be done on a medium speed as any excess heat occurring through turning can melt the PLA and result in a less than perfect finish.
Step 1: Modeling the 3d Printed Part


Heads up. I am very new to 3d modeling on a computer and 3d printing so your skills and knowledge here might be much greater than mine. You might even be able to create better parts than me. I encourage you to do so and please share your creations in the comments.
I used Tinker Cad for this project because it is a very easy program to use, and whilst I am getting to grips with 3d modeling on the computer I think its a brilliant thing to be able to learn the fundamentals using an "easy" program before cutting my teeth on a more advanced software such as Fusion 360 which is a brilliant program but not one I currently feel super confident with.
Building in tinker cad.
Building in Tinker Cad is lovely and easy.
Pretty much a case of pick a shape and put it where you want it.
I started with a cylinder shape and added another cylinder as a hollow shape inside the original shape before grouping the objects which resulted in my original cylinder becoming a tube as the hollow shape was reduced from it.
I knew from making pens before that I should be aiming for a few critical dimensions. These were easy to create by clicking into the dimension boxes and adding the dimensions needed.
The most critical dimensions were the brass tube I used to re-enforce the cylinder. 7mm wide (I used 7.1 to allow for imperfections in the print) and 51mm tall. Other than that all I needed to do was allow enough meat on the print to allow myself to work.
The tubes I used are readily available from most turning supplies. They are commonly used as part of wood turned slime line pens. Here is a link to the ones I keep in stock . (I use these as they are the perfect size to hold the dip pen inserts)
Once I was happy with the shape I saved it as an STL file.
Tinker Cad automatically names your files this one is called Brilliant Trug-Duup feel free to use it- the file is attached to this step.
Attachments

Step 2: Printing


I used a version of Cura slicing software to create the instructions for my 3d printer to work with.
your printer or a printer you have access to might work best with different settings and your filament might work better with a different temperature and feed rate. The ones I used are visible in the images shown on this step.
Other slicers are available and I believe the current version of Cura is better and has more support than the one I used.
It was important for me to ensure the orientation of the part required little to no support, I have printed parts in the past which required supports due to non-ideal orientation and this resulted in a higher fail rate.
Step 3: Inserting the Tube


The brass tube required a little force to go into the printed hole. I used a bench vice and was happy with the result.
Step 4: Chucking Up and Fitting the Printed Tube


The following steps will have some tools and techniques which might be not familiar to non-wood turners. I have written a primer for people interested in woodturning which will explain these tools and techniques available here.
Alternatively, I have a video showing the creation of a non-3d printed dip pen on a different instructable here .
I held a chunk of wood with the dimensions of around 18cm long by 3cm wide in the lathes chuck and turned a tenon to fit in the 3d printed part. In order to make this easier I used the tube to indent a mark to guide the thickness of the tenon.
I then ruffed the inner brass tube with sandpaper and added CA glue to the tenon in the hopes of creating a decent bond when the two met.
(Incidentally, CA glue isn't the best for this job west system epoxy would be far better but I had a severe lack of time to make this prototype so I compromised)
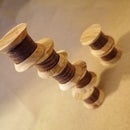
Step 5: Shaping the Pen


I prefer a more ergonomic grip for my pens so I used a spindle gouge to create my desired shape.
It's important to note if your tools are not sharp you could negatively affect the printed part by introducing heat at this stage. A benefit of using translucent PLA here is that I could see how much material there was between my tool and the brass tube. This isn't the case with wood and in the past, I have ruined pens by turning too deep.
I have been experimenting with worn looking finishes so for this pen as a prototype I thought I would intentionally rip grain in order to fill the rough surface with a darker wood dust. This resulted in the look of some of the tools I used when I was very young. I am glad I now know how to achieve this look but it's not one I will likely use for finished works.
Step 6: Insert the Calligraphy Nib Insert and Slam a Nib in It


The last step is to add a calligraphy nib insert.
I get mine from stilesandbates.co.uk who have always been lovely to me though you might be able to find them elsewhere for cheaper or in your own country.
The nib insert holds the nib which is really the business end of any pen.
The good thing about this type of pen is you can change the nibs as many times as you want and there's a whole world of nibs available to give you different lines, marks etc. you can also change inks super fast. I do like a good dip pen.
So would I recommend a part printed dip pen?
Yes. Though this isn't the prettiest dip pen I have ever made the weight of the PLA is very comforting in use and the PLA is resistant to the inks I have used so far, any accumulation of ink has wiped off easily)

Runner Up in the
Plastics Contest


