

Introduction: Perpetual Wall Calendar - Customizable


I have a fondness for advertising wall calendars of the type popular in the 1960's. At that time, many calendars had Sundays in red, and today no readily available calendars...even at specialty calendar shops...have that feature. I also have a fondness for perpetual calendars. These two interests led to the design and creation of this calendar, which can be customized to feature any subject that interests the maker. I prefer the advertising motif, but the top frame could contain just a family photo, original art, or any subject that you deem interesting for this use.
I used card stock 8 1/2 x 11 paper and a color laser printer. Conceivably, everything could be created as 8 1/2 x 11 photographs and sent off to a printer that can do prints at that size. Or the aspect ratio could be changed to 8 x 10. I went with the biggest size I could do with a standard home printer.
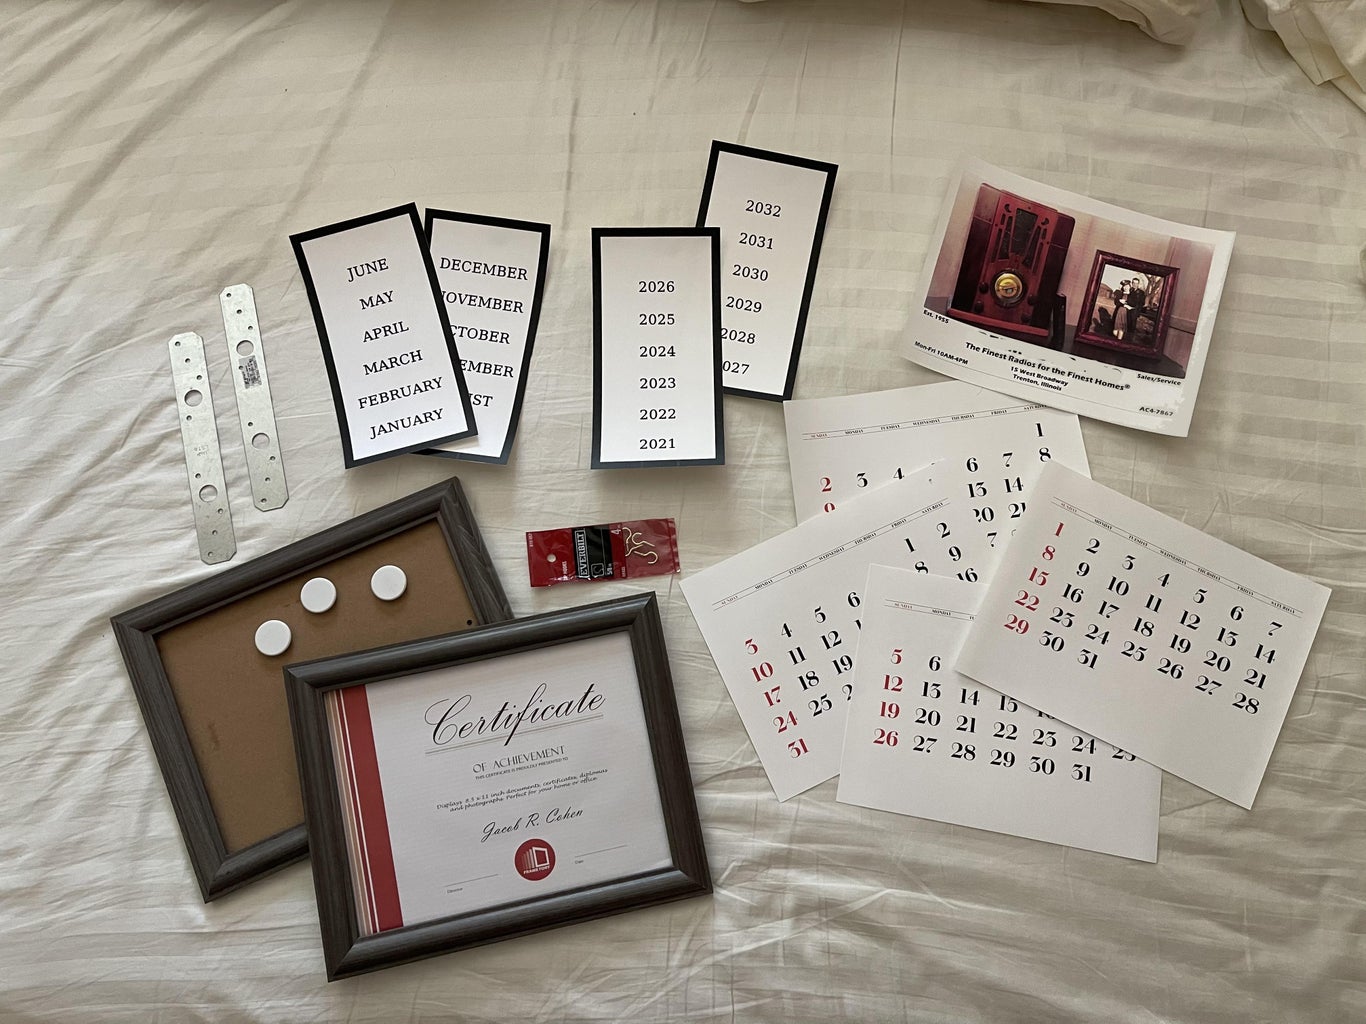
At the heart of this project is the perpetual calendar. It consists of SEVEN 31-day months. One starting on Sunday, one on Monday, one on Tuesday..... The object is to cover the 'unnecessary dates' with a magnet as you place the next month with the proper alignment in the frame. Two sliders were added to allow the display of the MONTH and the YEAR. I recognize that this method of displaying the year goes against the principle of being a "perpetual" calendar. All I can say is after 12 years....ditch the year. Or better yet, print out the next 12 years
Supplies
Two 8.5 x 11 picture frames (ideally with easy to open backs)
NOTE: Glass is not needed
8 1/2 x 11 card stock (plain paper would work OK, too)
Metal strap ties from a home center (see options in step 3)
Three 1" round magnets
Four 5/8" cup hooks from a home center hardware aisle
Four pipe cleaners (now called 'chenille stems' at craft stores)
Thumbtacks
Step 1: Design, Print
I have included .pdf files I created for the month sheets and the sliders. You are free to use them or to use them as an example create your own. For example, you may want text/graphics on the MONTH sheets.
Create the top frame picture to fill a 8 1/2 x 11 sheet or to suit your own idea of graphic art. This is where the customization/personalization shines through. My major hobby is vintage and antique radios, with a collection of approximately 20 models. As displayed here, I've created a fictitious radio store in my hometown, established in the year of my birth.
I glued the month sliders back-to-back and the year sliders back-to-back, but that isn't necessary. You can stack them. They'll be held in place by friction and advanced by sliding them down to the next label when appropriate.

Step 2: Create the Slider Drag Bars

Because the MONTH and the YEAR sliders need to be able to be advanced when needed, I used pipe cleaners held by thumb tacks as shown...two per slider, twisted together to tighten them enough to do the job. I admit there is room for improvement here with some kind of channel to hold the sliders, but this actually works just fine.
Step 3: Add Cup Hook Hardware to Connect Frames

After creating a slight pilot hole with a small nail, screw 5/8 inch cup hooks into top frame and bottom frame, aligning as shown. This allows the bottom frame to be easily removed without disturbing the MONTH and YEAR sliders.
Step 4: STEP 4 - Add Metal Behind Bottom Two Rows of Calendar Dates
The key to the perpetual calendar is covering the unnecessary dates with magnets. I used thin flat strapping metal pieces available in the lumber section of a home center, but any thin metal (coffee can rolled out, Altoid tins snipped to size) can serve the same purpose. I mounted my strapping pieces to the back of the bottom frame because the 1" magnets I had are fairly strong. You an choose to mount such metal to the front of the frame if you use weaker magnets. HINT: You can print the calendar months double sided to reduce overall thickness.
Step 5: Display! Use!

USING THE PERPETUAL CALENDAR
When you unhook the bottom frame, you will simply be moving the proper MONTH to the frame front. Move the MONTH slider down to the next month or flip/swap out the next six MONTHS when required. Likewise, slide the year slider down to the proper year when January rolls around. Cover the unnecessary dates.
I think that this design is attractive and does a decent job of capturing the essence of calendars no longer printed. I have not been able to find ANY site that will print a one-off calendar with red Sundays. If I had, I might not have gone through this effort. It's very strange how such a popular custom fell out of favor.
I'd love to see a few "I MADE IT!" posts for this one if it strikes you as a worthy project.

Participated in the
Home Decor Challenge


