

Introduction: Pikachu Pokemon Art Doll Tutorial


This art doll was inspired from the Pokemon live action movie Detective Pikachu. I wanted to make a realistic looking Pikachu with glass eyes. From pattern making, sculpting, wire armature and making glass eyes, this tutorial can be tailored to make your own art doll. To help with the making process you can check out the video provided.
Supplies
Monster clay / plasticine clay
Polymer clay
faux fur
packaging tape
polyfil stuffing
plastic pellets
wire, aluminum foil
2 part epoxy adhesive, white glue
acrylic paints
mixed media paper
glass cabochon
thread, wax thread and needle
sculpting tools, scissors, wire cutter
Step 1: Pattern-making


I made the pattern by first sculpting a clay form. I used Monster clay but you can use any wax or plasticine clay for this. Then I cut pieces of packaging tape and cover just half of the clay form. I used a sharpie to mark out the pieces where I will cut and you basically have a jigsaw puzzle pieces of patterns. I traced the tape pieces on paper and created darts so that I can flatten the tape pattern on paper. Just make sure you have 2 pieces of each piece of pattern to cover the other half of the form. Also, it's important to take note of the direction of fur when you cut the pattern from the fur fabric.
The tail and ear patterns were just drawn free hand.
The last picture shows the darts sewn up. The darts help to shape the fabric.
Step 2: Sewing the Pattern


I hand sew the fabric but if you have a sewing machine this will help to make this process faster. I sew first the one half of pikachu which you can see as I held it against the clay form. Then sew both halves of Pikachu together but not the back part so that you can place the armature inside. Sew both halves for the tail and ears leaving one end open where the wire will be inserted. The stitches I used for sewing are back stitch and ladder stitch.
Step 3: Making the Glass Eyes


I made my own realistic eyes by painting on mixed media paper with acrylic paints. Then I glued the glass cabochon on top with adhesive.
Step 4: Sculpting With Polymer Clay


I used polymer clay to make the the face, hands and feet parts. To prevent the face from becoming too thick I shaped the aluminum foil to a round shape and sculpted the face on it. The foil will be removed later after the clay has been baked.
To sculpt the face, I first covered the foil with a layer of clay. Then I pressed the glass eyes about half way from the head. I then mark out where the nose and mouth adding clay where more clay mass are needed such as around the eyes, muzzle and cheeks. While I'm sculpting I always refer to my reference to check for likeness.
The hands and feet are just log shaped forms then baked.
All these lay pieces will be covered with fur so no need to make it smooth.
Step 5: Making the Body Armature


I used a thick aluminum wire and shaped it like a key hole. The rounded part at the top is where the head will be attached. Then I attached a thinner piece of wire across the main wire armature for the arms. The ears and tail will also have wires attached so that they can be posable. To add weight to the art doll, I weighted it with plastic pellets secured from a pouch. I then wrap the main armature with polyfil stuffing and secured it in place with thread.
Once the armature is built I dress it up with the body fur pattern that and sewed the back. Then placed the fur tail and ears and sewed that in place too.
Step 6: Attaching the Clay Parts


I attached the face plate by first drilling holes on either side and using a wax string, I threaded it through the face plate to the thick wire armature for the head.
The hands and feet clay parts are adhered to the wire parts with 2 part epoxy putty.
Furring is probably the most time consuming part but I find it to be crucial to make it realistic. I started adding fur from the outer part of the face then going inwards. I used white craft glue and making sure that it is dry before I proceed to the next layer. Also, It's important to take note of the direction of the fur so I always have my reference on hand. I covered the hands and feet by starting from the toes or fingers then going upwards.
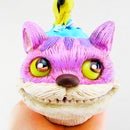
Step 7: Painting With Acrylic Paints


To paint the fur I find that its best to keep the paint on the watery side and have a paper towel handy to remove excess paint. I painted the markings on the ears, cheeks and back. I also painted around the eyes and mouth . Now he looks like he's ready to solve a mystery.

Second Prize in the
Sculpting Challenge


