

Introduction: Pottery Wheel/Spirograph


"I have a little Dremel,
With it, I'll play with clay.
And when it's dry and ready,
With clay I shall play.
Oh, Dremel, Dremel, Dremel!"
That's how the song goes, right? That's how I interpreted it anyway.
Hi, my name is Brian and today I'll be teaching you how to make a pottery wheel and Spirograph (circular art) out of the spare bits you may already have. Please keep in mind, this will be a homemade project from you to a loved one in your life. With that in mind, all pieces to this Instructable can be switched out for whatever suits you better (ex. the Dremel itself can easily be switched out for a cordless drill.)
Bring your ingenuity, and let's begin!
What I used:
-x1 Dremel
-x1 Dremel bit (rough sandpaper)
-x3 Caster wheels
-x3 Three parts of lamp post from an IKEA lamp (taken from my previous Lighthouse Lamp Instructable)
-x3 Spools of sewing thread
-x1 Large cork (from a ship in a bottle kit)
-x1 Super glue
-x3 Rolls of Washi tape (though I think duct tape would be preferable)
-x1 One medium sized, lightweight wheel (mine came from an ab roller gadget)
-x1 Deconstructed mini-easel (I think these come in a five pack at Michaels for like $4)
-x1 Drive to create a fun Christmas gift for my son!
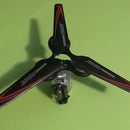
Step 1: Create Tripod Base


This is the first and arguably most important step. A secure tripod allows for the blazing RPM's of the pottery wheel.
With super glue, I glued one caster wheel to each of the three lamp metal rods. Surprisingly, super glue bonds very well between the plastic of the caster wheels and the metal rods. If you don't have caster wheels, that's fine! It would actually make this project more secure to not be on wheels. I chose to add caster wheels so that my son can push this around to where he wants to try it out, without having to lift it up and balance it. I think it also adds a cool look ;).
Once your wheels are on, we get to the tricky part. Align your legs into a tripod stance and push down the cork onto the top. This step takes constant pressure, so if you find yourself unable to secure the cork correctly, ask for a helping hand to hold everything in place as you secure. I secured the cork in place using sewing thread first. Once I felt the sewing thread had the cork on relatively secure, I did my same under/over pattern with a roll of Washi tape. Pay careful attention that you are reinforcing the inside of the tripod as well, so that your legs don't collapse in when you go to pickup the pottery wheel.
Step 2: Securing the Dremel's Battery

The important element of this step is that you secure the battery in such a way that you can still charge it when you need to. I made the mistake by the end of this project of running my tape too high. So, when my battery dies, I will have to redo my taping after I'm finished recharging the battery (not a big deal!)
Secure the battery in the same fashion as the cork. Use thread first, then cover in Washi tape. Make careful note that your battery is level. It's easier to add the Dremel if you are already level.
Step 3: Securing the Dremel/Adding the Wheel


Just like the battery, it is important in this step to be able to secure the Dremel, while still giving you the option of removing it later to recharge the battery. I used the wood from one of the mini canvases to achieve this. After gluing on the wood pieces, in such a way that they did not touch the battery portion, I secured the Dremel onto the battery base.
*Mistake I made- At the end, I Washi taped over the full area, which means that when it's time for me to recharge the battery, I will have to cut the outer layer of Washi tape to disconnect the Dremel from the battery. Again, not a huge deal, but in the future I will avoid securing the full unit together.
Now, unfortunately I don't have a good picture of how I secured the wheel to the Dremel bit, but I think you'll be able to handle (you've gotten this far!) I wound sewing thread around the Dremel bit until I could barely squeeze it into the center hole of my lightweight wheel. Once the bit was fairly secure inside the wheel, I superglued the opening, bonding together the bit, thread and wheel. It formed a very tight bond and will be able to handle the high speeds.
At this point, I used a bit of super glue to glue on two base papers. These papers will allow my son to make a quick Spirograph with crayons before we move into the clay part of this.
*Important note- Before adding clay to the top of the wheel, I will be covering the paper in plastic (probably a trash bag I'll cut to shape). Also, I will be moving the pottery wheel outside, since there are no splash guards, the clay/water will want to spin everywhere. That's okay! My son is going to love this little outside mess (my wife maybe not so much, but cool toys is what Christmas is all about ;).
Step 4: Ready to Use!

And now, look! You have a beautiful, hand-made Christmas present for a child in your life. It's easy enough for anyone to use as a Spirograph maker (just add new paper, turn on and use some crayons) or as a pottery wheel (just cut plastic to cover).
I hope to see your version of this soon! Merry Christmas and happy holidays!

Participated in the
Design For Kids Challenge

Participated in the
Wheels Contest 2017

Participated in the
Homemade Gifts Contest 2017


