

Introduction: Raspi Pip-boy, Portable Gaming Console / Computer


Hi, I would like to present my first raspberry-pi project.
A Pip-boy like Personal Computer (if you are a Fallout Fan, you see what i mean) ! :
Overview :
- Raspberry-pi model B + a 2.8″ LCD 8bits parallel TouchScreen connected on GPIOS.
- Lxde Desktop session. Can be controlled with Touchscreen or wireless Keyboard.
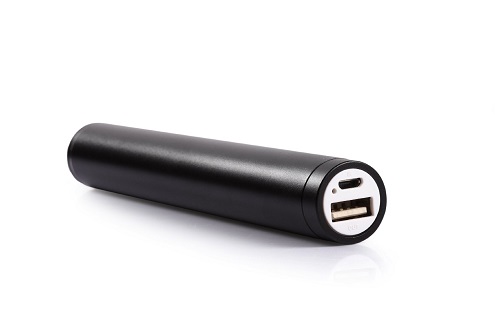
- It is powered with a 5V-1A 2600mAh battery which gave approx 3h of autonomy (about 2h if wifi dongle is used).
Up to 9-10 h with a 10000mAh powerbank (but more weight)
- Self-made case using 2 plastic photo frames (cut, screw and a little vit of glue), so the Raspi Pip-oy can be attached to arm.
It supports USB wifi dongle, Bluetooth mini-keyboard, webcam, joypad, etc..
It can display / record / steam video source (IP cameras, webcam) and run AdvanceMame Arcade Game Emulator.
2 switches are connected to GPIOS : the first to switch between displays (console/Dektop) and to command and the second to perform a safe shutdown.
Usage examples :
- ultra-mini broadcast system : display - control - record - stream video sources.
We use it with a webcam and a telescope. People that are around the telescope watch the images on the pip-boy screen. And the pip-boy also streamed the images for people watching through internet.
- portable gaming console
- Remote controller
Read more on Hardware-libre
General demo video :
MAME playing demo :
Elphel Network Camera streaming display :
Step 1: Hardware Parts

Hardware parts :
- 1 xRaspberry Pi model B + basic raspi case(30 – 35 €).
- 1 x ITDB02-2.8 TFT LCD 2.8″ Touchscreen from ITEAD STUDIO (15 – 20€).
- 1x Li-Po 2600mAh battery (10 – 15€) – 3 hours of autonomy.
- 2 x Plastic Transparent photo frame and 2 x fixing parts taken from snowboard gloves.
- 2 x microswitch (salvaged from a noisy toy).
- 25 x Female-Female Dupont wires.
Step 2: Software Parts
Software parts :
- OS : Raspian wheezy .
- Framebuffer and Touchscreen drivers based on FBTFT.
- AdvanceMame Emulator.
- Some Python scripts for microswitches management.
- Modifiy rc.local file, X11 configuration, evdev xinput configuration to match your needs.
FBTFT Drivers :
The FBTFT drivers are now included in the Raspberry Pi kernel and can be installed with rpi-update.
You have to set and enable the driver module for your TFT.
For this project (TFT is a ITDB02-2.8), the device is registered with this command line :
sudo modprobe fbtft_device name=itdb28fb gpios=led:18,db0:14,db1:15,db2:4,db3:23,db4:24,db5:27,db6:8,db7:22,dc:3,wr:2,reset:25
- "gpios" must match your wiring / "name" is the specific fbtft driver for the TFT model.
- alternatively, you can modify gpios in the source (fbtft_device.c file) and compile the modified driver (https://github.com/torvalds/linux/blob/master/drivers/staging/fbtft/README)
- See https://github.com/notro/fbtft/wiki, there are many informations about TFT drivers on these pages.
Step 3: Assembling


- See how to wire the TFT Touchscreen on the GPIO header of the Raspberry Pi on the corresponding picture.
- cut the 2 x Plastic Transparent photo frame. Use glue to fix the screen and screw the raspberry Pi.
- Attach the 2 x fixing parts taken from snowboard gloves.
- sew an elastic for mounting the Power Bank.
Step 4: Playing With Pi Camera
1st Test of the Pi amera mounted on a simple Lego Turret. (Details about mounting and Python Touch Camera Interace coming very soon !!)
Participated in the
Raspberry Pi Contest


