

Introduction: Reclaimed Nearly Free Tool Shed


I wanted to build a shed so my back yard would not look like a winter or summer tire storage ground with sharp gardening tools and lumber for my curious kiddos to hurt themselves on. I was also given a budget of zero dollars to create this shed. So I started talking to home builders and watching craigslist free ads.
I will state right away that not everyone may have access to all of the free materials that I was able to get, but you should be able to build a fantastic shed for far, far less than you might expect if you "get scrappy" and are patient. It took me about 3 weeks to gather all of the materials little bit by bit and then about 2 weeks for building the shed as I did it all myself.
Materials List and Where to Find Them:
2x4's, OSB board and lots of nails:
Go to a site where they are developing houses and ask them if you can raid their scrap piles or construction dumpsters. They will usually say yes if you are kind, respectful and thank them profusely. Please be careful when gathering materials out of dumpsters, it usually has rough edges and can contain nails and screws.
I got upwards of 30 2x4's of all sizes (a few were 12') and simply had to pull some nails off of them or deal with slightly warped boards. The same goes for the OSB scraps. Many coils of nailgun nails end up in the dumpsters as well if they jam. I just used my tin snips to cut the copper wire between the nails and used them just like regular nails. I also had a bunch of nails for my nailgun already that I used for the cedar siding.
Cinderblocks for Foundation:
Many people post these for free on Craigslist whenever they are removing or renovating their deck.
Metal Roofing:
I saw a large steel barn going up in town and stopped to ask if they had a scrap pile and they were very excited that I could lighten their load that they would have had to take to the landfill. Should you not have this opportunity, I would recommend either making your own cedar shingles, getting standard tar shingles from home construction site dumpsters or finding a roofing company in town that might let you know where they are putting in a metal roof that they are likely to have small amounts of extra roofing.
Cedar Fenceboards:
Same goes for these, I got 250 old nasty looking boards that I then planed down. out of all 250 I did hit one nail... try not to do this or you will need to sharpen your blades or worst case buy new blades. The fence boards were all over 25 years old and looked like they should just be thrown in a bonfire, but I the time, weather and compaction of the grain led to me actually keeping some choice pieces for their amazing color and grain to use on some small projects instead.
Screws, Hinges, Brackets, Latch:
These items were already to be found in my workshop, but can be found at your local Habitat for Humanity ReStore or for a reasonable price at your local hardware store. The one thing I spent money on was the special metal roofing screws with the neoprene gasket that keeps the roof watertight. If you score metal roofing like I did then definitely make sure you use these special screws, otherwise just get more cedar fencing and make yourself some cedar shingles!
Tools I Used:
Gloves
Eye Protection
Ear Protection (for the planer, if nothing else)
Shovel
Level
Framing Square
Hammer
Power Drill/Screwdriver
Chop Saw
Circular Saw
Jigsaw (not necessary, just nice to have)
Reciprocating Saw (not necessary, just nice to have)
Table Saw (only used for cutting the 45degree angles on the vertical corner trip pieces)
Planer (you could use a belt sander instead, but I borrowed a planer and it was AMAZING)
Nailgun & Air Compressor (you could also use a hammer and finish nails)
Step 1: Leveling, Squaring the Floor


Make it level.
At the bottom if it's not level by a little bit... It'll be WAY out of level at the top.
I needed to dig my cinderblocks into the ground a bit to level everything.
Then, make sure everything is square. There are several ways to check this- I used a construction framing square to check every 90 degree angle.
I wanted a strong enough floor to stack tires and rims on for my winter and summer tire sets, but I only had 2x4's rather than 2x6's and didn't want to make the floor another 2 inches higher off the ground. So I made several cross members more than I absolutely had to- this came especially handy when I put on the floorboards which were pieced together. If you don't have really large pieces of OSB or plywood, you'll get sagging if there aren't enough 2x4's underneath them so build the floor liberally.
Step 2: Wall Framing


So I had originally set out to build a shed that was 6x7 floor area and 10' at the back and 8' at the front with a sloping metal roof.
I built the wall frame for the 10' back and stood it up. It's mostly in the first picture. 10' is really high.
My wife said, in her very lovely voice "No way. Make it shorter."
So I dropped that wall and cut it down to 7.5' at the back and 6.5 at the front. It looks much better than it would have.
There will probably be comments to this section that I should have made a horizontal cross-bar midway through the tall wall for extra support. I would certainly have done that if I had kept the wall at 10', but I am very comfortable with the strength of the building overall.
The walls are made of 2x4 lumber with 3" long deck screws going from the bottom of the wall frame into the floor frame, then each corner is reinforced with large L brackets.
Step 3: Box It In


A lot of OSB sheets later, I have a really big box.
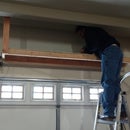
The rafter boards I used were the nicest, straightest kiln-dried pieces that I had from all of my dumpster diving. I don't want the roof falling down on me :) I attached them with offset 90 degree steel straps.
I then took my reciprocating saw and trimmed the extra osb board that was hanging over the top. I saved the longest, most complete pieces for the roof so that they would be as contiguous as possible.
Step 4: Tar Paper


If you happen to have it, or can find some in the dumpster- using a vapor barrier between your roof wood and whatever material you have is absolutely what you want to do if you want this shed to last.
That said, thatched roofs made of grass have stood up for hundreds of years of rain, sun and snow... so there are many ways to roof a building.
Step 5: Cedar Transformation


Free cedar fence-boards from craigslist.
25 years old, never stained or painted. some had rot on the bottom where they touched soil. All of them looked like the craigslist poster simply wanted someone else to pay for their dump run. Everyone thought I had just acquired a very heavy rotting pile of garbage. Then I sent the first few through the planer and voila! Some of these boards were too colorful, patterned and knotted to use on the shed, I've kept those to make other reclaimed instructables in the future.
The rest became the siding for my shed.
Step 6: Siding


A nail gun and a level come in very handy on this one.
The boards I had were long enough to go full length along the front of the shed, but on the sides and back, I needed to use more than a full length. I chose to intersperse the boards in different lengths to vary the starts and stops of each plank. I would recommend this as more aesthetically pleasing, but to each their own.
When I got to the angled top where the roof line made things tricky, I used my level as a straightedge ruler and matched in pencil the line of the roof 2 inches down into the top two boards so there would still be overlap and the angle would match the line of the roof. I cut these boards lengthwise at this angle using a handheld jigsaw, a table saw with a jig would make very clean, precise cuts.
Step 7: Adding the Roofing


I did this in the evening so the photos are a little dark.
I wanted to have nearly all of the siding up first and then add the roof on top so it wouldn't interfere with the side angled pieces that needed to be cut and fit, then recut and refit again.
If you are using metal roofing, be sure to #1 wear gloves and be safe lifting it- it can be incredibly sharp and can slide off the roof if you're not careful. Having someone help you on this step is highly recommended.
steel roofing has rib lines that should all be running downhill so that water and snow can easily follow the slant, they will overlap onto one another at each side on one of these ribs.
Be sure to use self-drilling metal screws with a neoprene washer that compresses when screwed in to a watertight seal. This was the only part I spent money on and they cost about $0.23 each at Ace Hardware.
Step 8: Put a Door on It!


There are lots of great videos and plans on how to build a shed door.
I went with the simplest and lightest I could build that was still made with a simple rectangular 2x4 frame and a panel of OSB screwed to the outside face. I used standard door hinges- there are many types of hinges available but these are stronger than necessary and have a low profile which I liked because it allowed me to cover the entire face of the door with cedar. I did not overlap the cedar on the door so that it would stand out as the obvious door.
Step 9: Finishing Touches


I then added the final trim pieces of fascia cedar siding to the very top of the shed in front and back where the rafters opened to close out any cold air getting in and out during the winter. I then sealed any cracks in the OSB or gaps in the cedar from the inside with spray-can foam.
Before screwing in the final steel roofing screws in the very front, I did add a long metal dripline edge catch piece that was screwed through with those last screws into the edge of the front wood fascia. This helped give a more finished look to the front top edge and could save some trouble with water running under the metal roof if the wind blows it upwards.
I added a left-to-right hasp on the door at a height far above the reach of my young children that I can add a padlock to if I ever want to.
UPDATE:
Thanks so much to @KurtPH for the great idea of finishing the exterior corners with some vertical pieces. I cut long pieces with a 45 degree angle along their length with a table saw and cornered them together with 18 gauge finish nails. It really gives a great finished look and is shown on the last photo and the new instructable headline photo. Thanks Kurt!
Isn't she a beut!?

Runner Up in the
Outdoor Structures

Participated in the
Reclaimed Contest 2017


