

Introduction: Small Scale Home Production


This instructable is more of a guide and an inspirational on how to run small scale home production on PVC pipe instruments and just about anything in general, hence the more of a guide.
So I won't be going into specifics about sizes, dimensions, and such this is already covered
in my shackuhachi instructable. https://www.instructables.com/id/How-to-make-a-Shakuhachi/
WARNING!!!!
DO NOT CUT OLD PVC ON ANY KIND OF CIRCULAR SAW, IT WILL SHATTER AND HURT YOU. THE OLDER PVC GETS THE MORE BRITTLE IT GETS AND IS PRONE TO SHATTERING. (don't ask me how I know)
Things to keep in mind about producing.
TIME:
What ever you can do to reduce the time you spend doing something is better.
Such as making jigs, or if you can automate a procedure. If you can automate you can set it and go on to do other things that can't be automated, effectively doubling your man power.
Cost:
Try to reduce cost. You can do this by; reducing the time on a particular procedure by making jigs and automating. IE producing more using the same amount of time. Using less material or making more efficient use of the material you have IE generating less waste.
Checking your production system:
Run one unit all the way through first. You want to do this to ensure you have your process and production system down. You don't want to get to the end of your first run and find that they are all ruined because you missed something.
Do one thing at a time a number of times:
Do each procedure of the process one at a time, IE cut fipple's and do nothing else until you are done with all the pipes. Not even removing flashing or anything of the sort. If you miss one unit and have gone on to the next step in production, leave it! don't go back and do it, it's wasting time. Leave it for the next run.
Quality control:
You are your own quality control.
You should be inspecting at the beginning middle and end of every step of the process.
The purpose of quality control in not just to ensure good workmanship but adjust and or improve the process if quality is not being met.
PLAN PLAN PLAN!
Even though it's the last section in this intro it's the first and last thing to do.
Make sure you have a plan before going into action. Plan out your raw materials, cost, time for a production run, cost per unit. This includes raw materials, man power, overhead, tool cost, electricity...ect. Keep in mind even though you may already have drill press, drill bits, sandpaper ect.. they will need maintenance, sharpening, and replacing. You may not see it
on the front end but you will see it on the back end sooner or later. So factor that in.
Once your done with your first production run take a good look at your process and look for improvements.
How can you work more efficiently but not necessarily faster, sometimes trying to hurry will cause waste, poor workmanship or worse injury. Work smarter not harder.
Look to see where can you eliminate waste, recycle and reuse. It's not just good for the environment it's good for your wallet! If you make efficient uses of your resources you will conserve them and not have to purchase as much for the next run, in turn saving you money.
And lastly what improvements can you make to the product. Look for ways to make your product(s) better or more attractive to potential customers. Set your self apart from the compition.
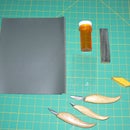
Step 1: Raw Materials


Raw materials
I started with 3 10ft. lengths of 1" SCH 40 PVC pipe
At 21 1/2" this will yield 15 flutes
scrap wood
measuring and marking devices
wood screws
Tools I used
radial arm saw
table saw
drill press
hand drill
A side note on tools and materials;
Don't be afraid to dumpster dive, get what you can for free.
Check the free section in Craig's list. For example, some one is giving away a beat up used up desk. Look to see if you can salvage the wood from it and re-purpose it. Like cutting
it up for knife handles.
another example the place where I was just laid off from had a large band saw. When the saw became dull the saw blade was tossed in the trash. I asked If I could have it and now it
can be re-purposed to become knifes! The saw blade will make great knifes, it's high carbon steel and has already been heat treated so all I would need to do is shape it and sharpen it.
Also don't be afraid to modify old and discarded power tools to do your biding. It's all about working smarter not harder.
Always keep on the look out to see what you can use and re-purpose.
Step 2: Start Cutting Blanks


I used a radial arm saw but you can use a chop saw as well to cut 15 blank flutes.
I marked the distance on the saw table to needed length.
Note that I didn't use a stop because on my saw using a stop traps the blank in between the saw and the stop. This is bad because if I pull back on the saw, the saw will hit on cut pipe and either ruin it or chuck it some where.
So instead I just made a mark and worked it that way. 'tis better to be safe than hurt!
Step 3: Cut the Fipple's


I made a jig for this part to demonstrate how jigs can help you cut angles more easily and repeatedly (and yes this saw does have and angle adjust)
First I marked the angle that I wanted on the table and drew a line.
Using a completed flute I compared how and where the cut would be made relative to the saw.
Using a scrap pieces of plywood, I screwed them down to snugly hold the pipe at the desired angle.
Using a scrap piece of pipe I made a test cut and found that I need a shim on the bottom.
Making a second test cut and comparing to a finished flute I had the setup I needed and proceeded to cut fipple's into all the pipes.
Step 4: Drum Sanding the Bottom Lip Piece


For the bottom lip piece I used a bigger pipe and shaped it to what I needed.(another jig !)
I then slid it over the unfinished flutes and drew the shape on to them.
Once I drew the shape on to all the flutes I sanded them to shape using the drum sander on
the saw. You could also use a belt sander.
Step 5: Trim the Flashing


Next I trimmed the flashing on all the flutes. Note in the pic I have a utility knife, I should have used and Xacto.
Step 6: Marking the Finger Holes


To mark and make the finger holes I made I made a jig for the drill press.
using a some plywood scrap I cut a base and screwed two parallel stripes of wood, In similar fashion to the one attached to the saw table.
Then I marked from one end of the jig at what distance my holes needed to be made.
The line and mark to the far right is the back hole, with the 4 markings on the left are the top holes.
I proceeded mark all flutes.
Step 7: Drilling the Finger Holes


I then drilled a test hole to set the depth stop on drill press on one flute.
Once I achieved the desired depth I drilled holes on all the flutes.
Just as a side note it might seem quicker to mark and drill the holes while you have the flute already on the jig. However if you do it that way will be turning the drill press on and off for every flute. It's quicker to do nothing but drill.
Step 8: Clean Up the Sharp Edges


Using fine sandpaper I removed all the sharp edges and smoothed out the fipple and bottom lip section.
I then put masking tape on the fipple and bottom lip section to make it ready for spray painting.
Step 9: Make a Paint Stand


Next thing I did was set up a paint stand.
I used scrap wood screwed into my home made saw horse.
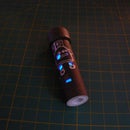
Step 10: Paint!


paint!
I started by putting primer to cover all the black lettering.
Then I painted the flutes using multicolored textured spray paint.
Using your dog as an assistant is optional.
Step 11: That's It!!!!


I've taken you on a basic tour on how you could potentially start your own small home business doing what you like.....making stuff!
You can give these away for Christmas, birthdays or take them to the local swap meet (flea market).
You could even sell online as well, your ambition is the limit.
Remember this is guide on how to run production, not just make a bunch of shackuhachi's.
Use it as a blueprint to guide you on producing something else you might want to make.

Participated in the
3rd Epilog Challenge


