

Introduction: Sand Sculpture


Sand sculpture is a great mixture of challenge and reward, whether you’re the only weirdo piling up sand on the beach, or you’re a part of a collection of weirdos at your local sand sculpture festival. It’s a great way to spend a day with family and friends, doing something that is profoundly silly.
In this Instructable I’ll be focusing on how to make stuff out of run-of-the-mill ocean beach sand. There are sites all over the world where folks can make gargantuan skyscrapers of sand, but those places tend to feature sand that really wants to stick to itself, due to high silt or clay content or underground glue reservoirs or divine intervention or random cosmic magnetic anomalies. Sticky sand removes much of the limitations that come with a sandy beach on the ocean, allowing for more altitude, undercuts and detail, but most of the basic principles are the same. So this ‘ible should help, whether you’re piling up sand or silt.
I’m also going to focus on structured sand sculpture events and competitions. Because while I think it would be awesome to head out and make something on a random beach somewhere for people to find just for the hell of it, I lack that particular brand of discipline and have only managed to go play in the sand when there’s a sandy event going on.
Step 1: What You Need


An excuse
My excuse is usually my local sand sculpture event, the Friends of the Dunes Sand Sculpture Festival, in Eureka, California. A few other times it has been Sandsations in Long Beach, Washington. I'm sure I'll come up with a few other excuses one of these days.
Friends (or gullible enemies)
Most events have a set number of people allowed on a team, and the work goes by a lot quicker if you can trick a few folks into helping, especially with the initial piling. My 2019 sculpture was a whole lot more fun because a few more friends than usual stopped by to help during the first hour, then I had the rest of the afternoon for the fun part. My daughter helped the whole time by spraying water and doing several other tasks, but I have 4 or 5 other folks who just helped for a little while and then wandered off. That works for me because I don’t mind being the only carver so all I really need is help with the initial pound-up, but most competitive teams are composed of folks with a range of carving skills who are working the whole time.
Carving tools
Every sculptor’s suite of tools for sand carving is unique, but broadly speaking I recommend tools designed for clay, like loop tools. Beyond that, a small shovel or cement trowel can come in handy, and brushes, brooms and rakes can help groom the surface of the sand (usually as a last step).
I hang a plastic straw around my neck, which keeps it handy for blowing away loose sand as I carve details using small tools.
Pressurized sprayer
Use this to keep the sand from drying out and blowing away; an almost constant mist is usually required to keep from prematurely losing your work to dryness. Tip: bring along a strainer for refilling with ocean water, so you can avoid bits of gunk and hapless crustaceans. I use a retired gold-mesh coffee filter.
Caution: Our carving was briefly interrupted during the 2019 Friends of the Dunes Sand Sculpture Festival by a loud noise like a gunshot, which turned out to be one of those sprayers exploding into bits! My guess is, it may have been weakened by a few years’ worth of sun exposure, then over-pressurized. Yikes!
Stacking aids
Of course you can get by with nothing but your hands and a shovel if you’re sticking with a traditional sand castle or a large but rounded-off structure (like a whale in profile) or a small-scale sculpture, but you’ll need some kind of form to assist you with packing the sand into a pile if you’re hoping for any real altitude.
The idea is to pile some wet sand on some other wet sand, tamp it down, then add another layer until you’re pile it taller than your sculpture is going to be. One of the simplest forms to use is a bucket or plastic trash can with the bottom cut out, which you can place upside-down and pack with wet sand. To corral the sand for larger structures, you’ll need a form made of plywood or clamped roofing paper or an old above-ground pool… there are lots of strategies, but I’ll focus on plywood (see step 3) because when folks really go over the top into colossal sand sculpture, they seem to rely almost exclusively on plywood forms.
Tamper
Use a jackhammer if you’re deadly serious and have no qualms about making everyone hate you for little while. Quieter options include a commercial tamper which is basically an 8” square steel plate at the end of a stick, or you can make something yourself: plant a handle into a coffee can and add cement, zip-tie a plywood square to the top of a sledge hammer, use a barbell with only one weight on the end, or just do a lot of jumping up and down. When you pour water on your packed sand and it runs right off or is very slow to sink in, you know you’re doing it right. If water sinks quickly in a certain spot, you know the sand is too loose there; poke a few holes and pour more water in that spot, then tamp and pack until the water slows.
Water
On most beaches you can dig down a bit and hit nice wet sand and then water, but you still need to scoop a bunch of it into your forms. That usually means shovels and buckets and lots of work.
In some cases you can get the bulk of your sand from the area immediately adjacent to your sculpture, dropping the level of the sand to grab more height in a hurry. It makes your sculpture harder to see from a distance because you're in a hole, but it can speed things up.
Bring at least one 5-gallon bucket (with a handle) per helper, smaller buckets for smaller helpers. These will be in constant use or the first hour or two of your sand sculpting day, as they’re filled, dumped, filled again, with water and sand and sandy water and watery sand. If you have a backhoe, use that instead, it’s somewhat faster.
Step 2: Getting to the Beach

On some beaches you can just drive your gear out to the site of your sculpture and leave it there, but in other places you’re looking at a bit of a hike. That means you either need more people helping or less gear or some kind of cart with nice big wheels that can handle sand.
My local event is right on the edge of too-dang-far-from-the-road-to-haul-plywood, but we manage. Every year I tell myself I’m going to come up with a wheeled setup that will make the gear transport easier, but as of this writing I have yet to do it, and I instead end up making multiple trips to the car. You can do better than that; please be smarter than me.
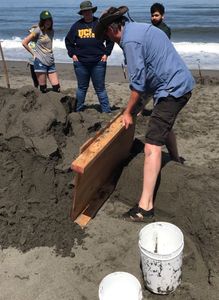
Step 3: Plywood Forms


Most plywood forms are constructed of ½” to ¾” panels and 2”x4” lumber, in pairs of “innies” and “outies,” which alternate and fit together in squares or rectangles or other polygonal shapes.
Large sculptures are made by stacking multiple forms on top of one another. The first form is filled and tamped down, then a smaller form is added and filled, and the process continues until you’ve got what looks a bit like a traditional multi-tiered cake. The top form is then removed, and the sculptor carves that part while standing on a lower tier. When the top is done, the next form down is removed, and the process continues until all the forms are gone and you’re left with a towering masterpiece.
My forms are similar, with one minor tweak: there are no innies or outties; they’re all constructed identically with their 2”x4” crosspieces at a slight angle. The advantage is that I don’t need to keep track of pairs, and I can use an odd number of panels if I feel like it. So for example with eight panels, I can make a five-panel base with a three-panel second tier.
Build your own forms using plywood thick enough to withstand warping, 5/8” works well. Length can vary, but 8’ or 4’ make sense since plywood is usually 4’x8’, and most folks seem to have settled on 2’ for the height. 2”x4”s should be at least a foot longer than their plywood panel, so there’s plenty of room for them to overlap each other (at least 6” on each side). Screw the 2”x4”s flush with the top and bottom edges to make an outtie, and 1.5” from the top and bottom for an innie. Or to go slanted like mine: run the 2”x4”s from the top edge on the left to 1.5” below the top edge on the right, and from 1.5” from the bottom edge on the left to flush on the right (see illustration).
I’ve used a few methods to assemble these: Duplex nails mean a lot of thumping that makes me nervous. Screws work but they mean I have to drag my beloved Makita drill to the beach. Ratchet tie-down straps work too, as long as the length is sufficient. Regardless, your form has to withstand an enormous amount of outward pressure and weight, then be relatively easy to disassemble.
Step 4: Stacking Sand
In a perfect world, when you removed your forms, you’d be left with pristine, vertical edges, perfect geometrical shapes to carve. In the real world, you’re at the mercy of all kinds of forces (most notably gravity), all conspiring to knock down your sand.
To maximize your chance for success, avoid non-sand bits like rocks and shells and seaweed, stack evenly and tamp down well as you stack. Keep adding wet sand, or dry sand and then water, temp, repeat. It’s a lot of work and seems to take forever no matter how many folks are on your team! But it pays to be patient at this stage, because going too fast can result in tragic hazards like pockets of sand that are less compacted, which can contribute to unpredictable collapse and percussive profanity.
New sand is angular and stacks better, old sand is harder to stack because it’s smoother and is more easily bossed around by gravity. The quality of the sand can vary tremendously depending on the topography of the ocean and the beach and what kind of little bits make up your particular pile of sand. My local sand sculpture event has notoriously rounded sand. For that reason, my standards are low: all I can realistically hope for around here is a reasonably tall core that’s solid enough to carve, because the corners always fall away. When I head up the coast to Long Beach, Washington, the sand stacks a bit higher, but still, no perfect corners. One must come to terms with that kind of thing if one is to engage in sand-piling activities.
Step 5: Design, Planning


There are normally a few loose rules about content at sand sculpture festivals and competitions—no politics, keep it family-friendly, etc.—but beyond that, the only limits to what you can make out of sand are your imagination, time and gravity.
No matter what you’re building, because time is short, it’s best to have a clear plan together before you hit the beach. I always have a few pages of doodles or reference photos, and I often do a quick sketch in clay beforehand, which helps me visualize how everything fits together.
Sand sculpture events have an element to performance art to them: at first there are usually not many folks pointing and laughing, but then as the day progresses, spectators like to come by and watch the sculptures take shape.
I think what works best in this environment is a sculpture that tells a very short story, ideally a story that can be at least partially understood right away, becoming clearer as more detail is revealed. A good name for the sculpture helps tell that story; usually you’ll have a chance to write your sculpture’s title on an official marker on a post, but if that’s not an option, bring a homemade sign, or take the time to make a sand block with the name carved into it. For example, my daughter helped name my 2017 sculpture “Heigh Ho, Oh No (a Miner Accident),” in which a giant snake is depicted devouring the Seven Dwarfs. I had made a little clay “Doc,” which I stuck to our sign post. Between the name and the character, the “story” was very quickly understood, and spectators enjoyed the (sick) joke long before the last detail was applied. And almost no one could resist counting the dwarf-shaped humps in the snake: “…five… six… seven!”
At the 2019 Friends of the Dunes event I knew I wanted to make a big giant guy busting out of the ground, but I didn’t have a story. I came up with “beach cleanup” intending to have him scooping up trash, but there was (happily) none available that day, so someone suggested he could be pulling up non-native beach grass. Perfect! So I went with that, and most folks seemed to understand what I was shooting for, explaining it to each other, in on the “joke.” Of course many other important questions were left unanswered, like “who is this guy?” and “why is he so big?” and “what is he doing underground?” and “are those barnacles on his head?” I’m okay with letting folks fill in the details in their own head, as long as there's a rough narrative.
The spectators become invested in your sculpture when they understand the story, and they’re eager to come back and see it finished.
Step 6: Carving


Michelangelo or Leonardo or some other ninja turtle once said something like, “Remove everything that isn’t your sculpture.” Any sculpting practice you do in any other medium will help you sculpt sand.
Always start with the highest point in your sculpture and work down, so your falling sand only lands on uncarved surfaces.
Use big tools like your cement trowel to rough out your shapes, then move to smaller tools for the details.
Concentrate on the focal points first—the bits that tell the story—then go back and add detail to the stuff in between. For example, the first part I did for “Beach Cleanup” was the eyes, so everyone knew right away that a big giant dude was on the way. When the face was complete, I blocked out the hand, leaving the body and arm kind of lumpy. Had I run out of time, the details would have suffered but the story would have remained intact.
The moment you’ve exposed part of the surface of your sculpture that’s “done,” you’ll need to keep misting it so the sand stays where it is. If you’re lucky and it happens to be “fogging cats and dogs” like it sometimes does here in Eureka you might be able to skip this entirely, but it’s more likely that you’ll be working in warm weather, and you’ll need to keep misting. This is a great job to delegate to someone else while you carve, if you have that luxury.
If you have the time after the sculpture is complete, take the time to smooth out the sand around it using a rake or broom. It makes the piece look finished, and photos turn out nicer.
Step 7: Dig!


I hope this encourages you to get out there and dig. Please share your questions, helpful hints and photos in the comments below.
I added a few sand sculptures I’m churned out over the years to this step. Future sandy endeavors (and carved pumpkins and other silly things) will be available at mikecraghead.com, Instagram: mikecraghead, Twitter: mikecraghead, Facebook: stupidmiketricks.
And if you have a moment, please vote for this ‘ible in the Art contest, because my entire wardrobe is comprised of Instructables t-shirts and I need more colors.
Cheers!
Mike

Grand Prize in the
Art Skills Challenge


