

Introduction: Secure IOT With AWS and Hornbill ESP32 Using Arduino.


Security of connected devices is of paramount concern. There are several possible ways to make the devices secure. One of the most essential and widely used options is to use end to end encryption. The widely used Transport Layer Security (TLS) version 1.2 is the latest standard used on web for secure connections including banking. There are very few micro-controller based solutions that implement TLS 1.2 due to lack of resources. ESP32 is one of the most affordable options out there. So let’s look at securely connecting Hornbill ESP32 Dev board to Amazon web services (AWS) IOT.
We will start with configuring AWS account, setting up the thing, generating the security certificates, testing with a MQTT desktop client and then communicating with the hardware.
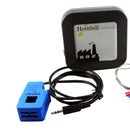
You'll need an ESP32 Dev board to accomplish this. We are running a campaign for the most affordable and feature rich ESP32 dev tools called Hornbill. Get one from the campaign here:
Step 1: AWS User Account :

For using the AWS services you need to have a user account and login using the AWS Login link
Existing users can directly login and directly jump to next. New users should register first and link the credit card for payments. Basic plan is free for first Year, other plans are chargeable.
Step 2: Creating a New Thing :

After Login, click on Signin To Console to go to AWS dashboard. Now type AWS IOT and Select the AWS IOT (Connect Devices to Cloud) from drop down as shown below.
Step 3: AWS Window :
Now the AWS GetStarted Window will open only for the first time. Click on GetStarted to go to dash board.
Step 4: Click on Register :

Things for registering a new Thing as shown above.
Step 5: Click on Create to Create a New Thing.

Step 6: Provide a Unique Thing Name

Step 7: MyTestThing Is SuccessFul Created As Shown Below.

Step 8: Get the MQTT HOST Name and Thing Name From Interact Menu. These Will Be Used to Connect With AWS MQTT and Also to Subscribe/publish the Topics.

Step 9: Generate Certificates for New Thing :
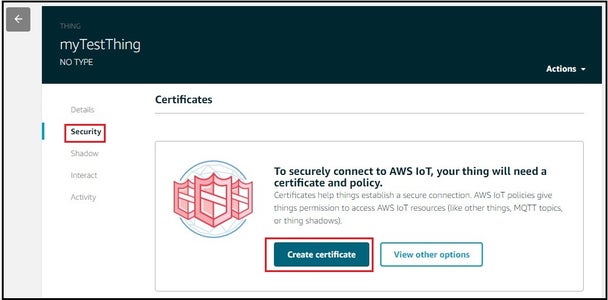
Go to Security menu and click on Create Certificate to register the certificates.
Step 10: Click on the Activate Button to Activate the Certificates and Download the Certificate,private Key and Root CA As Name Them As Below.

- aws-root-ca.pem
- certificate.pem.crt
- private.pem.key
Step 11: Define and Attach Policies:
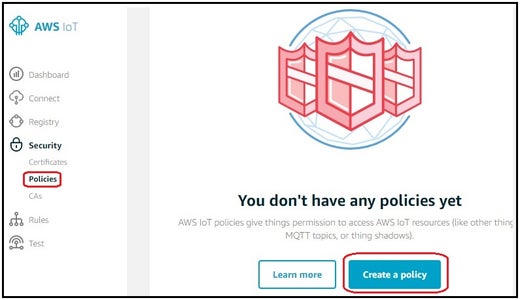
Go do AWS dash board and select the Security-->Policies and click on Create a Policy as shown above.
Step 12: Define the Policy for MyTestThing As Shown Below.

Step 13: Now Go Back to Certificates and Attach the Policy That Was Defined Above.

Step 14: Select the Thing and Attach the Policies Define Above.

Step 15: Verify the Attached Policies:

Now verify whether the policies are attached to newly created thing as shown above.
Step 16: Testing Using MQTT Fx Tool :

As we have a test thing and also the certificates assigned with required policies. We can test it using the MQTT Fx broker tool. Lets list all the info we had while creating the thing and it certificates.
Broker Address / HOST Name: xxxxxxxxxx.iot.us-west-2.amazonaws.com
Broker Port : 8883
The string in the broker address marked with xxxxxxxxxx will be unique to your account.
Certificates:
- aws-root-ca.pem
- certificate.pem.crt
- private.pem.key
Step 17: After Doing the Above Setting, Connect to the AWS.

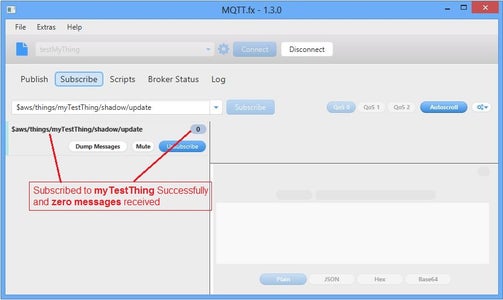
Step 18: Subscribe to the Thing That We Created in the Above Tutorial.

Step 19: Successfully Subscribed to the MyTestThing.
Step 20: Now Select the MyTestThing Topic and Publish a Message.

Step 21: The Published Message Is Successfully Received.

Step 22: Industrial Data Logger :
The sample code for logging the temperature and Current using HornBill ESP32.
Step 23: AWS IOT With Arduino ESP32 :

Now lets see hot to use the Arduino esp32 AWS IOT library to communicate with AWS server.
Download the AWS IOT library for Arduino ESP32 from this link.
Now open the first example pubSubTest.ino as shown above.
Step 24: Wifi SSID and Host Address Configuration :

Configure the below parameters at the beginning of the sketch as shown in the image.
- WIFI_SSID
- WIFI_PASSWORD
- HOST_ADDRESS
- CLIENT_ID
- TOPIC_NAME
Step 25: AWS Certificate Configuration

The below certificate and private key needs to be copied to aws_iot_certificate.c file in the form of array.
- aws-root-ca.pem
- certificate.pem.crt
private.pem.key
Step 26: Upload the Sketch and Verify the Output

Publish and subscribe(received) messages printed on terminal.
Step 27: Published Message Viewed on MQTT Fx Client Software:

Step 28: Publish a Message From MQTT Fx Client and Verify the Received Message on Terminal.

Step 29: Logging Temperature and Humidity Using DHT11 Sensor :

After setting the AWS client and AWS IOT lib, lets log the real time temperature and humidity using DHT11 sensor.Install the Adafruit DHT11 sensor library using Arduino Library Manager or download it from this link.
Do the connection as shown above.
Now copy paste the below code and configure the Wifi SSID, Host Address and upload the sketch.
click here for code.
Step 30: Temp and Humidity Logged to AWS IOT Server.

Step 31: Download :
Download the Arduino ESP32 AWS IOT lib and examples form this link.
Thank you for going through the entire Instructable. For us continue bring you this stuff support our product campaign below:


