

Introduction: Simple DIY 3x4 LED Display for Arduino MEGA / Uno / Nano

In this Instructable I'll show you how to make a small 3x4 LED 'display' for an Arduino with a minimum of 12 pins (in this case I used an Arduino Uno). One reason for me to build this was to make a small display by just using the Arduino without needing an extra microcontroller - I just wanted to build something with with basic components. I know that I could do this better but it was my first own Arduino project (before that I just re-build other projects and copied the codes).
Step 1: What You'll Need...
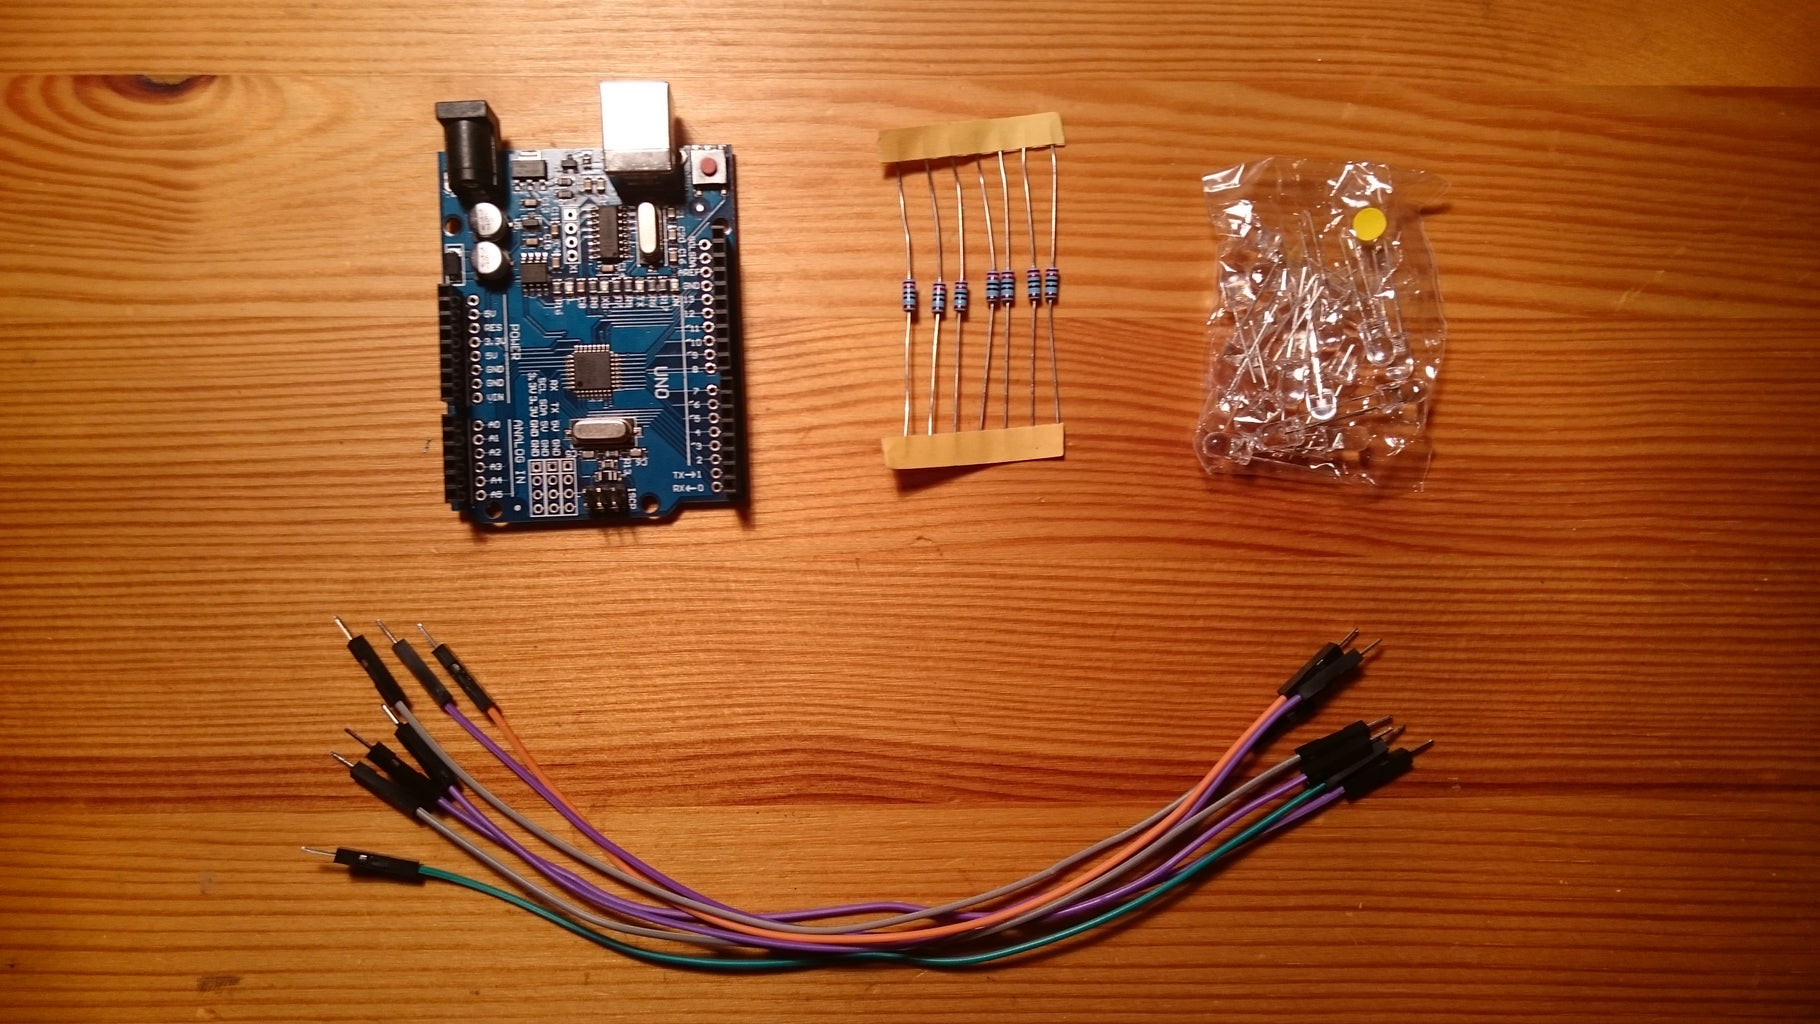
For this project you'll need...
Materials:
- 1x Arduino MEGA / Uno / Nano (one with a minimum of 12 pins) [I got mine from China]
- 12x LED's [I got these in a mix of 20x red, blue, yellow and green also from China]
- 12x 220Ω Resistors [I got these from a local components store]
- Cables [I used jumpercables which I cutted in half - also from China]
- some cardboard to mount the LED's on
Tools:
- Soldering Iron (optional)
Step 2: The Setting of the Components
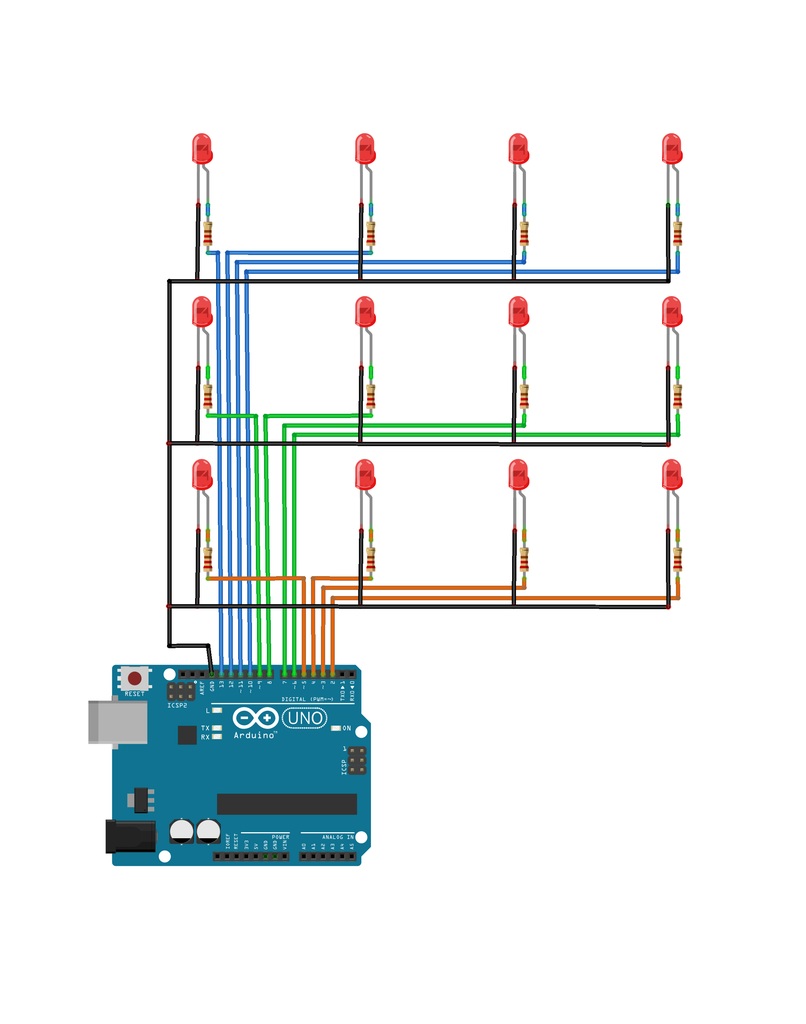
Here you can see the plan, how the components are connected.
Step 3: Build Log


First I poke holes for the LED's in the cardboard and inserted the LED's. Than I soldered all negative pins together (the copper wire). After that I soldered the resistors to the positive pins and soldered the wires to the resistors.
Why do you need the resistors?
First I just soldered the wires to the LED's but the main chip of the Arduino can not handle all LED's togehter -> it will get really hot (on a long period of time it will damage your chip). The main chip can only handle about 200mA (it depends on your board).
Step 4: Final Display...


I just added a frame and some legs so it can stand beside the Arduino.
Than you just have to connect all wires to the Arduino as shown on the picture or on the sketch above.
Step 5: The Code...
Here's an example code which lights up the LED's as shown in the animated picture:
Head of the Code:
void setup() {
  pinMode(13, OUTPUT);
  pinMode(12, OUTPUT);
  pinMode(11, OUTPUT);
  pinMode(10, OUTPUT);
  pinMode(9, OUTPUT);
  pinMode(8, OUTPUT);
  pinMode(7, OUTPUT);
  pinMode(6, OUTPUT);
  pinMode(5, OUTPUT);
  pinMode(4, OUTPUT);
  pinMode(3, OUTPUT);
  pinMode(2, OUTPUT);
}
Main part of the Code:
void loop() { //Here I have all frames for the animation
  int a2[4] = {1,0,0,0}; //Each array stants for each line and each '0' or '1' stands for each LED
  int b2[4] = {0,0,0,0}; //1 = LED ON - 0 = LED OFF
  int c2[4] = {0,0,0,0}; //I'm using three arrays here to see how the result will look like
  led(a2, b2, c2); //I excluded the code which tunrs the LED's ON or OFF
  delay(200); //Time between the frames - I animated the

  int a3[4] = {1,1,0,0};
  int b3[4] = {0,0,0,0};
  int c3[4] = {0,0,0,0};
  led(a3, b3, c3);
  delay(200);

  int a4[4] = {1,1,1,0};
  int b4[4] = {0,0,0,0};
  int c4[4] = {0,0,0,0};
  led(a4, b4, c4);
  delay(200);

  int a5[4] = {1,1,1,1};
  int b5[4] = {0,0,0,0};
  int c5[4] = {0,0,0,0};
  led(a5, b5, c5);
  delay(200);

  int a6[4] = {1,1,1,1};
  int b6[4] = {0,0,0,1};
  int c6[4] = {0,0,0,0};
  led(a6, b6, c6);
  delay(200);

  int a7[4] = {1,1,1,1};
  int b7[4] = {0,0,1,1};
  int c7[4] = {0,0,0,0};
  led(a7, b7, c7);
  delay(200);

  int a8[4] = {1,1,1,1};
  int b8[4] = {0,1,1,1};
  int c8[4] = {0,0,0,0};
  led(a8, b8, c8);
  delay(200);

  int a9[4] = {1,1,1,1};
  int b9[4] = {1,1,1,1};
  int c9[4] = {0,0,0,0};
  led(a9, b9, c9);
  delay(200);

  int a10[4] = {1,1,1,1};
  int b10[4] = {1,1,1,1};
  int c10[4] = {1,0,0,0};
  led(a10, b10, c10);
  delay(200);

  int a11[4] = {1,1,1,1};
  int b11[4] = {1,1,1,1};
  int c11[4] = {1,1,0,0};
  led(a11, b11, c11);
  delay(200);

  int a12[4] = {1,1,1,1};
  int b12[4] = {1,1,1,1};
  int c12[4] = {1,1,1,0};
  led(a12, b12, c12);
  delay(200);

  int a13[4] = {1,1,1,1};
  int b13[4] = {1,1,1,1};
  int c13[4] = {1,1,1,1};
  led(a13, b13, c13);
  delay(200);

  int a14[4] = {0,1,1,1};
  int b14[4] = {1,1,1,1};
  int c14[4] = {1,1,1,1};
  led(a14, b14, c14);
  delay(200);

  int a15[4] = {0,0,1,1};
  int b15[4] = {1,1,1,1};
  int c15[4] = {1,1,1,1};
  led(a15, b15, c15);
  delay(200);

  int a16[4] = {0,0,0,1};
  int b16[4] = {1,1,1,1};
  int c16[4] = {1,1,1,1};
  led(a16, b16, c16);
  delay(200);

  int a17[4] = {0,0,0,0};
  int b17[4] = {1,1,1,1};
  int c17[4] = {1,1,1,1};
  led(a17, b17, c17);
  delay(200);

  int a18[4] = {0,0,0,0};
  int b18[4] = {1,1,1,0};
  int c18[4] = {1,1,1,1};
  led(a18, b18, c18);
  delay(200);

  int a19[4] = {0,0,0,0};
  int b19[4] = {1,1,0,0};
  int c19[4] = {1,1,1,1};
  led(a19, b19, c19);
  delay(200);

  int a20[4] = {0,0,0,0};
  int b20[4] = {1,0,0,0};
  int c20[4] = {1,1,1,1};
  led(a20, b20, c20);
  delay(200);

  int a21[4] = {0,0,0,0};
  int b21[4] = {0,0,0,0};
  int c21[4] = {1,1,1,1};
  led(a21, b21, c21);
  delay(200);

  int a22[4] = {0,0,0,0};
  int b22[4] = {0,0,0,0};
  int c22[4] = {0,1,1,1};
  led(a22, b22, c22);
  delay(200);

  int a23[4] = {0,0,0,0};
  int b23[4] = {0,0,0,0};
  int c23[4] = {0,0,1,1};
  led(a23, b23, c23);
  delay(200);

  int a24[4] = {0,0,0,0};
  int b24[4] = {0,0,0,0};
  int c24[4] = {0,0,0,1};
  led(a24, b24, c24);
  delay(200);

  int a25[4] = {0,0,0,0};
  int b25[4] = {0,0,0,0};
  int c25[4] = {0,0,0,0};
  led(a25, b25, c25);
  delay(200);
}
Excluded Code which turns the LED's ON or OFF:
void led(int r1[], int r2[], int r3[]){
  if(r1[0]==1){
    digitalWrite(13, HIGH);
  }else{
    digitalWrite(13, LOW);
  }
  if(r1[1]==1){
    digitalWrite(12, HIGH);
  }else{
    digitalWrite(12, LOW);
  }
  if(r1[2]==1){
    digitalWrite(11, HIGH);
  }else{
    digitalWrite(11, LOW);
  }
  if(r1[3]==1){
    digitalWrite(10, HIGH);
  }else{
    digitalWrite(10, LOW);
  }

  //------------------------------ I just made this to see where one line ends / starts

  if(r2[0]==1){
    digitalWrite(9, HIGH);
  }else{
    digitalWrite(9, LOW);
  }
  if(r2[1]==1){
    digitalWrite(8, HIGH);
  }else{
    digitalWrite(8, LOW);
  }
  if(r2[2]==1){
    digitalWrite(7, HIGH);
  }else{
    digitalWrite(7, LOW);
  }
  if(r2[3]==1){
    digitalWrite(6, HIGH);
  }else{
    digitalWrite(6, LOW);
  }
//------------------------------
  if(r3[0]==1){
    digitalWrite(5, HIGH);
  }else{
    digitalWrite(5, LOW);
  }
  if(r3[1]==1){
    digitalWrite(4, HIGH);
  }else{
    digitalWrite(4, LOW);
  }
  if(r3[2]==1){
    digitalWrite(3, HIGH);
  }else{
    digitalWrite(3, LOW);
  }
  if(r3[3]==1){
    digitalWrite(2, HIGH);
  }else{
    digitalWrite(2, LOW);
  }
}
//----------by-lucanletter----------\\
You are free to use this code in any project.
I know this is a bit circuitous but this is just the first basic script out of my head to run the display and I also had no idea to make it a bit easier - perhaps I'll upload a better code later.
If you have any tips for me to make this code easier let me know :)
Step 6: Finished Project...

If you made this project or something similar to this please let me know and also if you have some questions left or some suggestions for me put them also down in the comments...


![Tim's Mechanical Spider Leg [LU9685-20CU]](https://content.instructables.com/FFB/5R4I/LVKZ6G6R/FFB5R4ILVKZ6G6R.png?auto=webp&crop=1.2%3A1&frame=1&width=306)


