

Introduction: Smartphone Conrolled Hovercraft Made Using Evive-Arduino Based Embedded Platform


We’ve made a Smartphone-controlled electric boat and we’ve made a chuck glider. In this project, we’re going to make something that can both float and fly!
You guessed it; we’re going to show you how to make your own DIY hovercraft at your home all by yourself. We’re to program it using PictoBlox, our graphical programming software with advanced capabilities so that we can control it using Dabble, our ingeniously developed project interaction and controller app. ;) Download PictoBlox from HERE and get Dabble on Google Play.
So, what are you waiting for? Let’s get started!
Step 1: List of Components Required

Hardware
- evive
- HC-05 Bluetooth Module
- A2212/13T 1000KV BLDC Motor
- Simonk 30A Electronic Speed Controller
- 177.8mm 3 Blade Propellers
- Metal Geared Servo Motor
- Lipo Battery 3S 2200mAh
- Jumper Wires
- M3 Nut and Bolts
- Polythene bag
- Cable Ties
- MDF Sheet cutouts
- 3D Printed parts
- Thin double sided tape
- Screwdriver
- Insulation tape
- 25mm Male to Female standoffs
Software
Step 2: Understanding the Design

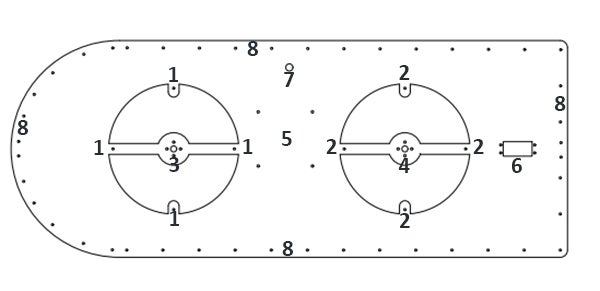
The structure of hovercraft is made up of some MDF parts and some 3D printed parts whose drawings and STL files can be found below.
A, B, C, D: Plates to hold the skirt
E: The Platform
We are going to assemble our entire hovercraft machinery on the platform, which makes the fact necessary that the platform should be strong enough to hold the weight. Also, we need to make the hovercraft float thus it also should be light. Let’s first understand the design of the platform.
1,2: For handling the lift engine
3,4: For fixing the BLDC motors
5: For fixing evive
6: For fixing the Steering
7: To pass the wires through it.
8: For holding the skirt


Step 3: What Is BLDC and ESC
Before we begin with the making of the Hovercraft, let’s first understand the two basic elements of the hovercraft, the BLDC motor, and the ESC.
BLDC
BLDC is the acronym for Brushless DC Motor. They do not have brushes as compared to the normal DC motors. Why BLDC? The advantages of a brushless motor are that they are high power to weight ratio, high speed, and electronic control. And for our hoverboard to lift up from the surface, we need high power motors that rotate with high speed.
ESC
ESC is the acronym of Electronic Speed Controller. As the name suggests it is the device that controls the speed of the motor by regulating the power of the motor.
Step 4: Assembling the Base


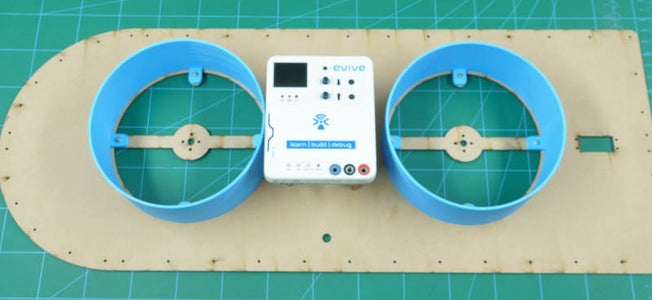
Take the platform and 3D printed lift engine cases and fix it at position 1 and 2 using M3 bolts of 12mm length and M3 nuts. We’ll assemble our entire lift engine into these cases and the cases will also make the air to force downwards and avoid to spread from the side of the propellers.
Now, it’s time to add our brain: evive. We will be attaching evive at the center of the platform and at a height little more than the height of the engine cases. Attaching evive at the center helps to distribute the balance equally.
Thus, attach 4 male-to-female standoffs of length 50(25+25)mm to the four corners on the base of evive.
Once done, take evive and fix the standoffs in 5 using M3 bolts.
Step 5: Making the Lift Engines


Now, let's add the lift engines. We are going to add two lifting machines to keep the hoverboard stable. Fix two BLDC motors at 3 & 4 using M3 bolts of 8mm length and M3 nuts.
Once done, we are going to add ESCs or the speed controllers. Connect two ESCs to the two BLDCs’ terminals. Once the ESCs are connected, fix them under the platform using cable ties as shown in the image above.
Step 6: Assembly of the Steering


We are going to add Steering so that the hovercraft can take the turn easily and that too whenever we want. We are going to use the metal servo for the same.
Note: Before we use the servo, lets first its angle. Connect the metal servo to any servo channel of evive. Now, switch ON the evive, select controls, select servos, finally select the servo channel on which you have attached the servo and set angle as 90 degrees using the potentiometer.
Once done, fix the servo into hole 6 using M3 bolts of 12mm length and M3 nuts.
This was the base of the steering, let’s add the steering. Attach 4-sided servo horn to the 3D printed steering using self-threading screws.
Step 7: Making the Thrust Engine


Let’s add the thrust engine. It is the one that will move our hoverboard in forwarding direction. We are going to need one more BLDC motor here. Take the BLDC motor and fix it into these holes on the 3D printed Steering using M3 bolts of 8mm length.
Step 8: Making the Connection


Time to make the connections. Extend all the wires and pass them through 7 and bring them on the platform to connect it to evive.
Once done, make the following connections:
- Connect +ve Terminal of the Lithium Polymer battery’s connector to the thick Red wire of each ESC.
- Connect -ve Terminal of the Lithium Polymer Battery’s connector to the thick Black wire of each ESC.
- Now take Lifting Motor 1 and Connect its 3 wires to 3 wires obtained from the output of ESC1.
- Similarly, connect Lifting Motor 2 and Thrust Motor with their respective ESC.
- Connect Steering Servo Motor to S1 port on evive.
- Now take ESC1 and connect its Signal pin to digital pin 2 of evive.
- Similarly, connect ESC 2 Signal pin to digital pin number 2 of evive.
- Now, take VCC and GND wires from any one of the ESC and connect it to VIN and GND of evive respectively.
- Connect ESC3 Signal pin to digital pin 3 of evive.
- Finally, connect HC-05 Bluetooth Module on its respective slot present on the evive.
Step 9: Completing the Assemblies of the Engines


All the three engines are yet to be completed, the missing part? The propellers. Take the propellers and fit each one of them to the BLDC motors.
Step 10: Adding the Skirt


The skirt is the most important and the only part of the hoverboard that touches the ground. The lift engines lift the hoverboard as the BLDC motors push air under the hoverboard which in turn is stored in the skirt.
We are going to use a big Plastic sheet to make a skirt.
Make sure that the size of the plastic should be a little more than the size of the platform.
Take the plastic and stick it to the edges of the platform using double-sided tape.
Now, we need our skirt to be fixed. Thus, we need to sandwich it between the top plate and the platforms. First, puncture holes of the platform into the plastic sheet and then attach the upper plate to it.
Attach M3 bolts to the platform such that they point upwards.
Next, take the upper plates and align them onto the platforms and fix them using M3 nuts.
Step 11: Powering the Hovercraft


The last step is to power up evive which in turn will power up our hovercraft. Also, we will be needed a lot of power to make the hovercraft hover. Thus, we are going to use the Lithium Polymer Battery. Connect the battery to evive as given in the connection section.
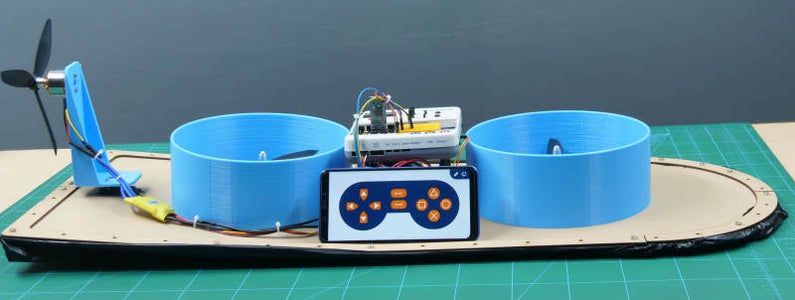
With this, our entire assembly of the hovercraft is complete.
Step 12: Debugging
The most important...most important part of the entire assembly is that the lift motors should compulsorily throw the air downwards and the thrust motor should throw the air backward. If any single one of the motor does not work as given, we need to reverse the connections, i.e. in all the three BLDC motors there are three wires, interchange any two wires and the motors will work perfectly fine.
Step 13: The Working of the Hovercraft
The basic mechanism of a hovercraft is very simple: our brain- evive powers up all the motors of the hovercraft using Lithium Polymer Battery.
The lift motors are used to lift the hovercraft above the ground as the propellers throw the air downwards into the skirt. The skirt then holds the air, lifting the entire hoverboard up. The thrust motors throw the air backward, making the hoverboard move forward. The steering servo is used to change the direction of the hoverboard.
As you already know, we are going to use our Smartphone to control the hovercraft, we are going to use Dabble for the same.
Steps for controlling the hovercraft wirelessly using a smartphone is given below:
- Open the Dabble app.
- Look for your particular Bluetooth module and connect it.
- Open the Gamepad module.
- Press the “START” button on the gamepad to start hovercraft lifting motors.
- Press the “UP” button to start steering fan.
- Press the “LEFT” button to take a left turn.
- Press the “RIGHT” button to take a Right turn.
- You need to press the “START” button again to stop the lifting motors.
Step 14: The Graphical Code
To code the hovercraft easily, we are going to code it in PictoBlox- graphical programming software.
The main block is used to connect the Smartphone via Dabble and call out the required blocks when the condition in the if arm is true.
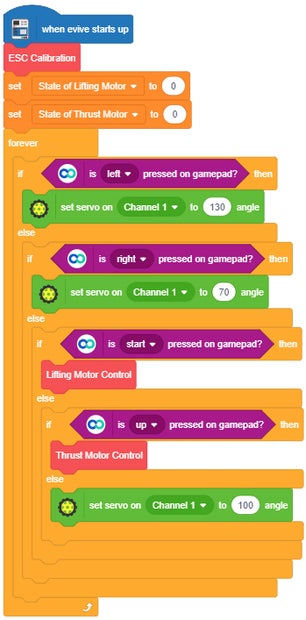
This block calibrates the ESCs.

This block will control the Lifting Motors(start or stop).

This block will control Thrust Motors(start or stop).

Attachments

Step 15: Arduino Code
You can even upload the following Arduino Code to evive.
Step 16: Conclusion
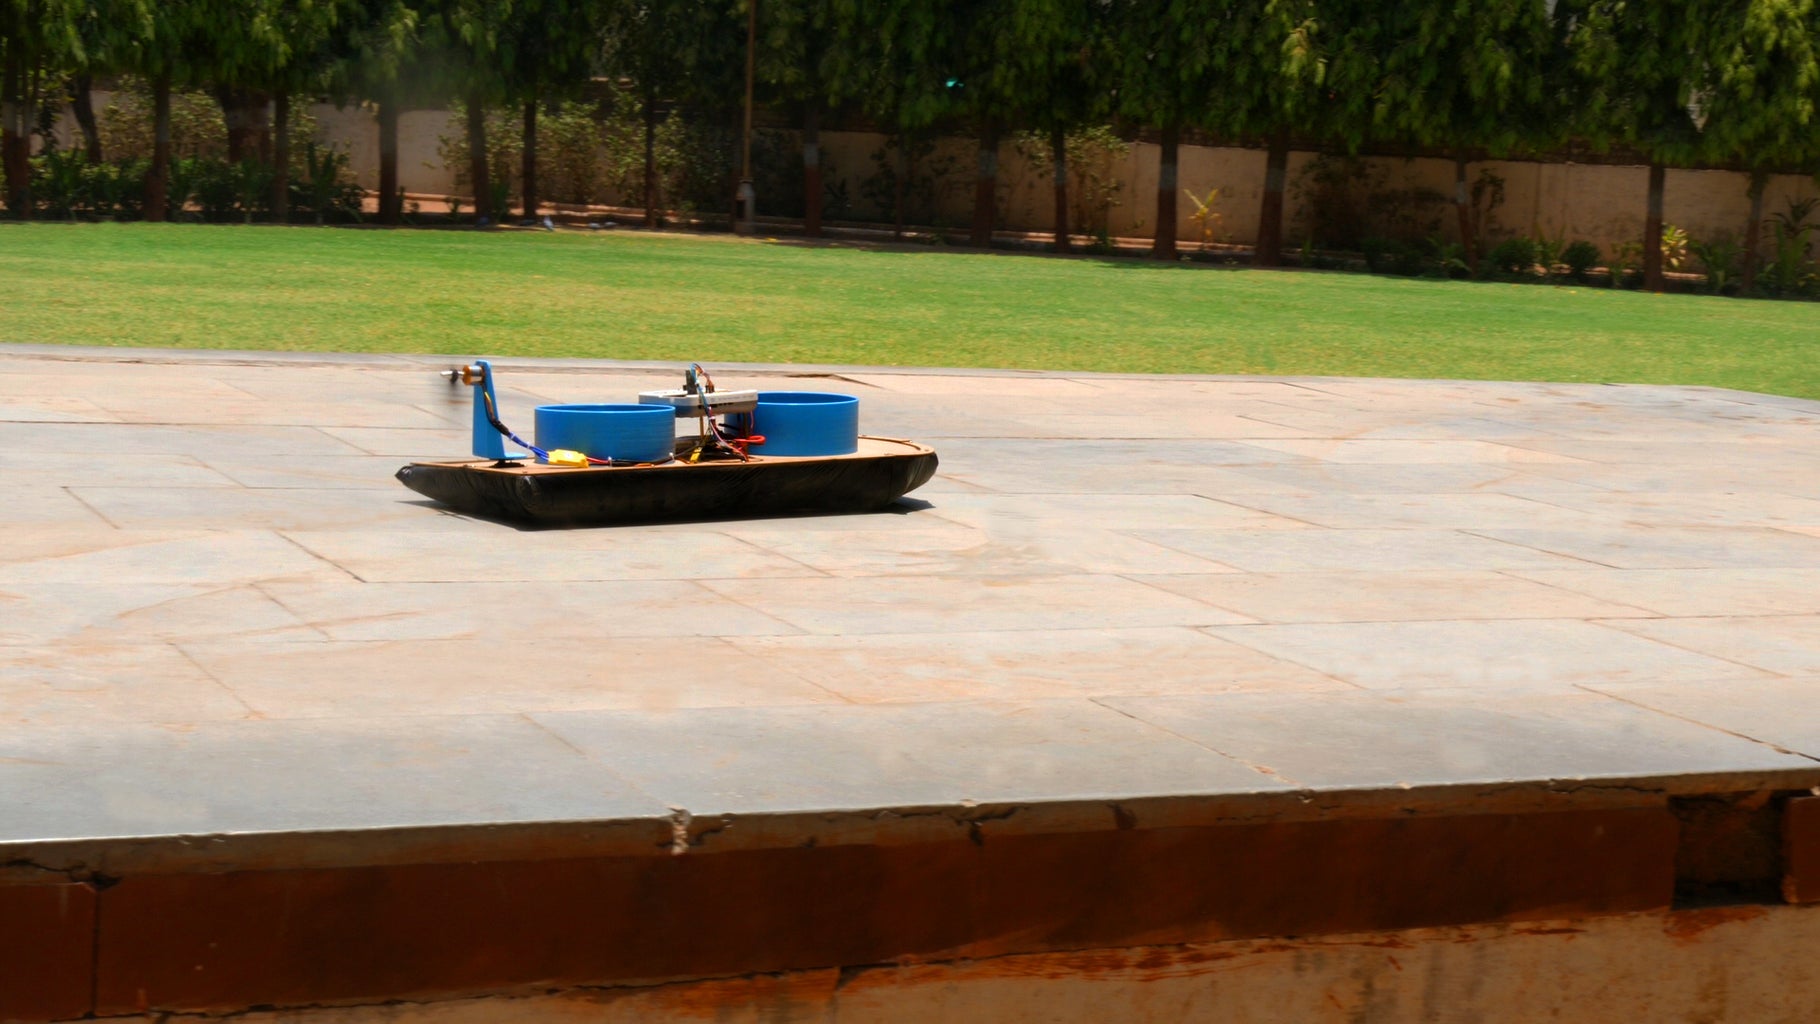
With this, your DIY Smartphone Controlled Hovercraft is all set for gliding around! All it needs is a command from Dabble! ;)

Participated in the
Backyard Contest


