

Introduction: Soda Can Hot Air Balloons


This instructable shows you how to up-cycle soda cans into hot air balloons for decorative purposes. Two methods are presented. The first one is an easy one where almost no tools are needed. The second method is about making a jig first. This allows you to produce a large number of soda can hot air balloons. Pipe insulation foam is used as a trick. Hopefully you are curious now to see the entire project/video.
Supplies


The following items are needed to complete this project:
- Half liter soda cans (the ink of the soda cans is not removed)
- Scissors
- Utility Knife
- Ruler
- Marker pen
- Contact Adhesive
- Embossing tools
- Flatten Soda Cans Sheets (Link to instructables)
- Paper clips
- Transparent string
- Thumbtack
- Pliers
- Hot glue gun
for the second method some more parts are needed:
- Pipe insulation foam
- Scrap wood
Step 1: Cutting the Can (Method 1)


We start with the first method to produce a hot air balloon from soda cans. Basically you only need a ruler, marker and scissors. Use a marker to draw marks at one centimetre intervals around the can at the bottom and at the top. Then draw a line between the marks with a ruler. Remove the bottom from the soda can (see video). We remove the bottom because the tab on the top is ideal for attaching some string to it later to hang the balloon from the ceiling. Scissors are used to make cuts along the drawn lines. To finish your first hot air balloon from soda cans you can continue now with step 5. In case you are interested to make a lot of these balloons please follow step 2-4 to see how to make the jig.
Step 2: Preparing a Jig (Method 2)


With some scrap wood and a hot glue gun we build ourselves a jig. The jig consists of a semicircular containment that can hold exactly one can (see picture). When you put the can in, the other half peeks out. A table-shaped base allows you to score the can on the long side with a sharp knife. Use a marker to draw marks on the can at one centimetre intervals. Then run the knife along the table-shaped base and score the soda can starting at each mark and moving to the other end of the can. This is very quick and also makes much nicer cuts than using scissors.
Step 3: Reinforcement of Soda Can for Cutting (Method 2)


When we run the sharp knife along the can to score it, the can is often dented. To prevent this, I use the following trick:
Pipe insulation foam from a hardware store can be easily inserted into a can and give the necessary counter pressure when cutting so that the can is not dented. If the pipe insulation is too big, I cut away foam until the roll fits into the can. This foam roll can be used over and over again.
Step 4: Cutting Using the Jig (method 2)


Now reinforce the inside of the can with the pipe insulation foam and place it in the jig. Run the knife along the table-shaped base to score the can. It is not necessary to cut the can - scoring it is enough. Roll the can between your hands to break the scored lines. Then take each cut strip and bend it to create a sun-like structure.
Step 5: Combine the Strips With Contact Adhesive


The next step is describing how to connect the strips with contact adhesive. The surface of the strips must be dry, clean and free of dust and grease - so better clean the cans before starting.
My recommendation here is not to use any kind of superglue as it is far to complicated - use a contact adhesive. This adhesive has to be applied to both surfaces of the strips. Then you have to pre-dry the adhesive before glueing the strips together. The period to wait depends on the quantity of adhesive added. Firm adhesion is obtained between 15 and 20 minutes after application. The correct moment for joining has been reached when the adhesive, gently touched with the fingertips, has become touch-dry.
When the adhesive is touch-dry, join the strips together as shown in the video. Watch the video carefully before connecting the strips. There will not be a second chance to place the strips, because they will not come off.
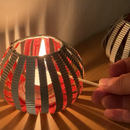
Step 6: Form Hot Air Balloon


Take the resulting ball in your hand and press with the other hand the strips at the bottom into shape. Slowly form it into a balloon shape.
Step 7: Hot Air Balloon Basket


Use a flattened soda can sheet (Link to instructables) to build the basket (or cabin). With scissors cut a square and then form the basket with pliers. In addition use a paper clip as a connector between the basket and the balloon. The basket is filled with hot glue an the paper clip is dipped into it.
Step 8: Combine Basket and Balloon


Connect the basket with hot glue to the balloon. One side of a transparent string is fixed to the soda can tab and the other side is fixed to a thumbtack. Arrange the hot air balloons on different heights so it look stylish.

Participated in the
Reclaimed Materials Contest


