

Introduction: Steampunk Explorer Toy Set: Telescope and Steampunk Prints


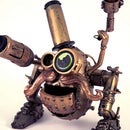

Make your own Steampunk Explorer Toy Set for your family and friends. It’s the holiday season and my family LOVES to make gifts for one another. It's easy on the budget, it's sentimental, and it's fun to make! I hope you enjoy this tutorial. This project was inspired by my cousin Alejo who is an adventurer in spirit and loves to play make believe.
I'm also selling some fun items on Society6:
Iphone Skin
Iphone Case
Art Prints
Enjoy!
Telescope was made with a Tiddle Winks game packaging. Essentially, you will need:
- 1 long cardboard tube (similar to a toilet paper or napkin holder tube) * size can vary
- 1 shorter cardboard tube smaller in size (size can vary)
- 1 Kates Paperie shopping bag or 1 sheet of card stock
- Measuring tape
- Ruler
- Glue gun
- 1 medium sized long screw
- 2 plastic caps that fit the end of the telescope (included in Tiddle Winks game)
- Black, Copper, Silver, and yellow acrylic paints
- Exacto knife
- Cutting mat
- Paint brushes
Steampunk prints:
- Laser printer
- Blank white paper 8.5" x14" or 8.5" x 11"
- Baking sheet
- 2-3 breakfast tea bags
- Small bowl
- *Sketches or images that you want to stain (photos, maps, structural plans, letters, etc.)
*I have provided some illustrations to play with in this tutorial.
p.s. My lovely model is my good friend and co-worker, Ayaka Ito.
Step 1: Telescope: Find Your Materials


Begin by looking for materials that resemble the shape of a telescope. I found a $12 Tiddly Winks game at Kate's Paperie. The long slender shape of the tube seemed perfect for the job. It also came with three smaller tubes and a variety of chips in a small bag. I did not use the chips, but I'm sure I'll find another use for them. The smaller tubes, however, turned out to be perfect for assembling the telescope's extension piece. The game also included caps for each tube. I kept these plastic inserts to create an eyepiece on one end of the telescope and a lens cap for the other. See photographs for reference.
Step 2: Telescope: Preping the Tubes


Preparing Large Tube:
1. Take the large tube and remove the black plastic caps from both sides.
2. Take one black plastic cap and cut a large hole in the center with an Exacto knife.
3. Insert the black plastic cap with circular cutout back into the tube.
Preparing Smaller Tube:
Glue two small tubes to create one longer tube. You will be gluing the two white caps together to connect the two tubes.
1. Remove the white caps.
2. Cut out the center of each white cap.
3. Replace both white caps.
4. Place Gorrilla Glue on the surface area of the white cap.
5. White cap to white cap, fasten both tubes together. Now, you have your 2nd tube.
Creating the eyepiece:
1. Take the second black plastic cap from the large tube and cut out a circle from the center. (Note: The diameter of the cutout should be smaller than the 1st black cap. This cap will serve as the telescope's eyepiece.
2. Place the this cap onto the smaller tube.
Cutting a slit into your large tube:
This slit will be used to connect your larger tube to your smaller tube.
1. Using your measuring tape, measure the length of the tube from the exposed edge to the edge of the black cap. Do not include the cap size in your measurement.
2. Now, put your small tube aside. Get your large tube and mark a slit a .5” away from the edge of tube. The slit should be on the opposite end of the plastic cap. The length of your slit should be .25” less than your measurement.
3. Once you have marked off your tube with a ruler, use your Exacto knife to make the cut.
Step 3: Telescope: Assembling Your Telescope


It’s time to assemble the telescope. We will add detail first, then piece both tubes together. I will be recycling the Kate’s Paperie shopping bag to add detail and create different textures.
Adding textures:
Time to create an industrial, steampunk look.
1. Cut off the excess parts of the Kate’s Paperie bag that you will not need. You want to have a flat blank sheet of paper without any creases. You will be using this sheet to create a variety of individual strips.
2. With your measuring tape, measure the circumference of the large tube. This measurement will be the length of your strip. This strip will be used for decorating the end of your telescope. (See 1st photo for reference).
3. Using your ruler, mark off the dimensions of your strip on to your paper. Use the measurement above for the length of your strip. And make your strip 1.5” wide.
4. Now, you are going to cover the smaller tube. With your measuring tape, measure the circumference of the small tube. This measurement will be the length of your strip.
5. Using your measuring tape again, measure the length of the tube from the exposed edge to the edge of the black cap. Do not include the cap size in your measurement. This measurement will be the width of your strip.
6. Using your ruler, mark off the length and width of your strip onto your card stock.
7. Cut out your strips.
8. Glue strips onto your tubes with a glue gun or another heavy duty glue.
9. Now, you will create a strip to hide the raw edges of your slit. Create a narrow strip that is .5” longer than the slit on your large tube.
10. Make another strip from card stock with the same dimensions for the opposite side of the telescope. Place this piece on the opposite side of the slit to make your design look symmetrical.
11. Glue these two strips to your telescope.
Adding rivets:
1. Heat up your glue gun.
2. Around the edges, add beads of glue. Space the beads of glue evenly to create the illusion of rivets. As you drop a bead of glue into place, keep still for a few seconds for the glue to dry. It's easy for the glue to drip or loose it's shape if you move too quickly. You want the drops to look circular.
Add as much detail and texture to your toy as you like. I encourage you to also look around your house for more discarded materials that you can recycle for this project. Create different textures by attaching gears from an old watches and wires from old cell phone chargers.
Piecing your telescope together:
1. Slide the smaller tube into the larger tube. Slide this tube in as far as it can go.
2. Once your telescope is in its collapsed state, positioned the way you want it.
3. Insert a screw between the slit and towards the far end of the telescope. Do not screw in all the way. Once screwed in, you should be able use the screw to expand and collapse your telescope.
Step 4: Telescope: Paint Your Toy


Painting your telescope is very simple and, personally, my favorite part. You will need paint brushes and acrylic paints, as well as a surface that you can paint on.
1. First, paint your telescope completely black. This will create an even coat for your telescope. Cover every nook and cranny!
2. While you wait for your paint to dry, begin mixing your copper, yellow, silver acrylics together to get the shade of metal you desire. For this tutorial, I used one part copper, one part silver, and a dab of yellow to create a bright, metallic color. I suggest mixing enough paint that will cover the entire telescope because it’s difficult to create the same hue twice.
3. Once the first coat of paint has dried, begin painting your second coat with your metallic mix. Using a dry brushing technique, brush paint lightly over your toy with even strokes. Keep your strokes moving in one continuous direction. To achieve a rusted look, do not fill in all of the spots that your brush will inevitably miss. Let the black coat of paint peek through the second metallic coat. Use less paint where there are crevices to create depth.
Step 5: Steampunk Prints: Download Illustrations, Print and Trim


Create your own steampunk influenced prints. In this tutorial, I have prepared a wanted poster, a blue print document, and stationary. Download these three illustrations and print them out at home. You can download them from my flickr, here:
For wanted poster: click here
For blue print: click here
For stationary: click here
1. Print out all three posters at home. These prints were made to fit on 8.5"x14” paper. If you do not have 8.5 x14” paper, use 8.5"x11” paper, select the option “fit to media” to print your posters a at reduced size. Also found in the print settings, select “crop marks” with a .5” border for easy trimming.
2. Trim down each poster print with a .5” border.
Step 6: Steampunk Prints: Stain Your Prints


Staining:
1. Fill a small bowl with water, heat up your water via. microwave for 1:30 min.
2. Place two breakfast tea bags into your bowl of water. Let the tea bags sit in the bath for a couple of minutes.
3. Once your water has changed colors, use a brush to stain your prints. Here, I used the tea bag as my brush. Your prints will become very fragile and easy to rip when wet, so brush over your prints gently. (Note: If your tea bag should bust, don’t worry. Once your papers have dried completely, the tea remnants will come right off.)
Adding texture:
1. Rough up the edges while your prints are still wet. Rub your finger along the edges of your prints to create a worn and textured look.
2. Add fold lines to the texture of your paper by gently folding your stained prints. Brush over the fold with your tea bag to accent the crease. Then, open up your paper to it’s original state.
8. Repeat steps 5-7 for each print.
Step 7: Steampunk Prints: Let Your Prints Dry


Done! Let your prints dry overnight.
Step 8: Steampunk Toy Set Complete! Now, Create Your Own Adventure.


Once dry, add your own personal touch. Use the stationary to write a letter, create a story about the steampunk robot, or make a treasure map of where to find him.
Thank you for reading my tutorial! I had so much fun making this for you. If you have an imagination and are interested in repurposing materials to make new and interesting things, I would love to hear from you. For more steampunk fun, please see my Steampunk Mr. Potato Head tutorial on instructable.com.
I'm also selling some fun items on Society6:
Iphone Skin
Iphone Case
Art Prints
Enjoy!
If you would like to see more photos of my work, please visit:
http://www.flickr.com/photos/saritamarianyc/collections/72157624354891437/
http://www.flickr.com/photos/saritamarianyc/sets/72157624366542441/
and my site, here:http://www.amongmadpeople.com
Thank again! Happy Crafting and have a Happy New Year!
Participated in the
Holiday Gifts Contest
Participated in the
Epilog Challenge


